background image

-9-

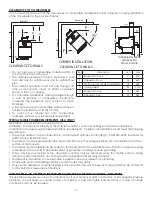
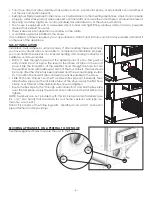
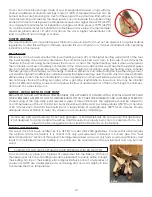
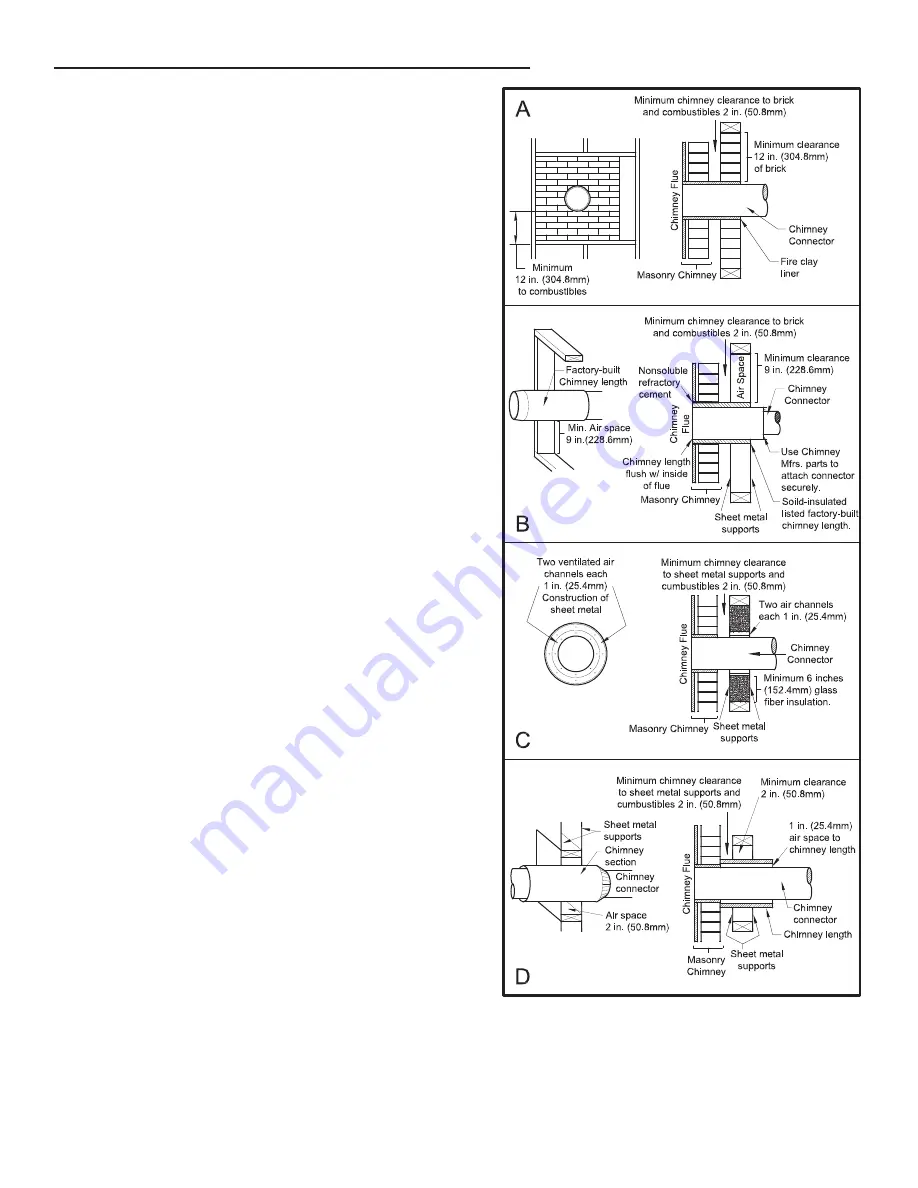
METHOD A -

 12” (304.8 mm) Clearance to Combustible Wall 

Member: Using a minimum thickness 3.5” (89 mm) brick 

and  a  5/8”  (15.9  mm)  minimum  wall  thickness  clay  liner, 

construct a wall pass-through. The clay liner must conform 

to ASTM C315 (Standard Specification for Clay Fire Linings) 

or its equivalent. Keep a minimum of 12” (304.8 mm) of brick 

masonry between the clay liner and wall combustibles. The 

clay liner shall run from the brick masonry outer surface to 

the inner surface of the chimney flue liner but not past the 

inner surface. Firmly grout or cement the clay liner in place 

to the chimney flue liner.

METHOD B - 

9” (228.6 mm) Clearance to Combustible Wall 

Member:  Using  a  6”  (152.4  mm)  inside  diameter,  listed, 

factory-built Solid-Pak chimney section with insulation 

of  1”  (25.4  mm)  or  more,  build  a  wall  pass-through  with  a 

minimum 9” (228.6 mm) air space between the outer wall of 

the chimney length and wall combustibles. Use sheet metal 

supports  fastened  securely  to  wall  surfaces  on  all  sides, 

to maintain the 9” (228.6 mm) air space. When fastening 

supports to chimney length, do not penetrate the chimney 

liner (the inside wall of the Solid-Pak chimney). The inner end 

of the Solid-Pak chimney section shall be flush with the inside 

of the masonry chimney flue, and sealed with a non-water 

soluble refractory cement. Use this cement to also seal to 

the brick masonry penetration.

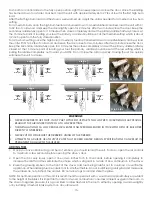
METHOD C - 

6” (152.4 mm) Clearance to Combustible Wall 

Member: Starting with a minimum 24 gage (.024” [.61 mm]) 

6” (152.4 mm) metal chimney connector, and a minimum 

24 gage ventilated wall thimble which has two air channels 

of  1”  (25.4  mm)  each,  construct  a  wall  pass-through. 

There  shall  be  a  minimum  6”  (152.4  mm)  separation  area 

containing fiberglass insulation, from the outer surface of the 

wall thimble to wall combustibles. Support the wall thimble, 

and cover its opening with a 24-gage minimum sheet metal 

support.  Maintain  the  6”  (152.4  mm)  space.  There  should 

also be a support sized to fit and hold the metal chimney 

connector. See that the supports are fastened securely to 

wall surfaces on all sides. Make sure fasteners used to secure 

the metal chimney connector do not penetrate chimney 

flue liner.

METHOD D - 

2” (50.8 mm) Clearance to Combustible Wall 

Member: Start with a solid-pak listed factory built chimney 

section at least 12” (304 mm) long, with insulation of 1” (25.4 

mm) or more, and an inside diameter of 8” (2 inches [51 mm] 

larger than the 6” [152.4 mm] chimney connector). Use this 

as a pass-through for a minimum 24-gauge single wall steel 

chimney connector. Keep solid-pak section concentric with 

and  spaced  1”  (25.4  mm)  off  the  chimney  connector  by 

way of sheet metal support plates at both ends of chimney 

section. Cover opening with and support chimney section 

on both sides with 24 gage minimum sheet metal supports. 

See that the supports are fastened securely to wall surfaces 

on all sides. Make sure fasteners used to secure chimney flue line do not penetrate the inner liner.

NOTES:

1. 

Connectors to a masonry chimney, excepting method B, shall extend in one continuous section through the 

wall pass-through system and the chimney wall, to but not past the inner flue liner face.

2. 

A chimney connector shall not pass through an attic or roof space, closet or similar concealed space, or a 

floor, or ceiling.

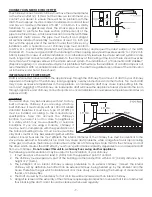
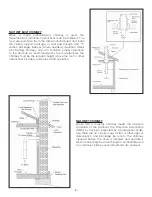
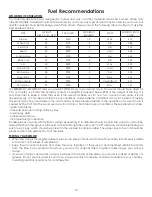
COMBUSTIBLE WALL CHIMNEY CONNECTOR PASS-THROUGHS

Содержание VOGELZANG VG3200

Страница 1: ...one lesquels sont reconnus dans l État de la Californie comme causant le cancer et des malformations congénitales ou autres dommages au fœtus Pour obtenir plus de renseignements veuillez consulter le site www P65warnings ca gov This manual is subject to change without notice ALL PICTURES SHOWN ARE FOR ILLUSTRATIVE PURPOSES ONLY ACTUAL PRODUCT MAY VARY DUE TO PRODUCT ENHANCEMENT CAUTION Please read...

Страница 2: ... with your records for any claims Combustible Wood Colors Metallic Black Flue Pipe Diameter 6 153 mm Flue Pipe Type Standard Single Wall or Double Wall Black or Blued Steel 2100 F 650 C Minimum Chimney Height 12 3 7 m Maximum Log Length 18 458 mm Electrical 120VAC 0 55A 60Hz Dimensions DEPTH WIDTH HEIGHT Overall Depth x Width x Height 39 995 mm 24 612 mm 32 1 2 826 mm Combustion Chamber Width x De...

Страница 3: ... Attach two corner pieces A to the center section B of skirting and secure with four 4 truss head screws 2 Attach the side skirting sections C D to the corner pieces and secure with four 4 truss head screws 3 Slide the U shaped skirting assembly around the pedestal base and secure with two 1 4 long pan head sheet metal screws at the rear corners Assembly UNPACK AND INSPECT Remove the packing from ...

Страница 4: ... IN THIS HEATER KEEP ALL SUCH LIQUIDS WELL AWAY FROM THE HEATER WHILE IT IS IN USE IN THE EVENT OF A CHIMNEY FIRE PUSH THE AIR CONTROL FULL CLOSED TO DEPRIVE THE FIRE OF OXYGEN CALL THE FIRE DEPARTMENT DO NOT CONNECT TO ANY AIR DISTRIBUTION DUCT OR SYSTEM A SOURCE OF FRESH AIR INTO THE ROOM OR SPACE HEATED SHALL BE PROVIDED WHEN REQUIRED POSITIONING THE STOVE It is very important to position the w...

Страница 5: ...ile home with 8 GA copper wire using a serrated or star washer to penetrate paint or protective coating to ensure grounding When moving your mobile home all exterior venting must be removed while the mobile home is being relocated After relocation all venting must be reinstalled and securely fastened Outside air is mandatory for mobile home installation See your dealer for purchasing Check with yo...

Страница 6: ... heating and cooling contractor or certified wood stove installer Drill a 5 hole through the wall at the desired point of entry The point of entry should be at or below the level of the intake air tube on the wood stove Slide the tail portion of the weather hood through the hole Secure the weather hood with fasteners at each of the four corners This task should be done after the stove has been ins...

Страница 7: ...to the room through appliance and chimney connector joints An uncontrollable burn or excessive temperature indicates an excessive draft CHIMNEY Your wood stove may be hooked up with a 6 factory built or masonry chimney If you are using a factory built chimney it must comply with UL 103 or CSA B365 standard therefore it must be a Type HT 2100 F It must be installed according to the manufacturer s s...

Страница 8: ... as recommended by the manufacturer The chimney must be the required height above the roof or other obstructions for safety and proper draft operation MASONRY CHIMNEY Ensure that a masonry chimney meets the minimum standards of the National Fire Protection Association NFPA by having it inspected by a professional Make sure there are no cracks loose mortar or other signs of deterioration and blocka...

Страница 9: ...ch has two air channels of 1 25 4 mm each construct a wall pass through There shall be a minimum 6 152 4 mm separation area containing fiberglass insulation from the outer surface of the wall thimble to wall combustibles Support the wall thimble and cover its opening with a 24 gage minimum sheet metal support Maintain the 6 152 4 mm space There should also be a support sized to fit and hold the me...

Страница 10: ...ons Under extreme conditions it may rot instead of drying This point cannot be over stressed the vast majority of the problems related to the operation of a wood stove is caused by the fact that the wood used was too damp or had dried in poor conditions These problems can be ignition problems creosote build up causing chimney fires low energy yield blackened windows incomplete log combustion Small...

Страница 11: ...s heater is designed to burn natural wood only Higher efficiencies and lower emissions generally result when burning air dried seasoned hardwoods as compared to softwoods or to green or freshly cut hardwoods Attempts to use wet or unseasoned wood will cause ignition problems rapid creosote build up resulting in chimney fire incomplete combustion low heat yield blackened glass DO NOT BURN 1 Garbage...

Страница 12: ...s the best heating burn rates after a good fire is established a lower burn rate may be a better option for efficient heating A lower burn rate slows the flow of usable heat out of the home through the chimney and it also consumes less wood NOTICE INITIAL BURNS TO CURE PAINT BECAUSE OF THE HIGH OPERATING TEMPERATURES THIS APPLIANCE IS COATED WITH A SPECIAL HIGH TEMP PAINT WHICH REQUIRES A SERIES O...

Страница 13: ...5 minute point of loading your fuel the primary air slide should be set at the medium setting which is about 1 2 inch open from the fully closed position For a low burn setting once the high burn or medium fuel load is burned down to an established coal bed load the unit with 31 to 32 lbs of cordwood and leave the door open for two minutes After two minutes close the door Keep the secondary airsli...

Страница 14: ...ved and air blown clean Make sure the blades do not have build up CAUTION Do not overfire appliance You are overfiring if any part of the appliance glows red Close the door and shut damper immediately to reduce the air supply and slow down the fire Chimney Maintenance CAUTION Slow burning fires for extended use or burning green wood may cause excessive creosote build up Ignition of creosote or ove...

Страница 15: ...ely Do not abuse the glass door by striking or slamming shut Do not use the stove if the glass is broken If the glass on your stove breaks replace only with the glass supplied from your heater dealer Never substitute other materials for the glass To replace the glass remove the screws retaining the glass moldings inside the door Remove the moldings and replace the damaged piece with a new one Perf...

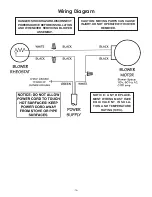
Страница 16: ...CE MENT WIRING MUST HAVE EQUIVALENT INSULA TION AND TEMPERATURE RATING 105 C CAUTION MOVING PARTS CAN CAUSE INJURY DO NOT OPERATEWITH COVER REMOVED DANGER SHOCKHAZARD DISCONNECT POWERSOURCEBEFOREINSTALLATION AND WHENEVER SERVICING BLOWER ASSEMBLY Wiring Diagram ...

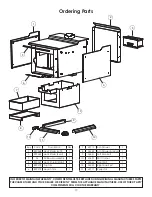
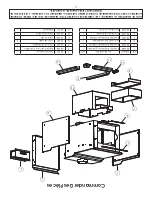
Страница 17: ...92279 Hearth Trim 1 7 69912 Ash Drawer 1 8 26548 Ash Drawer Support 1 9 26541 Left Side Skirt 1 10 40597 Skirt Corner 2 11 26546 Front Skirt 1 12 26553 Right Side Skirt 1 13 69911 Pedestal 1 IN ORDER TO MAINTAIN WARRANTY COMPONENTS MUST BE REPLACED USING ORIGINAL MANUFACTURERS PARTS PURCHASED THROUGH YOUR DEALER OR DIRECTLY FROM THE APPLIANCE MANUFACTURER USE OF THIRD PARTY COMPONENTS WILL VOID TH...

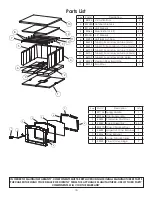
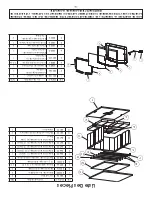
Страница 18: ...5 Firebrick 2 6 40595 Half Brick Ash Plug 1 7 86698 Tube 1 Secondary Air Tube 4mm 1 8 86699 Tube 2 3 Secondary Air Tube 3mm 2 9 86700 Tube 4 Secondary Air Tube 2 5mm 1 10 86701 Tube 5 Secondary Air Tube 2 0mm 1 11 86702 Tube 6 Secondary Air No Holes 1 12 88192 Ceramic Fiber Board Top 2 13 88193 Kao Wool 1 2 1 3 4 5 6 7 8 9 Key Part Description Qty 1 891135 Spring Handle 1 2 892266 Handle Assembly ...

Страница 19: ... 19 Notes ...
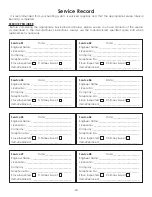
Страница 20: ...e 07 Date _____________________ Engineer Name ________________________________ License No ____________________________________ Company _____________________________________ Telephone No _________________________________ Stove Inspected Chimney Swept Items Replaced ________________________________ Service 02 Date _____________________ Engineer Name ________________________________ License No ______...

Страница 21: ...re Lorsque vous nous écrivez donnez toujours le numéro de modèle complet qui se trouve sur la plaque signalétique fixée sur l appareil de chauffage Lors de commandes de pièces détachées donnez toujours les informations suivantes telles qu illustrées dans cette liste 1 The Part Number Le Numéro De Pièce_________________________________________________ 2 The Part Description La Description De La Piè...

Страница 22: ..._____________________________ Service de 07 Date _____________________ Nom de l ingénieur ____________________________ N de licence _________________________________ Compagnie ___________________________________ N de téléphone _______________________________ Poêle Inspecté Cheminée balayée Articles Remplacé _____________________________ Service de 02 Date _____________________ Nom de l ingénieur _...

Страница 23: ...re 2 6 40595 Bouchon de cendre demi brique 1 7 86698 tube d air secondaire 1 4mm 1 8 86699 tube d air secondaire 2 3 3mm 2 9 86700 tube d air secondaire 4 2 5mm 1 10 86701 tube d air secondaire 5 2 0mm 1 11 86702 tube d air secondaire 6 sans trous 1 12 88192 Plateau en fibre de céramique 2 13 88193 Laine Kao 1 2 1 3 4 5 6 7 8 9 Clé Partie La Description Qté 1 891135 Poignée à ressort 1 2 892266 As...

Страница 24: ...érieure 1 6 892279 Garniture de foyer 1 7 69912 Tiroir à cendres 1 8 26548 Support de tiroir à cendres 1 9 26541 Jupe côté gauche 1 10 40597 Coin de jupe 2 11 26546 Jupe avant 1 12 26553 Jupe côté droit 1 13 69911 Piédestal 1 AFIN DE MAINTENIR LA GARANTIE LES COMPOSANTS DOIVENT ÊTRE REMPLACÉS PAR DES PIÈCES D ORIGINE ACHETÉES CHEZ VOTRE REVENDEUR OU DIRECTEMENT AUPRÈS DU FABRICANT DE L APPAREIL L ...

Страница 25: ...ctrique entrer en contact avec une surface chaude Garder le fil électrique à 12po 30cm au moins de la surface du poêle ou des conduits ATTENTION PIèces mobiles pouvant causer des blessures Ne pas faire fonctionner si le cou vercle est retiré AVIS tout câblage de remplace ment doit avoir une isolation et des caractéristiques thermiques similaires a l original 105 c ENTRETIEN DU VENTILATEUR REFOULAN...

Страница 26: ...er Utilisez un produit spécialisé disponible dans les magasins où les poêles à bois sont vendus Le verre ne doit être lavé qu à froid ATTENTION LES CENDRES POURRAIENT CONTENIR DES EMBRES CHAUDES MÊME APRÈS DEUX JOURS SANS FAIRE FONCTIONNER LE POÊLE LE CENDRIER PEUT DEVENIR TRÈS CHAUD PORTER DES GANTS POUR PRÉVENIR LES BLESSURES NE BRÛLEZ JAMAIS LE POÊLE AVEC LE PIÈGE À CENDRES OUVERT CELA POURRAIT...

Страница 27: ...n lente Par conséquent des résidus de créosote s accumulent sur le revêtement du conduit de fumée Lorsqu elle est allumée cette créosote fait un feu extrêmement élevé Le raccord de cheminée et la cheminée doivent être inspectés au moins une fois tous les deux mois pendant la saison de chauffage pour déterminer si une accumulation de créosote s est produite Si la créosote s est accumulée 3 mm ou pl...

Страница 28: ...un fonctionnement optimal de cet appareil il est recommandé de le faire fonctionner avec une charge de bois approximativement équivalente à la hauteur des briques réfractaires Il est important de noter que la combustion du bois consomme de l oxygène ambiant dans la pièce En cas de pression négative c est une bonne idée de laisser entrer de l air frais dans la pièce soit en ouvrant légèrement une f...

Страница 29: ...20 minutes Aérez de façon suffi sante pour éliminer la fumée ou les odeurs causées par ces feux ATTENTION ne laissez pas l appareil sans surveillance avec la porte ouverte Remarque utilisez uniquement du bois de chauffage solide Ne brûlez pas les ordures ou les liquides inflammables N utilisez pas de charbon Cet appareil n est pas conçu pour accueillir le débit d air tirage requis pour brûler corr...

Страница 30: ...s à partir de sciure imprégnée de cire ou de bûches avec des additifs chimiques Les bûches fabriquées à partir de sciure de bois compressée à 100 peuvent être brûlées mais faites attention à brûler trop de ces bûches en même temps Commencez avec une bûche fabriquée et voyez comment le poêle réagit Vous pouvez augmenter le nombre de bûches brûlées à la fois pour vous assurer que la température ne d...

Страница 31: ...t même pourrir au lieu de sécher On ne saurait trop souligné que la vaste majorité des problèmes liés au fonctionnement d un insert à bois est causée par le fait que le bois utilisé était trop humide ou avait séché dans de mauvaises conditions Ces problèmes peuvent être problèmes d allumage accumulation de créosote causant des incendies de cheminée rendement énergétique bas fenêtres noircies combu...

Страница 32: ...ustible Commencez avec une partie de cheminée Solid Pak fabriquée en usine agréée d au moins 12 po 304 mm de diamètre intérieur avec une isolation de 1 po 25 4 mm ou plus et un raccord de cheminée de 8 po de diamètre intérieur de 2 pouces 51 mm plus grand que celui de 6 po 152 4 mm Utilisez celle ci comme passage pour un raccord de cheminée métallique pour paroi unique de calibre 24 minimum Mainte...

Страница 33: ... dégagement de 2 po Chapeau homologué Mur combustible Consulter Dégagement des combustibles Protecteur de plancher Conduit de raccordement de cheminée Solive de toit combustible Cheminée homologué Mitre Solin CHEMINÉE EN MAÇONNERIE Assurez vous qu une cheminée en maçonnerie réponde aux standards minimum de l Association nationale de protection contre les incendies NFPA en la faisant inspecter par ...

Страница 34: ...température excessive indique un tirage excessif Pente de po par pied Partie mâle vers le bas 3 vis Vers l appareil Installer l extrémité sertie vers le poêle Direction de la circulation des gaz de conduits de fumée CHEMINÉE Tenez compte de l emplacement de la cheminée pour veiller à ce qu elle ne soit pas trop près des voisins ou dans une vallée pouvant causer des conditions malsaines ou nuisible...

Страница 35: ...é ou d un installateur de poêle à bois certifié Percez un trou de 5 pouces à travers le mur au point d entrée souhaité Le point d entrée doit être au niveau ou en dessous du niveau du tuyau d air d admission sur le poêle à bois Faites glisser la partie arrière du capot étanche à travers le trou Fixez la hotte avec des attaches à chacun des quatre coins Cette tâche doit être effectuée une fois le p...

Страница 36: ...s de maisons mobiles doivent répondre aux exigences suivantes Le chauffe eau doit être connecté à une cheminée préfabriquée conforme à la norme CAN ULC S629 norme pour les cheminées préfabriquées à 650 C Le radiateur doit être fixé en permanence au sol Il y a deux trous dans la base du piédestal utilisez des boulons de 3 8 po à travers le plancher Le radiateur doit être électriquement mis à la ter...

Страница 37: ...e doit par conséquent être installé dans la pièce où vous passez le plus de temps et dans la pièce la plus spacieuse possible Rappelez vous que les poêles à bois produisent une chaleur rayonnante la chaleur que nous sentons lorsque nous sommes à proximité d un poêle à bois Un poêle à bois fonctionne aussi par convection grâce au déplacement de l air chaud accéléré vers le haut et son remplacement ...

Страница 38: ...a base du socle Fixez deux pièces d angle A à la section centrale B de la plinthe et fixez les avec quatre 4 vis à tête bombée 2 Fixez les plinthes latérales C et D aux pièces d angle et fixez les avec quatre 4 vis à tête bombée 3 Glissez l ensemble de plinthe en U autour de la base du socle et fixez le avec deux vis à tôle à tête cylindrique large de 1 4 po aux coins arrière Assemblée DÉBALLER ET...

Страница 39: ...andard Acier noir ou bronzé 2100 F 650 C Hauteur minimale de la cheminée 12 pi 3 7 m Longueur maximale des bûches 18 po 458 mm Électrique 120VAC 0 55A 60Hz Dimensions Profondeur Largeur Hauteur Générales Profondeur x Largeur x Hauteur 39 po 995 mm 24 po 612 mm 32 1 2 po 826 mm Chambre de combustion Largeur x Profondeur 18 5 16 po X 22 1 4 po 466 mm X 565 mm Ouverture de la porte Largeur x Hauteur ...

Страница 40: ...IE Ce produit peut vous exposer à des agents chimiques y compris au monoxyde de carbone lesquels sont reconnus dans l État de la Californie comme causant le cancer et des malformations congénitales ou autres dommages au fœtus Pour obtenir plus de renseignements veuillez consulter le site www P65warnings ca gov R Numéro du rapport F20 586 Conservez ces instructions ce manuel vous aidera à obtenir u...

Отзывы: