


-22-
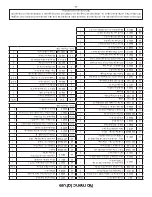
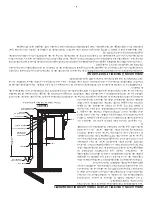
Nomenclature
Afin de maintenir la garantie, les composants doivent être remplacés par des pièces de fabricants d’origine
achetés chez votre revendeur ou directement auprès du fabricant de l’appareil. L’utilisation de composants
tiers annule la garantie.
Clé
Réf
La description
Qté.
1
25507
Nourrissez Door
1
2
25492
Poignée, Porte
1
3
83506
3/8 x 1 1/4 Rouleau Pin
1
4
891053
Porte en verre
1
5
88066
5/8 "Joint Rope
4.5 ft
6
88087
Verre Joint (1 x 1 3/16)
3.5 ft
7
25520
Retenue à fond de verre
1
8
25521
Top Glass Retenue
1
9
83278
Machine à laver
4
10
83202
Screw machine
4
11
891135
Poignée de printemps
1
12
25393
Retenue, Verre
1
N/S
25080MB
Verrou de porte
1
N/S - Pas montré
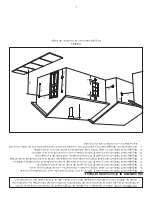
Clé
Réf
La description
Qté.
1
69524
Montage D'alimentation De Porte
1
2
891372
Charnière De Porte Pad
2
3
25080B
Nourrissez Loquet De Porte
1
4
69693
Logement Weldment Pot De
Combustion
1
5
86624
Assemblée Pot De Combustion
1
6
25513
Ash Cleanout
2
7
69713MB
Top / Couvercle Weldment
1
8
891148
Poignée En Plastique
1
9
69515MB
Cabinet Side - Gauche
1
10
80778
Assy, Carte De Circuit Imprimé (4
Chiffres) Ir Compatible
1
11
25488MB
Cabinet Side - Droit
1
12
69787
Assemblée Hopper
1
13
80491
Micro-Interrupteur
1
14
83541
# 4-40 Bolt
2
15
83542
# 4-40 Écrou
2
16
25480MB
Panneau D'accès
1
17
80461
Cordon D'alimentation
1
18
80462
Réceptacle, 3 Prong
1
19
891164
Auger Logement Weldment
1
20
891141
Vrille
1
21
891189
Top Bushing Plate
1
22
891132
Bague
1
23
83534
Retaining Ring
1
24
69719
Auger Cover
1
25
891161
Bottom Plate Retenue
1
26
25495
Moteur D'entraînement Bracket
1
27
891169
Tuyau De Chauffage
2
28
80488
Auger Motor
1
29
83529
Épingle À Cheveux
1
30
69763
Echappement Duct Weldment
1
31
88117
Conduit D'échappement Joint
1
32
80473
Échappement Blower
1
33
88100
Joint D'échappement Blower
1
34
80480
Thermistance
1
35
86633
Ignitor Tube Weldment
1
36
80619
Cartouche Ignitor
1
37
88118
Ignitor Bride Joint
1
38
80472
Souffleur De Distribution
1
39
88106
Répartition Du Ventilateur Joint
1
40
25774
Pressostat Support
1
41
80549
Commutateur De Pression
1
42
89586
Mamelon
1
43
891121
Tuyau De Silicone
3po
44
83537
Collier De Serrage (N ° 4)
1
45
88119
Couverture Isolante
1
46
88168
Logement Joint Pot De
Combustion
1
47
26096MB
Foyer
1
48
26097MB
Grill Mont - Gauche
1
49
26098MB
Grill Mont - Droit
1
50
69791MB
Louver / Assemblée Grill
1
N/S
80780
Télécommande IR
1
N/S
80779
Thermostat mural numérique
1
N/S
80798
Capteur IR, à bord
1
N/S
80548
Faisceau de câblage principal
1
N/S
80493
Câblage (Microswitch)
1
N/S
891673
Bague Rtnr. Pla Assy.
1
N/S
25863
Régulateur de carburant manuel
1
N/S
83249
Écrou papillon
1
N/S - Pas montré
-23-
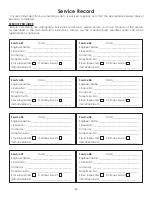
Il est recommandé
que votre
système de chauffage
est desservi régulièrement
et que
le Service Interval
enregistrement approprié est terminée.
FOURNISSEUR DE SERVICES
Avant de
terminer l’enregistrement
de service approprié
ci-dessous, s’il vous plaît vous assurer que
vous avez
effectué le service
tel que
décrit dans le les instruction
s du fabricant.
Toujours utiliser pièce de
rechange indiquée
par le fabricant lors de remplacement est nécessaire.
Enregistrement De Service
Service de 01
Date:
_____________________
Nom de l’ingénieur:
____________________________
N° de licence.:
_________________________________
Compagnie:
___________________________________
N° de téléphone:
_______________________________
Poêle Inspecté: Cheminée balayée:
Articles Remplacé:
_____________________________
Service de 03
Date:
_____________________
Nom de l’ingénieur:
____________________________
N° de licence.:
_________________________________
Compagnie:
___________________________________
N° de téléphone:
_______________________________
Poêle Inspecté: Cheminée balayée:
Articles Remplacé:
_____________________________
Service de 05
Date:
_____________________
Nom de l’ingénieur:
____________________________
N° de licence.:
_________________________________
Compagnie:
___________________________________
N° de téléphone:
_______________________________
Poêle Inspecté: Cheminée balayée:
Articles Remplacé:
_____________________________
Service de 07
Date:
_____________________
Nom de l’ingénieur:
____________________________
N° de licence.:
_________________________________
Compagnie:
___________________________________
N° de téléphone:
_______________________________
Poêle Inspecté: Cheminée balayée:
Articles Remplacé:
_____________________________
Service de 02
Date:
_____________________
Nom de l’ingénieur:
____________________________
N° de licence.:
_________________________________
Compagnie:
___________________________________
N° de téléphone:
_______________________________
Poêle Inspecté: Cheminée balayée:
Articles Remplacé:
_____________________________
Service de 04
Date:
_____________________
Nom de l’ingénieur:
____________________________
N° de licence.:
_________________________________
Compagnie:
___________________________________
N° de téléphone:
_______________________________
Poêle Inspecté: Cheminée balayée:
Articles Remplacé:
_____________________________
Service de 06
Date:
_____________________
Nom de l’ingénieur:
____________________________
N° de licence.:
_________________________________
Compagnie:
___________________________________
N° de téléphone:
_______________________________
Poêle Inspecté: Cheminée balayée:
Articles Remplacé:
_____________________________
Service de 08
Date:
_____________________
Nom de l’ingénieur:
____________________________
N° de licence.:
_________________________________
Compagnie:
___________________________________
N° de téléphone:
_______________________________
Poêle Inspecté: Cheminée balayée:
Articles Remplacé:
_____________________________


