IMTX200-02
www.ueonline.com
Part II - Adjustments
SPANNING THE MoDEL TX200™ TRANSMITTER uSING THE
SHuNT CAL FEATuRE
A feature of the field adjustable transmitter (TX200A) is its span ratio of 5:1. The
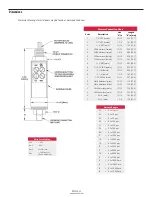
span can be field adjusted using the control buttons located on the transmit
-
ter (see diagram 2) and without removing it from service or the necessity of
a precise pressure source. using the following formula and procedure below,
the transmitter is easily recalibrated to the desired pressure range.
Formula: Ical = (Cal# x 16/Pcal) + 4
Formula Key:
Ical
is the output current that the user will set, with the
shunt cal on, in order to achieve the desired full scale
pressure (Pcal).
Cal#
is the amount of pressure simulated by turning
the shunt cal on. The value is engraved on the TX200
housing and written on the Certificate of Calibration.
Pcal
is the desired (user defined) full-scale pressure
recalibration point.
Procedure:
1) Determine transmitter pressure range for application and apply the above
formula to get
Ical
.
Example:
End-user has a uE transmitter P/n TX200A10s1(0 to 2500 psig /0
to 172,4 bar range). For a particular application, a 0-1500 psig (0 to 103,4
bar) range is desired using this transmitter - this is the
Pcal.
The
Cal#
engraved on the transmitter housing is 424 psi (29,2 bar). using the formula
above,
Ical
= (424 x 16/1500) +4, the
Ical
calculated is 8.52. When all
steps below are completed, the transmitter in this example would be spanned
so that the 4 mA output signal = 0 psig and the 20 mA output signal = 1500
psig (103,4 bar).
2) Connect the transmitter to a 24 volt-nominal voltage source through a 100
ohm load resistor (reference Diagram 1A). Connect a digital voltmeter across
the terminating resistor. The output across the resistor will be 100 mVolts/mA.
3) Zero the transmitter (if necessary).
4) Turn the Cal switch to the on position.
5) Adjust the span and Fine span control buttons until the
Ical
value appears
on the digital voltmeter.
6) Turn the Cal switch to the off position.
The transmitter should now be spanned to the desired pressure range. To
verify the new pressure range, check that the transmitter output is 4mA at
zero pressure. next, apply full-scale pressure to the transmitter and check
that the transmitter output is 20 mA at
Pcal
.
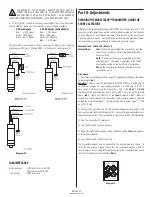
Diagram 1C
Diagram 2
THE WIRING TO THE PRESSuRE TRANSMITTER MuST ONLY bE
CONNECTED IN THE SAFE AREA OR bY AN APPROvED TERMINAL
BOX CErTIFIED TO En 60079-0 Or En 60079-1 FOr hAZArDOus
LOCATIOns/FLAMEPrOOF ATMOsPhErEs. (ATEX rEquIrEMEnTs OnLY)
A 1/2” nPT (male) conduit connection is provided on top of the transmitter
with 18 AWG, 72” leadwires. The leadwires are color coded as follows:
4-20 mA output
1-5 VDC output (option M204)
red:
+VDC signal
red: +VDC signal
Black: -VDC signal
Black: -VDC signal
Green: Earth Ground
Green: Earth Ground
Blue: 1-5 V Output
The transmitter may be wired in either a sourcing (see diagram 1A) or sinking
(see diagram 1B) circuit. (Option M204 1-5 Volt output, see diagram 1C.)
LoAD IMPEDANCE
4-20mA output
1300 ohms max. at 36 VDC
700 ohms max at 24 VDC
1-5 V output
2000 ohms min.


