background image


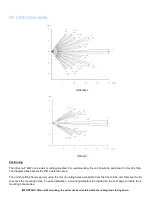
  PIR DETECTION AREA 


Horizontal 


Vertical 

  Positioning 

The Infresco-P 4kW can be wall or ceiling-mounted. For wall mounting, the unit should be positioned 1-3 metres high. 
The diagram above shows the PIR’s detection area.  

The unit should be fixed securely using the four mounting holes accessible from the front of the unit. Remove the lid 
to access the mounting holes. To ease installation, a mounting template is provided on the next page to locate the 4 
mounting hole centres. 

IMPORTANT! When wall mounting, the unit must be orientated with the cable glands facing down. 


Содержание INFRESCO P

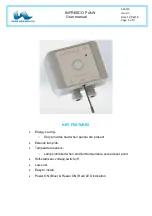
Страница 1: ...EY FEATURES Energy saving o Only provides heat when people are present Extends lamp life Temperature sensor o Lamps inhibited when ambient temperature exceeds set point Soft start zero voltage switch off Low cost Easy to install Power ON Blue Heater ON Red LED indication ...

Страница 2: ... high inrush current potentially increasing lamp life by as much as 30 The lamps are switched on for a fixed time period of 5 minutes This period is reset each time the PIR detects any further movement Installation of the unit is simple and once installed is relatively maintenance free Installation Important Read carefully the following information before installing the unit The passive infrared s...

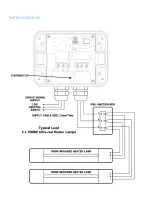
Страница 3: ...WIRING DIAGRAM ...

Страница 4: ...bove shows the PIR s detection area The unit should be fixed securely using the four mounting holes accessible from the front of the unit Remove the lid to access the mounting holes To ease installation a mounting template is provided on the next page to locate the 4 mounting hole centres IMPORTANT When wall mounting the unit must be orientated with the cable glands facing down ...

Страница 5: ...e dimensions to locate the 4 mounting hole centres prior to drilling IMPORTANT Drilling of any holes through the enclosure will immediately invalidate the warranty of the unit The unit MUST be orientated with the cable glands facing down ...

Страница 6: ...L to the N terminal and EARTH to the E terminal If two lamps are to be fitted they must be wired in parallel Warning Ensure all earth wires are connected to maintain earth continuity to the lamp fittings Check all wiring and make sure the cable glands are tightened Commissioning Turn the set point temperature preset VR1 fully clockwise to select walk test mode VR1 is located at the top of the prin...

Страница 7: ... point temperature VR1 Check the lamps Lamp fittings Contact your supplier Problem Lamps do not switch off Solution Ensure nobody enters the detection area for 5 minutes This will allow the 5 minute on time to expire The PIR might be continually being re triggered due to false activations Mask the PIR lens and wait 5 minutes If the lamps switch off after 5 minutes the PIR is receiving false activa...

Страница 8: ...tion of the I E E Wiring Regulations BS7671 The regulations contain important requirements regarding the safety of electrical equipment ELECTROSTATIC DISCHARGE ESD This product range has been identified has requiring protection from electrostatic discharge ESD They include integrated circuits IC s that may be damaged or degraded if mishandled They are much less vulnerable when built in circuit and...

Страница 9: ...4 H Q T e l 4 4 0 1 7 0 4 5 1 6 5 0 0 F a x 4 4 0 1 7 0 4 5 1 6 5 0 1 E m a i l s a l e s u n i t e d a u t o m a t i o n c o m W e b w w w u n i t e d a u t o m a t i o n c o m PRODUCT APPLICATIONS Patio areas Smoking shelters Restaurants Warehouses Workshops Garden lighting Livery stables ...

Отзывы: