background image


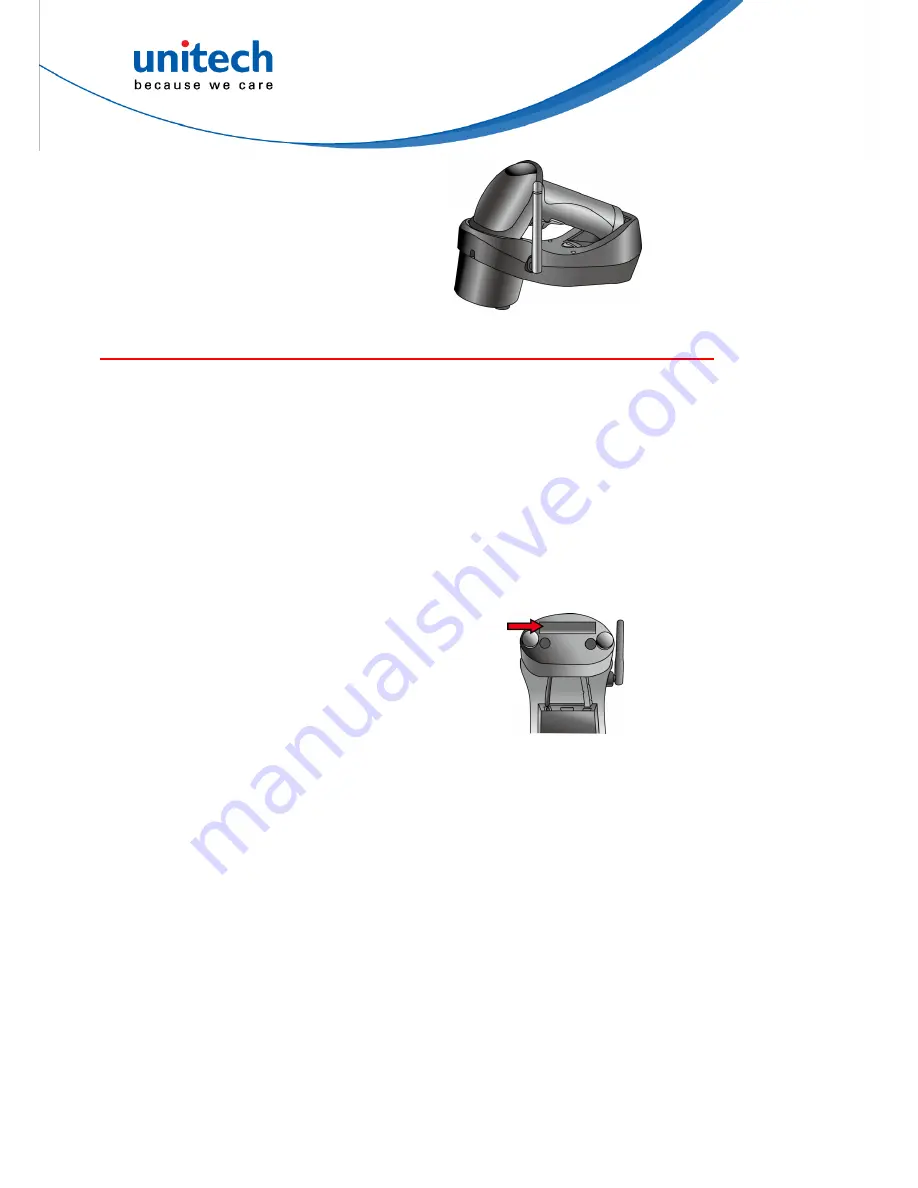
3.  Place the scanner in the cradle. The 

scanner LED will be red to indicate 
charging. When the scanner is charged, 
the LED will turn off. 


Cradle Mode, Connection (MS840B) 

Cradle Mode (with SCM support) 

In order to establish a proper connection between your computer and a scanner 
through a cradle, we suggest that you follow these step-by-step instructions: 
1.  Ensure the cradle powered, check the Power LED. 
2.  Turn on your computer. 
3.  Connect the cradle to the USB, RS232, or PS2 port of your computer 

respectively with a USB cable, RS232 cable, or PS2 cable. 
USB cable will operate as HID device (keyboard) 

4.  Determine that the power LED on the cradle is bright in solid green and the 

communication status LED on the cradle is bright in solid blue. 

5.  By default, the MS840 operates in cradle mode. Thus, by using at most 3 

scanners, scan the Cradle Address barcode on the bottom side of the cradle. 


The Cradle


Address barcode is on the bottom side of the cradle.


6.  The scanner LED should turn off and beep shortly one time with a high tone 

and the communication status LED on the cradle should flash in blue. 

7.  The Pager button can be used to verify correct connection of scanner and 

cradle. 

8


Содержание MS840

Страница 1: ...Wireless Scanner MS840B MS840P MS840 User s Manual Version 1 6 ...

Страница 2: ......

Страница 3: ...any electrical or mechanical means such as photocopying recording or information storage and retrieval systems without permission in writing from the manufacturer The material in this manual is subject to change without notice Copyright 2012 Unitech Electronics Co Ltd All rights reserved Unitech global website address http www ute com Bluetooth is a registered trademark of Bluetooth SIG i ...

Страница 4: ...ed or operating in conjunction with any other antenna or transmitter 2 This equipment complies with FCC RF radiation exposure limits set forth for an uncontrolled environment To maintain compliance with FCC RF exposure requirements avoid direct contact to the transmitting antenna during transmitting 3 Any changes or modifications including the antennas made to this device that are not expressly ap...

Страница 5: ...R Subchapter J and to the requirements of IEC 825 1 Class II and Class 2 products are not considered to be hazardous The MS840 MS840 series contains internally a Visible Laser Diode VLD whose emissions do not exceed the maximum limits as set forth in the above regulations The scanner is designed so that there is no human access to harmful laser light during normal operation user maintenance or pre...

Страница 6: ...ffect Keep the lithium Ion battery cool Avoid a hot car For prolonged storage keep the battery at a 40 charge level Do not leave the lithium Ion battery discharged and unused for an extended period because the battery will wear out and the longevity of the battery will be at least half of the one with frequent recharges Battery charge notice It is important to consider the environment temperature ...

Страница 7: ...ear limited warranty Lithium Ion battery 6 month limited warranty Warranty becomes void if equipment is modified improperly installed or used damaged by accident or neglect or if any parts are improperly installed or replaced by the user Use only the adapter supplied Using the wrong adapter may damage the unit and will void the warranty ...

Страница 8: ...vi ...

Страница 9: ...ttery Notices iv Battery charge notice iv Storage and safety notice iv Warranty v CHAPTER 1 OVERVIEW 1 Introducing the MS840B MS840P MS840 1 Package Contents 2 CHAPTER 2 BATTERY CHARGING AND CONNECTION 7 Cradle Mode Battery Charging MS840B 7 Cradle Mode Connection MS840B 8 Cradle Mode with SCM support 8 Wall Mount Installation of a Cradle 9 Cradle less Battery Charging MS840B 11 Cradle less Connec...

Страница 10: ...ndication for Scanner 19 Beeper Indication for Scanner 20 LED Indication for Cradle 20 CHAPTER 3 BARCODE SETTING 21 Barcode Menu Setting 21 Barcode Length Setting 22 Code ID Setting 22 Preamble Prefix and Postamble Suffix 23 Predefined Labels 23 Quick Setup 24 Batch Setup 24 Scanner Configuration Manager Software 26 CHAPTER 4 OUTPUT DATA EDITING 27 Programming 28 Programming Sequence 28 Preparatio...

Страница 11: ...le 2 32 Advanced Features 32 APPENDIX A QUICK SETUP SHEET 35 APPENDIX B FUNCTION CODES 36 Function Codes for PC 36 Function Codes for IBM Terminals 38 APPENDIX C SETUP MENU 39 APPENDIX D FULL ASCII CHART 48 APPENDIX E BARCODE TEST CHART 52 APPENDIX F WORLDWIDE SUPPORT 53 ...

Страница 12: ...x ...

Страница 13: ...freedom The device is the best scanning partner you can trust Thank you for choosing Unitech product Features Extremely low power consumption Firmware upgradeable Supports most popular barcode symbologies including GS1 128 EAN 128 GS1 DataBar RSS etc Supports 2 scan profiles Cradle Mode and Cradle less mode User feedback via LED indicator and beeper Beeping tone and duration programmable for Good ...

Страница 14: ...r Unitech representative Scanner only package MS840B Wireless laser scanner Power adapter 1010 601959G User s manual CD Scanner and cradle package MS840B Wireless laser scanner Power adapter 1010 900008G User s manual CD Cradle 5000 900007G USB Cable 1550 900040G Optional PS2 Cable 1550 900041G Optional RS232 Cable 1550 900042G Optional 2 ...

Страница 15: ...epending on your order Save the box and packaging material for future use in case you need to store or ship the scanner 2 When you receive and unpack the package at first time if any item above is lost please contact the dealer you bought from immediately 3 Environment temperature for charging should be between 0 C 40 C 4 Up to 3 scanner devices work with only 1 host PC through 1 cradle or wireles...

Страница 16: ...6 Reset Pinhole Cradle Aspect 10 8 12 11 13 9 7 4 1 3 2 5 6 1 Antenna 2 Communication Status LED 3 Page Button 4 Wedge Note 1 5 Power LED 6 Cradle Contact Points for Charge 7 Cradle Foot Note 2 8 Cradle address barcode 9 Interface Switch Note 3 10 USB RS232 PS2 Socket 11 Reset Pinhole 12 DC Power Socket 5V 13 Guidance Groove Note 4 ...

Страница 17: ...pport HID default or COM port when switch is set to right Before changing the switch Disconnect power from cradle Disconnect USB cable from cradle Set the interface switch Connect USB Cable to cradle Connect power to cradle 5 Interface switch left USB Interface switch right COM PS2 RS232 Operation in USB COM requires additional driver which is available at http www ute com In case the USB cable is...

Страница 18: ...6 ...

Страница 19: ...rst time you will need to fully charge the battery Note It takes approximately 4 5 hours to fully charge the battery To charge the scanner with a cradle follow the instructions below 1 Plug the adapter cable into the power socket on the bottom of cradle 2 Plug the AC adapter cord into an electrical outlet Now check whether the power LED on the cradle is bright in solid green and the communication ...

Страница 20: ...ter respectively with a USB cable RS232 cable or PS2 cable USB cable will operate as HID device keyboard 4 Determine that the power LED on the cradle is bright in solid green and the communication status LED on the cradle is bright in solid blue 5 By default the MS840 operates in cradle mode Thus by using at most 3 scanners scan the Cradle Address barcode on the bottom side of the cradle The Cradl...

Страница 21: ...stic Conical Anchors Before mounting the cradle onto the wall prepare a screwdriver and read the step by step instructions made below Follow the steps below to mount the cradle onto the wall Step 1 Loose and remove 2 screws from the stand of cradle by using a screwdriver Then remove the stand from the cradle Step 2 Move the stand of cradle to the lower portion of the cradle from the upper portion ...

Страница 22: ...en or pencil Drill the screw locations somewhat deep Insert 2 plastic conical anchors into the screw holes Attach and secure the plate to the wall with the 2 screws Step 5 Align the two holes on the bottom surface of the cradle respectively with the two short pillars of the iron plate for insertion of the pillars into the holes Then push the cradle downwards to wedge the pillars into the guidance ...

Страница 23: ...charge the scanner without a cradle follow the instructions below 1 Plug the adapter cable into the power socket of the foot of scanner 2 Plug the AC adapter cord into an electrical outlet Now check whether the scanner LED will be bright in solid red during charging When the charging is done the scanner LED will turn off 11 ...

Страница 24: ... the change is successful the LED indicator of scanner flashes in blue Cradle less Mode 4 Make your Host with wireless technology search for the MS840 scanner When your Host locates a HID SCANNER select it 5 The Host should now present a pairing pin and you will be requested to input the pin code at the Scanner For inputting the pin code scan the Link Keys barcode below Link Keys 6 At this step re...

Страница 25: ...e Mode To determine whether your scanner mode is successfully changed press the Page button on the cradle your scanner will have 2 short beeps when you press the Page button For example if your scanner operates currently in cradle mode and you want to change the existing mode of the scanner to cradle less mode then scan the Cradle less Mode barcode as shown below Cradle less Mode Whenever the scan...

Страница 26: ...ctions 1 Turn on your computer or laptop PC 2 Insert a dongle into a USB port of the computer or laptop PC 3 Scan the MAC address of the dongle by using the MS840B scanner 4 When being successfully connected to the dongle the scanner will beep shortly one time with a high tone You can also connect the MS840B scanner optionally to another dongle by following the steps made below 1 Scan the Disconne...

Страница 27: ...ll beep shortly one time with a high tone Cradle Mode Connection for MS840P ONLY Cradle Mode without SCM support In order to establish a proper connection between your computer and a scanner through a cradle into which a dongle is inserted we suggest that you follow these step by step instructions 1 Turn on your computer or laptop PC 2 Plug the adapter cable into the power socket on the cradle 15 ...

Страница 28: ...ith a USB cable for transferring data to your computer by using the MS840B scanner 5 Insert a USB dongle into the USB port of the cradle 6 Scan the MAC address of the dongle by using the MS840B scanner 7 When being successfully connected to the dongle the scanner will beep shortly one time with a high tone 16 ...

Страница 29: ...With the 4 KB transmit buffer the scanner can ignore the transmission status and keep on reading barcodes until the buffer is full When the Batch Mode is enabled and the scanner is out of range the scanner will respond with two short beeps high low tone upon reading a barcode successfully When the memory buffer is full the scanner will respond with one long beep low tone and its LED indicator will...

Страница 30: ...de scan the following barcodes in the order 18 E1 Bear in mind the fact that the scanner operating in the inventory mode does not send out the scanned data automatically but keeps the data in its memory buffer If you want to make the scanner output the data it scanned before please scan the Read Buffer barcode as shown below Exit 1 Enter Group 6 Read Buffer Note After scanning the Read Buffer barc...

Страница 31: ...or red to indicate the status of the battery and scanning LED Light State What it means Blue LED blinks per 3 seconds Trigger is pressed to power on the scanner Red LED flashes per 5 seconds Low battery power Red LED on 1 Barcode reading when the trigger is pressed 2 Battery charging when the scanner is set on the cradle Green LED flashes Successful barcode reading Blue LED fast blinks and then tu...

Страница 32: ...er is full Definition of batch mode In range Scanner will transmit each scanned data right after scanning the barcode Out range Scanner is able to continue scanning and all scanned data are stored into the memory buffer Out range in range Stored scanned data will be transmitted automatically right after the radio link is resumed You will hear 3 hi low long beeps indicating the radio connection los...

Страница 33: ...d MSI Group 9 UPC EAN and Delta Distance Code Group 10 Data Editing Group 11 Dump setup Setup Procedures For most parameters proceed the following steps for the setting 1 Locate a group that contains the parameter to be changed 2 Scan the Enter Group label to enter setup mode The green LED on the scanner will flash to indicate that setup is in progress 3 Scan the label on right hand side represent...

Страница 34: ...orted by the scanner has a default ID character defined below If you don t know what the label that you re scanning is you may use this feature to identify Symbology Pre Defined UPC A A UPC E E EAN 13 F EAN 8 FF I 2 of 5 I S 2 of 5 H Code 39 M Codabar N Code 93 L Code 128 K UCC EAN128 C1 MSI O Code 32 T Delta Code D Plessey Code P Label Code IV V B China Postal Code C Those ID characters can be re...

Страница 35: ...ed through the setup menu The definition of the labels share the same space with Edit Formula definition See Output Data Editing so you can only use one of the functions Label 0 Label 1 Label 2 F Y FZ F Here is an example indicating how to define the output of Label 0 as START Label 1 as ACCEPT and Label 2 as END Scan Enter Group 3 Scan B7 Scan 0 to define Label 0 Scan S T A R and T from Full ASCI...

Страница 36: ...nning these labels configuring the other scanners The following label is called Dump Settings label Before you scan the label please open a text editor application such as Notepad Word etc Scan the following label and the settings of the scanner will dump to the screen as one or several ASCII string s Use a barcode printing software select Code 39 symbology and use the string s to generate barcode...

Страница 37: ... or terminal only if that PC or terminal matches the type defined by Device Type of the scanner The previous example of Keyboardless Wedge as Device Type is equivalent to a PC AT interface so you cannot dump that settings to a system which dose not support a PC AT keyboard interface The following label let you dump the settings to a PC AT regardless what kind of device has been chosen on the scann...

Страница 38: ... configure scanner settings on a computer by using the Microsoft Windows based operating system Use this program to define the settings and then download the parameters to the scanner Download the program from our web site http www ute com The SCM is for Cradle Mode only SCM will be future support for MS840BT 26 ...

Страница 39: ...Insert characters to the record including function codes D Duplicate characters in the record E Insert time delay in the record Formula Formula is a structure that tells the scanner what and how to process the original data record to produce the desired output The wedge allows multiple Formulas but the number of the Formulas can be defined depends on the memory size allocated for Data Editing Orig...

Страница 40: ... sheet If a field is optional and missing the next one in the sequence can be entered But Enter must be the last input of a formula Preparation To start the data editing the following barcode sheets are needed Programming Sheet Setup Sheet in Appendix D Full ASCII Sheet Appendix E Function Code Sheet Appendix B or C Before programming Data Editing you should know the format of the original data re...

Страница 41: ...t position Enter To end the current formula 0 to 9 For digit input IN_ID For ID field input LEN For Length field input MATCH For Match field input O STR For O String input For O String input For O String input Exit Save all formulas and exit setup Note The and on Programming Sheet have special meanings as mentioned above and are different from those represented in Full ASCII chart Always use chara...

Страница 42: ...4 UPC A 5 UPC E 6 I 2 of 5 7 Codabar 8 Code 128 9 Code 93 10 S 2 of 5 11 MSI 19 All Inputs There is no limitation on the number of IDs to be defined Example IN_ID 0 11 What is shown above means the original data can be Code 39 or MSI Length Format LEN Min Max Length field consists of two length parameters minimum length Min and maximum length Max When defined a formula will be performed if the len...

Страница 43: ...e a wild character for any position or for the last position in the original data If is used N is valid Here N is a digit parameter The string parameter C can include for any digit or for any letter Examples MATCH 3 AB Checks if the original data has A at position 3 B at position 4 and last character is MATCH 10 A Checks if the original data includes a string with a digit as first character and A ...

Страница 44: ...maining characters counting from P the remaining characters are included as valid Examples Example 1 If the original data is Code 39 and content is AA output ABC Company and otherwise output the original data as it is IN_ID 0 LEN 2 2 MATCH 1 AA ABC company Enter IN_ID 19 O STR 1 Enter Example 2 If the original data is Code 128 and logically divided into First six characters are personal ID Other c...

Страница 45: ...on of N is the same as P except that the searching position is starting from P 1 For both P and N if string is defined a value can be added to or subtracted from the position That following O Strings ab ik M and ab ik M are meaningful M is an integer number Example Suppose the following is a message to be modified B012345678901234 ABEL STEVE L MGR 90010129999999 In this message is start sentinel 0...

Страница 46: ...34 The output of above input will be ABEL STEVE CR 012345678901234 CR 9001 CR ...

Страница 47: ...ading Digit Cut Check Digit ISBN Conversion Beep None Medium Terminator Enter Field Exit Scan Code U S Alt Key Inter Character Delay 1 ms 20 ms Code ID No Yes UPC A Default Cut Leading Digit Cut Check Digit Supplement Code No Yes Menu Setup Enable Disable Display Version Display Version Factory Default Factory Default In cradle mode the cradle is set for functions necessarily through SCM 35 ...

Страница 48: ... VK Cursor Right FC Cursor Up FE PgUp FG TAB FI Esc FK Right Ctrl FO Shift Make FP Ctrl Make FQ Alt Make FR Del FX F2 VB F4 VD F6 VF F8 VH F10 VJ F12 VL Cursor Left FD Cursor Down FF PgDn FH Back Tab FJ Left Enter FL Right Enter FM Ins FW Shift Break FS Ctrl Break FT Alt Break FU 36 ...

Страница 49: ... VL F13 VM F14 VN F15 VO Cursor Left FD Cursor Right FC Cursor Down FF Cursor Up FE page down FH page up FG ins FJ tab FI Enter FL Esc FK return FM Option Make VP Option Break VQ Control Make VR Control Break VS Shift Make VT Shift Break VU Apple Make VV Apple Break VW 37 ...

Страница 50: ...F1 VA F3 VC F5 VE F7 VG F9 VI F11 VK F13 VM F15 VO F17 VQ F19 VS F21 VU F23 VW Home FA TAB FI Return FM Field FP Clear FR F2 VB F4 VD F6 VF F8 VH F10 VJ F12 VL F14 VN F16 VP F18 VR F20 VT F22 VV F24 VX End FB Enter FL Field Exit FO Field FQ 38 ...

Страница 51: ... ms 3 5 ms 4 10 ms 5 30 ms 6 50 ms 7 100 ms A3 Reconnection Time 0 10 minutes 1 30 minutes 2 60 minutes 3 240 minutes When disconnecting for more than 10 30 60 240 minutes the scanner stops searching for connection and then enters the power saving mode When the scanner enters the power saving mode you can press the trigger to release the power saving mode The RF module will reconnect A4 PharmaCode...

Страница 52: ... 2 Swiss 7 German Japanese 3 Swedish 8 French 4 Spanish 9 Alt Key Mode B3 Output of Wand Emulation 0 Bar with High Space with Low 1 Bar with Low Space with High B4 Level Duration of Mini Width 0 200us 1 600us B5 Polarity of Idle Condition 0 Low 1 High B6 Pre define Label 0 Label 0 1 Label 1 2 Label 2 See Pre defined label section for detail B7 Use number keypad digits 0 Disable 1 Enable B8 0 1 2 3...

Страница 53: ...ication 2 RTS Enable at Power up 3 4 Special Bell Off On C4 ACK NAK for serial wedge 0 Off 1 On C5 BCC Character for serial wedge 0 Off 1 On C6 Time Out for serial wedge 0 1 sec 1 3 sec 2 10sec 3 Unlimited C7 Data Direction for Terminal Wedge 0 Send to Host 1 Send to Host and Terminal 2 Send to Terminal C8 0 1 2 3 4 5 6 7 8 9 Define Terminator of RS232 input Scan an ASCII code in full ASCII Chart ...

Страница 54: ...ecial 18 China Postal code Toshiba Code D3 Scan two digits to choose a code and then scan a char From full ASCII table to define ID Double Verification 0 Off 1 7 On Verify 1 7 times D4 Scanning Mode Trigger Function 0 Trigger 1 Flashing 2 Multiscan 3 One Press One Scan 4 Test Mode 5 Old Laser flash Mode 6 Continuous 7 Trigger with Command control scanning Trigger in Flash 8 Enabled 9 Disabled D5 L...

Страница 55: ...6 Group Default Buffer Mode 0 Disabled 1 Inventory Mode 2 Batch Mode E1 Reserve E2 Buffer Transmit delay 0 50ms 1 100ms 2 300ms 3 600ms 4 1s 5 2s 6 3s 7 5s E3 Reserve Reserve Reserve Reserve Reserve Reserve 0 1 2 3 4 5 6 7 8 9 Exit 43 ...

Страница 56: ...shiba Code 0 1 Disable Enable 2 3 Fix Length On Off by first three reads 4 Check Digit CD Calculate Send 5 CD Calculate not send 6 CD not Calculate 1 48 Min length 4 Max length 48 F3 Code 32 Italian pharmacy 0 1 Disable Enable 2 3 Leading Character Send No Send 4 5 Tailing Character Send No Send F4 Telepen 0 1 Disable Enable 2 3 Standard Numeric Set F5 UCC EAN 128 0 1 Disable Enable 2 3 Code ID Di...

Страница 57: ...Length 16 G2 Code 93 0 1 Disable Enable 1 48 Min Length 1 Max Length 48 G3 Code 11 Special 0 1 Disable Enable 2 3 One Two Check Digit 4 5 Check Send No Send 1 48 Min Length 1 Max Length 48 G4 Codabar 0 1 Disable Enable 2 3 Start Stop Send No Send 4 Check Digit Calculate Send 5 Check Digit Calculate but not Send 6 Check Digit not Calculate 7 8 CLSI Format On Off 3 48 Min Length 3 Max Length 48 G5 L...

Страница 58: ...e Disable H3 EAN 8 0 1 Disable Enable 2 3 Leading Digit Send No Send 4 5 Check Digit Send No Send H4 Supplement Code 0 1 Two Supplement Code Off On 2 3 Five Supplement Code Off On 4 Transmitted if Present 5 Must Present 6 7 Space Separator Inserted Not Inserted H5 Delta Distance Code 0 1 Disable Enable 2 3 Check Digit Calculated Not Calculated 4 5 Check Digit Send No Send H6 Reserved H7 RSS14 Code...

Страница 59: ... See the section Batch Setup for how to use the labels below Dump Settings Dump Settings on PC AT 47 PC AT Interface Keyboard setting RS232 Interface Keyboard Setting Speed 9600 Databit 8 Parity None Stop 1 Flow Control None ...

Страница 60: ...haracters in parentheses represent Code 39 barcode printing NUL U SOH A STX B ETX C EOT D ENQ E ACK F BEL G BS H HT I LF J VT K FF L CR M SO N SI O DLE P DC1 Q DC2 R DC3 S DC4 T NAK U SYN V ETB W CAN X EM Y SUB Z ESC A FS B GS C 48 ...

Страница 61: ...RS D US E SP A B C F G H I J L 0 1 2 3 4 5 6 7 8 9 Z F G H I 49 ...

Страница 62: ... J V A B C D E F G H I J K L M N O P Q R S T U V W X Y Z K L M N _ O 50 ...

Страница 63: ... W a A b B c C d D e E f F g G h H i I j J k K l L m M n N o O p P q Q r R s S t T u U v V w W x X y Y z Z P Q R S DEL T 51 ...

Страница 64: ...A UPC E 0 2 1 2 3 4 5 7 9 9 ISBN 957 630 239 0 9 7 8 9 5 7 6 3 0 2 3 9 8 0 7 2 0 0 Interleaved 2 of 5 Code 39 W E D G E Code 39 with C D UNI TECH E EAN 128 01 054123456789 01 659344 Code 128 Unitech 128 Codabar A2 2 3 5 7 0 0 0 5 9 9 8 7 6 B MSI Code 0 6 4 7 6 6 9 1 3 7 1 6 1234558 0987654321 ...

Страница 65: ...sentative For complete contact information please visit the Web sites listed below Region Web Site Global Operation Center http www ute com Unitech Taiwan http tw ute com Unitech Asia Pacific Middle East http apac ute com http india ute com Greater China Division http cn ute com Unitech Japan http jp ute com Unitech America http us ute com http can ute com Unitech Latin America http latin ute com ...

Отзывы: