background image

                                                     
                                                                                                                                                                        91 

UDR-204(C) Operation manual Revision 3.0 


  Close the RAMS information window 

  Display S/W update window of DVR system 


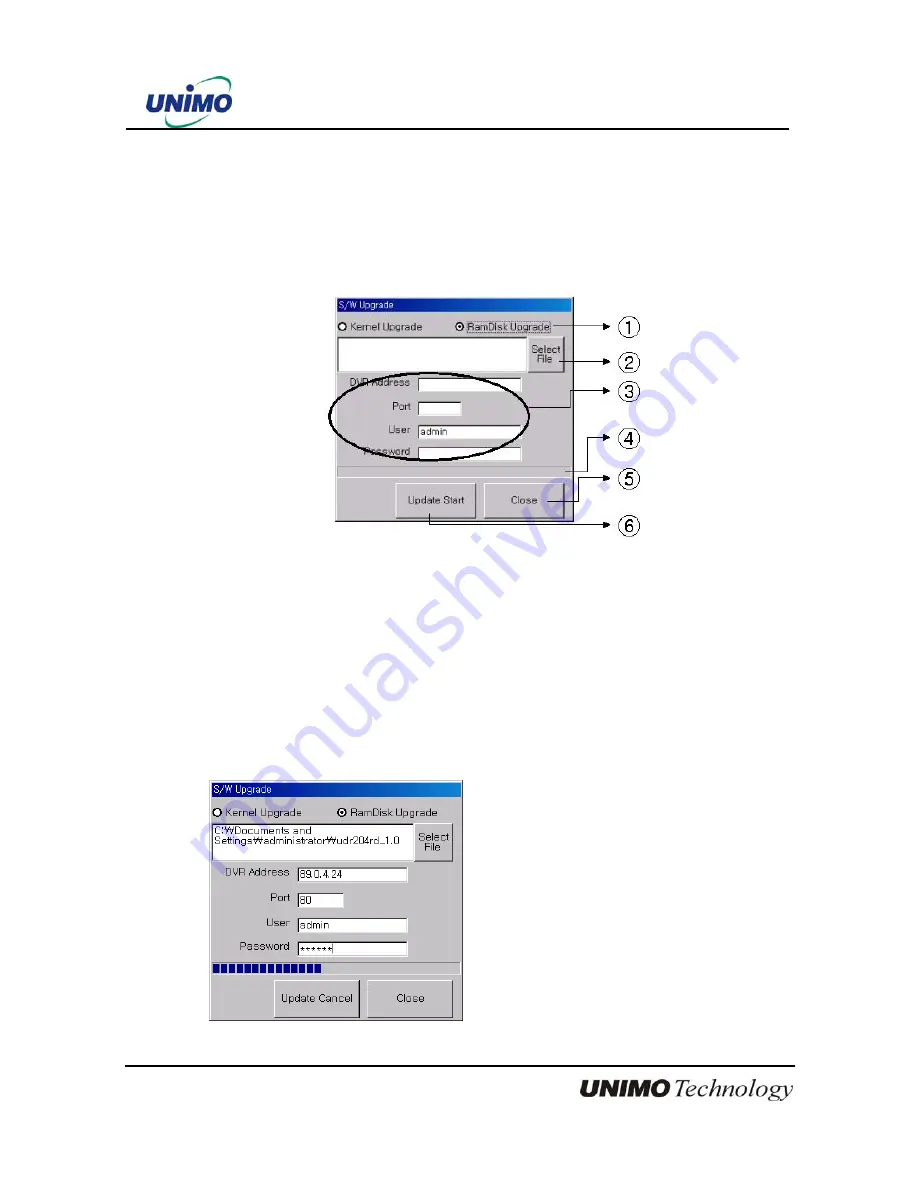
4.3.20  S/W upgrade of DVR 

S/W upgrade window is activated on pushing S/W upgrade button in the program version   

check screen 


  : Select targeted files to upgrade 


  : Select targeted files saved in local PC 


  : Enter targeted DVR information such as DVR address, Port,


user, and password (admin 

only) 

  : Indicator of targeted file’s transmission status 

  : Close upgrade window 

 : Transmit targeted files. After that, changed to upgraded cancel (cancel of upgrade 

transmission) 


=> Display status of SW Upgrade 


Содержание MPEG-2

Страница 1: ...USER MANUAL Digital Hard Disk Recorder UDR 204 UDR 204C MPEG 2 Default system password 111111 for RAMS Record stop Menu setup System off Auto key lock Default ID admin for RAMS ...

Страница 2: ...en the equipment is operated in a commercial environment This equipment generates uses and can radiate radio frequency energy and if not installed and used in accordance with the instruction manual may cause harmful interference to radio communications Operation of this equipment in a residential area is likely to cause harmful interference in which case the user will be required to correct the in...

Страница 3: ... does not fit into your outlet consult an electrician for replacement of the obsolete outlet 10 Protect the power cord from being walked on or pinched particularly at plugs convenience receptacles and the point where they exit from the apparatus 11 Only use attachments accessories specified by the manufacturer 12 Use only with the cart stand tripod bracket or table specified by the manufacturer or...

Страница 4: ...1 3 3 Remote controller function 20 1 4 INSTALLATION 21 1 4 1 Installation and connection 21 1 4 1 1 Camera 21 1 4 1 2 Video Out 21 1 4 1 3 Audio 22 1 4 1 4 RS 232 22 1 4 1 5 PTZ AUX ALARM 22 1 4 1 6 Network 23 1 4 1 7 USB flash memory 23 2 BASIC OPERATION PROCEDURES 24 2 1 POWER ON OFF 24 2 1 1 Power on 24 2 1 2 Power OFF 24 2 2 DATE TIME SETTING 24 2 3 PASSWORD SETTING PROCEDURE 24 2 4 NETWORK S...

Страница 5: ... System 27 2 9 2 UniPlayer 27 2 9 3 MultiViewer 27 2 9 4 Quick Installer 27 3 MAIN SETUP SCREEN 28 3 1 CAMERA SETUP MENU 28 3 1 1 Channel number 29 3 1 2 Camera Name Edit 29 3 1 3 Camera hide 29 3 1 4 PTZ setup 30 3 1 4 1 Model Number 30 3 1 4 2 PTZ ID 30 3 1 4 3 Reverse Control 30 3 1 4 4 RS 485 Setting 31 3 1 4 5 TEST 31 3 1 5 Picture Setting 31 3 1 5 1 Contrast Brightness Hue Sharpness 32 3 1 5...

Страница 6: ... 3 3 1 Motion Detection Setting 38 3 3 1 1 Channel 38 3 3 1 2 Sensitivity 38 3 3 1 3 Detection Zone 39 3 3 2 Sensor Setting 40 3 3 2 1 Sensor Type 40 3 3 2 2 Channel Link 40 3 3 3 Alarm Output 41 3 3 3 1 Sensor 41 3 3 3 2 Motion 41 3 3 3 3 Relay Time 41 3 3 4 Post Alarm Record Time 41 3 3 5 FTP Setting 42 3 3 5 1 FTP Server IP address 42 3 3 5 2 ID 43 3 3 5 3 Password 43 3 3 5 4 Target Path 44 3 3...

Страница 7: ...word 52 3 6 3 Network Type 52 3 6 4 Static 53 3 6 4 1 DDNS On off 53 3 6 4 2 Port 53 3 6 4 3 IP Address 53 3 6 4 4 Subnet Mask 53 3 6 4 5 Gateway 53 3 6 5 DHCP 54 3 6 5 1 Port 54 3 6 6 PPPoE 54 3 6 6 1 Port 55 3 6 6 2 ID 55 3 6 6 3 Password 55 3 6 7 Changing the Network configuration 56 3 7 SYSTEM SETUP SCREEN 56 3 7 1 DVR Name 56 3 7 2 System Password 57 3 7 2 1 Password Setting 58 3 7 2 2 Passwo...

Страница 8: ...ault 65 3 8 BACKUP 66 3 8 1 Backup Device 67 3 8 2 Start Time 67 3 8 3 End Time 67 3 8 4 Channel 67 3 8 5 Event 67 3 8 6 Backup Start 67 3 8 7 Format 67 3 9 SYSTEM INFORMATION 68 3 9 1 Video type 68 3 9 2 H W version 68 3 9 3 S W version 68 3 9 4 KERNEL version 68 3 9 5 Mac Address 68 3 10 SEARCH MENU 69 3 10 1 Search by Time 69 3 10 1 1 Starting Time 69 3 10 1 2 Ending Time 70 3 10 1 3 Channel 70...

Страница 9: ...GRAM 77 4 1 OVERVIEW OF UDR 204 77 4 1 1 PC requirement minimum 77 4 2 INSTALLATION EXECUTION OF PROGRAM 77 4 3 RAMS REMOTE ACCESS MONITORING SYSTEM 78 4 3 1 Screen and button 78 4 3 2 Connecting to DVR 79 4 3 3 Channel On Off 80 4 3 4 UniPlayer link 80 4 3 5 Full screen display 81 4 3 6 Program setup 81 4 3 7 DVR recording 82 4 3 8 DVR playback search 83 4 3 9 DVR playback search 84 4 3 10 DVR ba...

Страница 10: ...aying pause temporarily pause move by interval of frame fast forward Playing 98 4 4 9 Water mark drawing 99 4 4 10 Panorama 100 4 4 11 Check the program version 102 4 4 12 Close Program 102 4 5 MULTIVIEWER 103 4 5 1 Program login 103 4 5 2 Screen and Button 104 4 5 3 DVR LIST management connection 105 4 5 4 Camera On Off 106 4 5 5 Full Screen 107 4 5 6 Program Setup 107 4 5 7 Link with UniPlayer 1...

Страница 11: ...5 1 2 Installing two hard disk drives 113 5 1 3 Installing CD RW drive 114 5 2 TERMINAL INFORMATION 116 5 2 1 DSUB 9P RS 232 116 5 2 2 DSUB 15P PTZ AUX ALARM SENSOR 116 5 3 FACTORY DEFAULT VALUE 117 5 3 1 Main Menu 117 5 3 2 Search Menu 120 5 4 PROTOCOL 121 5 4 1 Code table 121 5 4 2 Usage 122 5 5 HDD RECORDING TIME TABLE 123 ...

Страница 12: ...n 3 0 All rights reserved No part of this publication may be reproduced or transmitted in any form or any means electronic or mechanical including photocopy recording or any information storage and retrieval system without prior permission ...

Страница 13: ... included as soon as you open the box 1 1 1 Components UDR 204 Removable HDD Rack or UDR 204C CD RW Drive Power cable DSUB 15 connector for PTZ AUX ALARM Quick Manual Software CD RAMS UniPlayer MultiViewer QuickInstaller and Operation Manual Removable external Hard disk drive rack key screw 1 1 2 Options Remote controller two battery included Hard disk drive Option or included ...

Страница 14: ... for recording frame rate resolution Various backup method support Removable HDD UDR 204 CD RW UDR 204C USB Network Selectable Quad MUX recording Audio recording available Multiple recording modes Time lapse video loss alarm schedule manual continuous recording Still image capture and search function Convenient search by alarm time or date Quick and responsive playback field by field viewing with ...

Страница 15: ...ld Forward Backward Sensor Input 4 NO NC Selectable Alarm Output 1 NO NC Aux Control In Out 2 3 Selectable Function Menu Alarm Reset In Record Start In Record ON OFF Alarm Out Error Out Record Start Out Disk Full Out Record Status Out Audio 1CH mono mute Network 10Base T STATIC DHCP PPPoE E mail FTP Motion Detection 11x8 8 Level Sensitivity Hard Disk Removable UDR 204 Internal Backup Method Remova...

Страница 16: ... FULL Green light No more disk space for recording PTZ Pan Tilt Zoom Focus status is indicated by Green 3 Numeric button Live Viewing mode button 1 2 3 4 Channel selection for Live Viewing and Playback mode Used to input password MULTI Multi view View all four channels in the same window in live viewing or quad playback Select all sections for Motion Detection Zone SEQ Sequential view View all act...

Страница 17: ...o access Main Menu Press again to return 5 Direction select button UP Used to move the cursor up change possible values in the setup menu under PTZ control sub menu used to move camera or used to adjust focus DOWN Used to move the cursor up change possible values in the setup menu under PTZ control sub menu used to move camera or used to adjust focus LEFT Used to change possible values in the setu...

Страница 18: ...ion and Channel at playback setup of menu At pause mode it will release pause mode Under PTZ control menu used to increase the speed of Pan Tilt Zoom Focus PAUSE Press to freeze the picture at playback mode 1 3 2 Rear panel view 1 2 3 4 5 6 7 8 9 1 USB Connect USB flash drives for backing up stored video files 2 ETHERNET Network terminal for 10Base T RJ 45 3 PTZ AUX ALARM Terminal for PTZ sensor a...

Страница 19: ...osite video and s video to connect with monitor 7 CAMERA IN Video input to connect with camera output OUT Video output Loop through output for video input 8 FAN Heat protection fan to reduce heat in the unit 9 POWER INPUT Power cord terminal free voltage 100 240VAC 50Hz 60Hz ...

Страница 20: ...on POWER NET HDD NUMBER SEQ DIRECTION OK REVERSE PLAY STOP FRZ PTZ 4 Division MUTE REC LOG INFO LOCK DVR SEARCH MENU MULTI PAUSE PLAY ZOOM OSD MUTE Voice Mute HDD HDD status information NET Network connection status user connection information INFO Hardware Software version ...

Страница 21: ...ic 1 4 1 1 Camera The unit comes with 4 video IN and 4 video OUT for up to four camera connection Connect to IN terminal for video input and to OUT for loop through output When connecting the BNC cable to OUT be sure that the BNC cable connects to a display monitor or other types of video equipment for termination 1 4 1 2 Video Out The unit has one composite video output and one S video output Use...

Страница 22: ...UX Port consists of 2 input ports AUX 1 2 and 3 output ports AUX 3 4 5 and the function of each port is selectable according to user s purpose user s access to external DVR or controllers using the supplied DB 15 connector 1 4 1 5 3 Alarm Out NO COM NC The Alarm output is activated using a relay contact point when an alarm event occurs for the duration of the alarm event Select from Normal Open Re...

Страница 23: ...r 1 4 Users can connect up to four N O N C type sensors and configure them within Main Menu Sensor Setting 1 4 1 6 Network Connect RJ 45 Ethernet cable 1 4 1 7 USB flash memory Perform backup of recorded video files from DVR system to USB flash memory manually ...

Страница 24: ...er to shutdown the system you must type in the password The default password for shutdown is 111111 2 2 Date time setting Set the date and time for the DVR System Setup in Main Menu Time Date 2 3 Password setting procedure Select or change your password for the DVR The password must be a 6 digit number consisting of numbers 0 4 System Setup in Main Menu System Password 2 4 Network setting There ar...

Страница 25: ... 2 6 1 Press the Play button The DVR will playback either the first recorded file or the last recorded file according to the setting in the Playback Setup menu 2 6 2 Audio files You will hear audio when video files containing audio is selected for playback 2 7 Search 2 7 1 Search mode The UDR 204 has 3 types of search modes SEARCH BY TIME Displays recorded data by recording time and camera number ...

Страница 26: ...ed time In the backup menu select backup time start backup and backup for capacity of CD RW The backed up files can be play backed by general Media player or by Uniplayer 2 8 3 USB flash memory User can backup manually from internal HDD to USB memory stick by connecting one to USB port equipped at rear side of DVR Connect USB Memory Stick into USB port Input the start of backup date and time at ba...

Страница 27: ... and register selected DVR s IP address Port number from the DVR list After selecting the target DVR enter admin for ID and 111111 for default password This will enable you to access the DVR 2 9 2 UniPlayer A viewer with functions for recording capturing backing up files 2 9 3 MultiViewer To monitor multiple DVR both locally and remotely Up to 16 Channels for example 4x4CH DVR or 16x1CH DVR 2 9 4 ...

Страница 28: ...28 UDR 204 C Operation manual Revision 3 0 3 Main Setup screen Figure 3 1 Main Setup screen 3 1 Camera Setup menu Figure 3 2 Camera setup screen ...

Страница 29: ...vailable 12 letters at maximum Selected name at this paragraph will be displayed at the left side of top portion on window By using CAPS button user can shift a letter to capital one and or inversion By using ㅡ button user can delete miss entered characters If you enter OK button entered name will be applied after that and revert to previous menu If user enter cancel button entered name will be di...

Страница 30: ... choose NONE 3 1 4 2 PTZ ID Set the PTZ ID 0 255 The PTZ ID must match the ID number that has been set by the PTZ Controller Please verify the ID on the Controller first before setting the PTZ ID 3 1 4 3 Reverse Control Without any further changing of cable connection user can control PTZ controller by changing reverse direction of PTZ Each PAN TILT ZOOM FOCUS will be selectable to reverse directi...

Страница 31: ...om Focus mode will be controlled after entering OK key button PTZ control speed will be controlled by PLAY button for higher speed or by R PLAY button for precision control Users can access prior menu with PTZ key entering after finishing test 3 1 4 6 Additional PTZ Menus Users can access additional PTZ menu after pressing Menu button in the PTZ mode Figure 3 5 Additional PTZ Menu Set Preset To pr...

Страница 32: ... Auto Pan To automatically pan the camera On off are selected by Left Right and OK buttons 3 1 5 Picture Setting 3 1 5 1 Contrast Brightness Hue Sharpness Contrast Brightness Hue Sharpness will be managed each parameter has 16 level steps adjustable 3 1 5 2 Default Users can restore the factory default setting of Contrast Brightness Hue Sharpness Confirmation box on picture setting default will ap...

Страница 33: ...ze Under MUX Recording mode resolution will be applicable to all channel Picture quality recording time and recording mode can be selected channel by channel Under QUAD Recording mode Resolution picture quality and recording rate will be applied to all channel equally 3 2 2 MUX Type Figure 3 7 MUX Record setup screen 3 2 2 1 Resolution Under MUX Recording mode Resolution for NTSC is 360 x 240 or 7...

Страница 34: ...ng 1 2 3 5 7 10 15 30 fps will be available But with 720 x 480 resolution user should not set to exceed 30 frame per second with accumulated total channel recording 3 2 2 5 2 PAL Under MUX recording mode User select channel s recording frame rate and none no recording 1 2 3 5 6 10 12 25 fps will be available But with 720 x 576 resolution user should not set to exceed 25 frame per second with accum...

Страница 35: ... Event Setup Menu Refer to paragraph 3 3 2 Motion Sensor Start to recording under motion detection or Sensor occurrence The detailed will be referred to previous motion detection sensor occurrence Schedule This mode supply user defined time and date schedule recording in advance detailed recording schedule will be referred to paragraph 3 2 4 record schedule 3 2 3 QUAD Type Figure 3 8 Quad record s...

Страница 36: ... Frame rate at Quad Recording none Non recording 1 2 3 5 7 10 15 30 fps will be selectable This setting is applicable to all channels as equal forms 3 2 3 4 2 PAL User can set the recording Frame rate at Quad Recording none Non recording 1 2 3 5 6 10 12 25 fps will be selectable This setting is applicable to all channels as equal forms 3 2 3 5 Record mode Please refer to terms on Record mode 3 2 2...

Страница 37: ...esired position of time by pressing up down key and set the recording mode at the desired position of time by pressing the OK button with referring to the Help Message per Record Mode on the right position After the setup store the set schedule and exit to the top menu by pressing the Menu button 3 3 Event Setup Menu Figure 3 10 Event Setup screen ...

Страница 38: ...uad recording 3 3 1 1 Channel Sets up the motion detecting area and sensitivity for each channel It sets up all 4 channels when it is set on the Quad recording Under Quad recording mode multi channel is setup as same as one channel when user setup motion detection areas sensitivities 3 3 1 2 Sensitivity Sets up the motion detecting sensitivity The lower the sensitivity gets the closer to the left ...

Страница 39: ...es the area that was already selected as the motion detecting area When the cursor positions on the area that was selected as the motion detecting area it turns green Above screen is for MUX motion detection set up and for QUAD motion detection set up all four screens appear together Full screen shall be as the motion detecting areas after entering MULTI button The reverse key button is SEQ erasin...

Страница 40: ... installed sensor s contact point is usually open in normal condition and changed from open to close at sensor s detect event N C Normal Close Operation mode for the installed sensor s contact point is usually close in normal condition and changed from close to open at sensor s detect event 3 3 2 2 Channel Link Assign sensors to designated Camera Channels ...

Страница 41: ... Motion Configure the alarm out on off triggered by the motion detection 3 3 3 3 Relay Time Configure the alarm duration time It can be set up from 1 second to 60 seconds in the unit of 5 seconds 3 3 4 Post Alarm Record Time Configure the recording continuation time after starting an event recording It can be set up from 10 seconds to 60 seconds in the unit of 10 seconds ...

Страница 42: ...event occurs The event will be transmitted 15 seconds after the event occurs 3 3 5 1 FTP Server IP address Configure the IP address of the FTP server The number changes by moving left and right and then it moves to the next digit by pressing the OK button for setting up the next number Change the IP address of the FTP server to fast forward or backward by using shuttle equipped in front panel ...

Страница 43: ...Revision 3 0 3 3 5 2 ID Configure the FTP ID The ID can contain maximum of 31 characters Figure 3 16 FTP ID 3 3 5 3 Password Configure the FTP password The password can contain maximum of 12 characters Figure 3 17 FTP Password input ...

Страница 44: ... path can contain maximum of 31 characters Figure 3 18 FTP Target Path 3 3 5 5 FTP Length of Image second Select FTP length of image by second 5 to 10 seconds are selectable to transmit image files for selected seconds 3 3 6 FTP Trigger Setting Selects on off for transmitting the video file to FTP for each channel ...

Страница 45: ...nfigure motion events 3 3 7 E Mail Address Setting Transmits the content of an event log periodically through e mail Configure up to four e mail address to transmit under event status simultaneously The e mail address can contain maximum of 31 characters and the event logs transmitted through e mail will be deleted in the DVR unit ...

Страница 46: ...ress setting 3 3 8 E Mail Setting Figure 3 21 E Mail Setting 3 3 8 1 Send Period Configure the e mail transmitting cycle It does not transmit when it is set to NO The setting time can be set up at the units of within 2 minutes after event 30minutes 1 2 5 12 24 hours ...

Страница 47: ...y for Unimo employees and will not work for your set up C ping mail unimo co kr Pinging mail unimo co kr 211 104 85 230 with 32 bytes of data Reply from 211 104 85 230 bytes 32 time 342ms TTL 114 Reply from 211 104 85 230 bytes 32 time 344ms TTL 114 Reply from 211 104 85 230 bytes 32 time 347ms TTL 114 Reply from 211 104 85 230 bytes 32 time 350ms TTL 114 Ping statistics for 211 104 85 230 Packets...

Страница 48: ...ision 3 0 3 3 9 Event Log Shows the event log of the selected channel It can reset periodically by setting e mail as described in paragraph 3 3 7 Figure 3 22 Event Log Display screen 3 4 Playback Setup Figure 3 23 Playback setup screen ...

Страница 49: ...position when the Replay button is pressed FIRST This can search for and replay the oldest recorded images from the selected channel LAST This can search for and replay the latest recorded images from the selected channel 3 4 3 Audio If the recorded files contain audio choose whether to turn the sound ON OFF when the Play button is pressed 3 5 Display Setup screen Figure 3 24 Display setup screen ...

Страница 50: ...vision 3 0 3 6 Network Setup screen Figure 3 25 Network Setup screen 3 6 1 DDNS setting Set up DDNS Dynamic Domain Name System server address port number Users can set up two DDNS server address and port Figure 3 26 DDNS setup screen ...

Страница 51: ...sary to setup DDNS link on By indicating the address of a DDNS Server the UDR 204 will update its IP address and its MAC address periodically Therefore when users access the DVR over the network the same URL can be used For example if the DVR has a MAC address of 00 09 F8 12 34 56 and the domain name of the DDNS server is ns udrdns net the users can access the DVR with the URL u123456 udrdns net T...

Страница 52: ...4 combined 6 units Figure 3 27 Remote Connection Login Password screen 3 6 3 Network Type Choose one type from the following Static DHCP PPPoE Static mode uses fixed assigned IP address in the network DHCP Dynamic Host Configuration Protocol receives an IP address from the DHCP Server and it may change according to the lease period PPPoE PPP over Ethernet mode is used for network using PSTN such a...

Страница 53: ...ing System The default Port number is port 80 Change easily by using Jog shuttle equipped in front panel 3 6 4 3 IP Address Assign a fixed IP address to the UDR 204 Change easily by using Jog shuttle equipped in front panel 3 6 4 4 Subnet Mask Assign the Subnet Mask Change easily by using Jog shuttle equipped in front panel 3 6 4 5 Gateway Assign the Gateway address Change easily by using Jog shut...

Страница 54: ... UDR 204 C Operation manual Revision 3 0 3 6 5 DHCP Figure 3 29 DHCP setup screen 3 6 5 1 Port Please refer to paragraph 3 6 4 1for Port setting of Static DHCP PPPoE 3 6 6 PPPoE Figure 3 30 PPPoE setting ...

Страница 55: ...ph 3 6 4 3 6 6 2 ID Type in your user ID for the ADSL account PPPoE The password can contain maximum of 31 characters Figure 3 31 ID input screen 3 6 6 3 Password Type in your user Password for the ADSL account PPPoE The password can contain maximum of 12 characters Figure 3 32 Password input screen ...

Страница 56: ...of UDR 204 users must reboot the system User can restart the new network mode setting after entering yes key button Figure 3 33 Changing the Network setting screen 3 7 System Setup screen Figure 3 34 System Setup screen 3 7 1 DVR Name Type in the name of the DVR you wish to assign The name can contain maximum of 12 digits ...

Страница 57: ...nual Revision 3 0 Figure 3 35 DVR name screen Using the arrow type in the DVR name Click OK when finished 3 7 2 System Password Figure 3 36 System password set up Set up part for system password related function and application ...

Страница 58: ...ed Users can use any numeric number from 0 4 combined 6 units Password input screen present new confirm if it is wrong twice confirm to change Figure 3 37 Password input screen 3 7 2 2 Password Apply Determine whether the system password has to be applied to power On Off The applicable features are recording close enter menu system off Users can set up password ON OFF for each feature Setting to O...

Страница 59: ...t current password 3 7 3 Time Date Users can configure the view of time date on the system as well as Day Light Saving Time Figure 3 38 Set up Time Date 3 7 3 1 Set up Time Date Set up date and time on the system 3 7 3 2 Time Date Format Set up format for date and time There are two types of time 24hr circle 12hr circle Date format can be set up as the following YYYY MM DD MM DD YYYY DD MM YYYY 3 ...

Страница 60: ... mode 3 7 3 3 4 Apply hour Set up the duration time in Day Light Saving Time mode 3 7 4 Buzzer Users can turn the buzzer On Off depending on the situations Usable situation is Sensor Motion Video Loss When users activate the buzzer buzzer will make a sound when there any event occurs There would be no sound if the buzzer is turned Off Figure 3 39 Set up buzzer 3 7 5 Language English Korean Japanes...

Страница 61: ...ystem events The items that manage by Log are Video Loss Power On Power Off Menu entry HDD Full failure of FTP transmission failure of E mail transmission Figure 3 40 System Log screen 3 7 7 HDD Setup Set up for Internal HDD and Removable HDD See the information Figure 3 41 HDD Setup image ...

Страница 62: ...hat off is setup the recorded images shall not be erased In case that 30 is setup the images recorded 30 days earlier than today shall be erased 3 7 7 4 Internal HDD 3 7 7 4 1 Capacity Indicate the used part and total capacity of Internal HDD Used part of HDD GB Full capacity of HDD GB 3 7 7 4 2 Format This is function for internal HDD formatting and you must reboot the system after this instructi...

Страница 63: ...backup It is fixed to auto backup system will automatically backup recording image If it is fixed by extension it will be the same as Internal HDD If backup mode Manual Auto backup is changed to extension mode warning box on HDD function change will appear after entering yes key button and it can erase all information of Removable HDD Figure 43 Change of HDD Function mode 3 7 7 5 3 Format Please r...

Страница 64: ...sh the button RECORD ON OFF Recording start stop during user push the button same as pushing remote controller or DVR machine 3 7 8 2 2 Direction OUT ALRAM OUT Notice the assigned port when event occurred ERROR OUT Notice the assigned port when system error occurred Mark system error RECORD START OUT HDD of DVR is full send signal to DVR which is connect with AUX port During receiving recording si...

Страница 65: ...r factory default Figure 3 45 Confirmation box for Factory Default 3 7 10 Software Upgrade Users can upgrade the software of Ramdisk and Kernel using the USB flash drive thumb drive by the following steps Download the latest version of software Ramdisk Kernel from the following address ftp ftp udrdns net UDR 204 Software Copy the downloaded files from the PC to the USB memory Connect the USB memor...

Страница 66: ...sion 3 0 Figure 3 46 Software Upgrade After the unit recognizes the USB flash drive and upgrading end the unit will reboot Figure 3 47 Ramdisk Upgrade 3 8 Backup Backup recording data to HDD or USB Flash Drives Figure 3 48 Backup image ...

Страница 67: ...nnel to backup 3 8 5 Event Choose the event to backup In case of none mode selected files according to time will be backed up 3 8 6 Backup Start Based on the input date time channel and event other condition search the images will be backed up to the chosen device Back up progress rate is marked on the bottom right side of the screen 3 8 7 Format This menu is used only when backup device is CD RW ...

Страница 68: ...mation 3 9 1 Video type It shows that present Video type of System is NTSC or PAL 3 9 2 H W version It shows the H W Version of system 3 9 3 S W version It shows the S W Version of system 3 9 4 KERNEL version It shows the S W Version of KERNEL 3 9 5 Mac Address It shows Mac Address of system ...

Страница 69: ...annel Event UDR 204 saves lat searching condition so it automatically displayed last search condition under search mode Screen where the condition of search will be input Figure 3 51 Search by time 3 10 1 1 Starting Time Starting Time and date for Search is input The starting year range is from 1970 to 2037 and it is not possible to input any year after 2037 ...

Страница 70: ...ect the Event as follows NONE All of files are searched regardless of Event MOTION The file recorded by MOTION is searched SENSOR The file recorded by SENSOR is searched 3 10 1 5 Example of Search Result Figure 3 52 Screen of result of search by time 3 10 2 Search of still image Still image is not searched by Time and Channel If users press search Button the still images recorded in the system app...

Страница 71: ...en of Still Image 3 10 3 Search of back up HDD The images that were backed up manually or automatically can be searched by Time Channel Event Figure 3 54 Screen for input data of HDD Search The method of input and search is the same as that of recorded file as indicated in the paragraph 3 10 1 ...

Страница 72: ...or Played back directly 3 11 1 1 Method of playback In order to play back the recorded images put the Curser to the selected content in the Menu of Search and press Button OK The screen of Search results disappears and the selected images are played back The recorded files with Audio are played back with Audio 3 11 1 2 Screen of played back Figure 3 55 Screen of playback ...

Страница 73: ... of playback users press button LEFT and speed is controlled 3 11 1 3 4 Change of Direction of Playback There s forward and Backward directions In order to change direction from Forward to Backward user press the button REVERSE PLAY and backward playback starts with normal speed On the contrary to change direction from Backward to Forward user press the button PLAY and Forward playback starts with...

Страница 74: ...ethod of playback As the paragraph 3 2 1 users put the curser to contents In the searched still Image Lists and press Button OK The screen of search list disappears and still image is played back as the paragraph 3 2 1 3 11 2 2 Screen of playing back Figure 3 56 Still Image of playing back 3 11 2 3 Control during Play back 3 11 2 3 1 Stop of play back To stop the playing back User press button STO...

Страница 75: ...cally from the recorded images in the system are played back The functions for Playback of backed up images screen during playback control during playback are same as those of Playback of Recorded images as the paragraph 3 11 1 3 12 Miscellaneous Menu Figure 3 57 Miscellaneous Menu This menu is to use the five functions that are placed only on the remote control but on the keypad of the unit 3 12 ...

Страница 76: ...splay It substitutes the OSD button on the remote control 3 12 3 Audio Mute Turns on off the audio It substitutes button on the remote control 3 12 4 HDD Displays the HDD information It substitutes the HDD button on the remote control 3 12 5 LOG Display the System Log It substitutes the LOG button on the remote control ...

Страница 77: ...or 16x1CH DVR QuickInstaller is a setup configuration template for quick easy multiple unit setup using RS 232 or network It can used to derive setting parameters of DVR system and to save setting parameters to DVR system 4 1 1 PC requirement minimum DirectX 8 0 Explorer 5 0 Video card memory 32MB memory Resolution 1024 x 768 4 2 Installation execution of program Please use DirectX 8 0 or newer ht...

Страница 78: ...CH 2CH 3CH 4CH Quad Quad Capture Quad Record button sound On Off volume adjustment Click to view program version and to upgrade DVR S W Time date indicator PC Hard disk information Live view or Playback mode indicator Connected DVR information indicator Pan Tilt Zoom Focus button DVR Connect button recording time setting button UniPlayer link button parameter setting button Full Screen button DVR ...

Страница 79: ...ess and port number Click Add to add the newly entered DVR information into the DVR list After selecting a DVR Name from the list and making changes click Modify to update the changes made to the item To remove an IP address DVR Name click and highlight the desired name then press the Delete button to remove Enter the correct password for either Admin or User for the target DVR Click Close to exit...

Страница 80: ...his screen will be phased out Under bad network transmission condition if users use selected channel pre allocated channel transmission will be better If users enter this icon again entered channel will appear Channel number 2 was turn off 4 3 4 UniPlayer link If you click this button on main menu UniPlayer program will be executed Regarding the UniPlayer program please refer to page 93 ...

Страница 81: ...s icon in the main menu full screen form appears If users press the key of ESC you will return to the selected screen 4 3 6 Program setup If users click this button in the main window window of program setup appears Capture a still image and select a folder where the image is recorded ...

Страница 82: ...urrence is on or off when motion detection or sensor icon activated Close the window without saving the setup Close the window after saving the setup 4 3 7 DVR recording It works as recording button of DVR system After logging in admin button will be activated Under recording mode at DVR red icon will be displayed at the top of right at the window DVR live viewing ...

Страница 83: ...83 UDR 204 C Operation manual Revision 3 0 DVR Recording mode 4 3 8 DVR playback search This button is used for playback search playback and backup functions for DVR and after logging in by admin ...

Страница 84: ...Previous research result will appears 4 3 9 DVR playback search Search data will appear list form if users push two buttons at DVR playback screen DVR search files will appear recording start end time channel and event information included Button for staring of backup With pushing selected channel start to playback Start to playback after pushing selected channel If do double click selected files ...

Страница 85: ...mode to playback mode Display playback picture derived from DVR system Button for reverse playback pause still reverse phase forward phase slow fast previous search next search Comeback playback mode to Live viewing mode Reverse playback button Playback button Temporarily pause button Still image button When user use temporarily pause image file move to backward ...

Страница 86: ...k next files of present viewing files 4 3 10 DVR backup DVR search files will appear recording start end time channel and event information included Indicator backup progress at backup Button for staring of backup With pushing selected channel start to backup Close DVR backup window After selecting a file at DVR backup list user can start to backup with pushing start button The destination of back...

Страница 87: ...easily It can be activated after logging in by admin 4 3 12 Still image Capture Yon can save playing image such as live viewing image DVR playback image into still image by capture Besides users can capture image by pushing capture button for each channel or push capture button at the foot of a screen Still image will be saved in a path frame directory established in RAMS s setup section screen If...

Страница 88: ...still image recording folder through setup menu among RAMS program 4 3 13 Watermark insertion Click the watermark checkbox then push the save button to save still image with watermark 4 3 14 Printing still image To print still image please push icon in capture screen 4 3 15 Motion picture recording With live viewing picture motion picture recording and saving at local PC User can record each chann...

Страница 89: ...recording option automatically close it With starting record button will be changed to button In order to stop recording users just push record button again record The recording destination is record directory installed in Program 4 3 16 D Zoom Button is only for viewing one channel Once users push this button and move to image screen mouse curser will change into cross shape And D Zoom button wil...

Страница 90: ...ed on pushing this icon Select hard disk It shows total capacity of HDD It shows the used capacity of HDD used It shows the capacity of HDD to be used It shows the capacity of HDD used and to be used Close the window 4 3 19 Check the program version Click UNIMO Logo to check program version or do S W upgrade of DVR system Display the name version of program ...

Страница 91: ...ade button in the program version check screen Select targeted files to upgrade Select targeted files saved in local PC Enter targeted DVR information such as DVR address Port user and password admin only Indicator of targeted file s transmission status Close upgrade window Transmit targeted files After that changed to upgraded cancel cancel of upgrade transmission Display status of SW Upgrade ...

Страница 92: ...r for playback progress rate Reverse playback playback still pause reverse phase forward phase slow fast Channel selection button 1CH 2CH 3CH 4CH Quad Panorama playback button Click the logo to check program version Uniplay s status Search list File path is displayed if selected at search list Button for user searching Button for directory based searching Retrieve button for watermark printing Qua...

Страница 93: ...wing of files users can access it 4 4 2 1 Search option from video image backup file Select whether recording files at RAMS Multiviewer or backup files Enter targeted recording date for search Enter targeted DVR name for search Enter targeted channel Enter keyword to classification to list Start to search accordingly Close search option window ...

Страница 94: ... manual Revision 3 0 If there is nothing to special condition for searching all files saved in recording folder will be displayed on search window after searched Search window after selected channel number 1 as search option ...

Страница 95: ... date for search Enter targeted DVR name for search Enter targeted channel Enter keyword to classification to list Start to search accordingly Close search option window If there is nothing to special condition for searching all still images saved in folder will be displayed on search window after searched ...

Страница 96: ...d date June 22 004 as search option 4 4 3 Searching by directory You can use it when you know the directory has AVI file or still image file It will be set up default directory at first After that users can choose their own directory than see all folder user want to save will be on the list CANCEL ...

Страница 97: ... 4 4 4 Still Image Capture Save replaying images into still image by capture Besides users can capture image by push capture button for each channel or push capture button at the foot of a screen Still image will be saved in a path of which is established in RAMS s setup section screen ...

Страница 98: ...h watermark 4 4 6 Printing still image To print still image please push the button in capture screen Then use this button in main page But In the motion picture state this button only is applicable to pause or temporarily pause mode 4 4 7 D Zoom Function Button is for only viewing one channel Once user push this button and move to image screen mouse cursor will change into cross shape And D Zoom b...

Страница 99: ...ntrol by click this button Play file quickly User can control by click this button 4 4 9 Water mark drawing When still image is display if push this button watermark will be drawn If you find other color except black white blue color image file must get damaged Push this button one more time reverts to original image state Still image Display screen Push this button water mark will be drawn ...

Страница 100: ... can see the panorama screen when you push this button while file playing Button will change into like this button And button can help user to view screen while control screen back and forth And click the one screen which is one of the 16 channel you can see 640x480 image If you want to come out of the panorama mode click button Then program will go back to former state ...

Страница 101: ...101 UDR 204 C Operation manual Revision 3 0 Screen in panorama mode ...

Страница 102: ...102 UDR 204 C Operation manual Revision 3 0 Image when click one screen in panorama mode 4 4 11 Check the program version Click Unimo logo to confirm version 4 4 12 Close Program Close UniPlayer program ...

Страница 103: ...ram login Insert program password If inserted password is right multiviewer runs Close program Modify program password After inserting current password change password confirm password accordingly changes program pass Closing window without changing Return to login window ...

Страница 104: ...for channel Connect Disconnect Capture Record Channel SCREEN Click on UNIMO logo to check the version of program Actual Time shows Information of Hard Disk of PC shows Button for dividing screen 4 screen 9 screen 16 screen Button for DVR list Full Screen Recording time Setting up link to UNI Player Button for Pan Tilt Zoom Focus Button for closing program ...

Страница 105: ...List management connection window appear DVR List that user recorded appears Input DVR name IP address domain name port Input id name Input id password Delete the information selected in DVR List Modify the information of DVR List Add the information in DVR List Connect to the selected DVR ID Close the screen after storing DVR List ...

Страница 106: ... screen If connection is impossible it displays error defectives on screen 4 5 4 Camera On Off In order to connect to DVR in the main screen please click button and select DVR and log in After connection please click one more time and DVR is disconnected ...

Страница 107: ...107 UDR 204 C Operation manual Revision 3 0 4 5 5 Full Screen Click the Full Screen button to open a screen in full view Press ESC to return 4 5 6 Program Setup Click to launch Setup ...

Страница 108: ...age among 4channels Check the image among 9 channels Close the Screen after storing the setup Cancel the Screen without storing the setup 4 5 7 Link with UniPlayer Click this button in the main screen to start Uniplayer Please refer to the UniPlayer section 4 5 8 PAN TILT ZOOM FOCUS These buttons are for PAN TILT ZOOM FOCUS of DVR After logging in by admin please select one channel 4 5 9 HDD Infor...

Страница 109: ...ws the used capacity of HDD It shows the free capacity of HDD It shows both the used capacity of HDD and free space Click to close the screen 4 5 10 Confirmation of Version of Program Click the UNIMO logo to check the program version 4 5 11 Closing of Program Click to close the Multiviewer program ...

Страница 110: ...on System parameter setting window is same form as Main menu used in DVR system Users can change DVR system parameter by entering each menu Main menu description File Open Read to display saved parameter values from DVR system 1 File Save Click to save setting parameter values as file 2 File Close Click to close program 3 System parameter Read parameters from DVR Derive to display setting paramete...

Страница 111: ...ble language 9 Information Click to display program version information 4 6 3 Communication over Network or serial port Click to open system parameter Write to DVR The below window will be activated on After Setting system parameters Derive system parameters from DVR Network mode as communication media Enter assigned network access password for Admin After authenticated users can communication bet...

Страница 112: ... one removable HDD Please note that the Jumper setting must be set to MASTER To Install a single HDD in the Removable Bay please follow these steps Prepare one HDD Verify the Jumper setting It must be set to Master Jumper Setting Master Open the cover of the Removable Bay Connect the HDD power cable and the Data signal cable Power Data Insert the HDD in the Rack and close the cover ...

Страница 113: ...n 3 0 Slide in the Removable Bay in to the DVR Lock the Removable Bay 5 1 2 Installing two hard disk drives The Jumper setting should be done as follows The Internal HDD Master The Removable Bay HDD Slave Mount the HDD in the internal slot ...

Страница 114: ...e removable HDD to Slave Follow the procedure as listed in paragraph1 1 1 of Appendix V 5 1 3 Installing CD RW drive To install the CD RW drive in the Removal Bay as backup purpose set the Jumper setting on the CD RW drive to Slave Mount the CD RW drive in the Removable Bay then connect to DVR system Once the CD RW drive has been firmly mounted in the DVR connect the power cable 4pin and the data ...

Страница 115: ...115 UDR 204 C Operation manual Revision 3 0 The CD RW drive installed in the DVR system ...

Страница 116: ...5 Transmit Data 9 Alarm Out Alarm Out NO 2 RS 485 RS 485 Transmit Data 10 Alarm Out Alarm Out COM 3 AUX1 11 Alarm Out Alarm Out NC 4 AUX2 Auxiliary In Port RSI ARI RONOFFI 12 Sensor1 5 AUX3 13 Sensor2 6 AUX4 14 Sensor3 7 AUX5 Auxiliary Out Port ARO RSTO ERRO DFO RSO 15 Sensor4 NO NC 8 GND Signal Ground Abbreviation RSI Record Start In RSTO Record Start Out RI Alarm Reset In ERRO Error Out RONOFFI ...

Страница 117: ... Brightness 9 Level Hue 9 Level Sharpness 9 Level Picture Setting Default Camera Setup Sequence Time 2 sec Record Type MUX MUX QUAD MUX 360 240 NTSC 360 288 PAL Resolution QUAD 720 480 NTSC 720 576 PAL Audio Sync NONE Channel No CH1 Quality FINE 4 Levels Frame Rate FPS 30 Record Setup Channel Record Mode MANUAL Channel No CH 1 Sensitivity 5 Level 8 Levels Motion Detection Setting Detection Zone AL...

Страница 118: ...isplay Setup Alpha Blending 4 Level 8 Levels DDNS Server1 211 104 85 235 Port 7100 DDNS Server2 221 139 14 109 DDNS Setup Port 7100 Admin 111111 Remote Connection Login Password User 111111 DDNS Link OFF Port 80 IP Address 192 168 1 200 Subnet Mask 255 255 255 0 Gateway 192 168 1 1 STATIC DNS IP 0 0 0 0 DHCP Port 80 Port 80 ID dvr Registered ID Password 111111 Registered PW Network Setup Network T...

Страница 119: ...acity Used Cap Total Cap Function EXTENSION HDD Setup Removable HDD Format Active HIGH LOW HIGH IN UNUSED Aux Port Function Out UNUSED Factory Default Ramdisk S W Upgrade Kernel Device HDD USB CD RW HDD Start Time Date Date of Yesterday Time Current Time End Time Date Date of Today Time Current Time Channel CH1 Event NONE Backup Format CD RW only Video Type Current Type NTSC PAL H W Version 1 3 XX...

Страница 120: ... Value Remarks Start Time Date Date of Yesterday Time Current Time End Time Date Date of Today Time Current Time Channel CH1 Search by Time Event NONE Still Image Search Start Time Date Date of Yesterday Time Current Time End Time Date Date of Today Time Current Time Channel CH1 Search Backup HDD Search Event NONE ...

Страница 121: ...kseq Sequence 18 kmulti Multi 19 klock Lock 20 kdvr DVR 21 ksearch Search 22 kmenu Menu 23 kup Up 24 kdown Down 25 kleft Left 26 kright Right 27 kok Ok 28 krplay R Play 29 kstop Stop 30 kplay Play 31 kpause Pause 32 kptz PTZ 33 kfrz Freeze 34 kzoom Zoom 35 kosd OSD 36 k4ch 4ch Devision 37 k6ch 6h Devision 38 k8ch 8h Devision 39 k16ch 16 Devision 40 kshold Shuttle Hold 41 ksr8 Shuttle Right 8Step 4...

Страница 122: ...eft Jog left 58 kjright Jog right 59 kpower Power 5 4 2 Usage System protocol to control UDR 204 from remote client software installed in PC or remote controller It maps button function of remote controller with front key in the front panel of UDR 204 If user add English letters assigned protocol paragraph and n new line and transmit ASCII Code form UDR 204 will be activated same as for user to pu...

Страница 123: ...195 0 1786 2 7 44 3 65 3 89 3 109 7 163 9 5 67 0 98 7 134 9 165 7 247 7 Super Fine 3 100 9 148 6 203 1 249 5 372 9 7 65 6 96 6 132 0 162 2 242 4 5 99 8 147 0 200 9 246 8 368 9 Fine 3 150 5 221 7 302 9 372 2 556 3 7 80 5 118 7 162 1 199 2 297 7 5 119 2 175 7 240 0 294 9 440 7 Enhanced 3 176 5 260 1 355 4 436 6 652 6 7 90 9 133 9 183 0 224 8 336 0 5 133 0 196 0 267 8 329 1 491 8 MUX 720 480 Normal 3...

Страница 124: ... 74 0 109 1 149 0 183 1 273 7 Super Fine 3 92 7 136 6 186 6 229 3 342 8 6 67 0 98 7 134 9 165 7 247 7 4 108 0 159 1 217 4 267 1 399 3 Fine 3 129 3 190 5 260 3 319 8 478 0 6 81 2 119 7 163 5 200 9 300 3 4 125 7 185 3 253 1 311 0 464 9 Enhanced 3 153 0 225 4 308 0 378 4 565 6 6 90 9 133 9 183 0 224 8 336 0 4 137 0 201 9 275 8 338 9 506 5 MUX 720 576 Normal 3 170 0 250 5 342 2 420 5 628 5 25 51 0 75 ...

Страница 125: ...125 UDR 204 C Operation manual Revision 3 0 UNIMO Technology Co Ltd 479 12 Bangbae 3Dong Seocho Gu Seoul KOREA 137 820 TEL 82 2 3470 4490 4499 FAX 82 2 581 3107 E Mail jsoh unimo co kr www unimo co kr ...

Отзывы: