background image

CAUTION

1.  Working Environment.

i. 

The environment in which this welding/cutting equipment is installed must be free of grinding dust, 

corrosive chemicals, flammable gas or materials etc., and at no more than a maximum of 80% humidity.

ii. 

When using the machine outdoors, protect the machine from direct sunlight, rainwater and snow, etc.; 

the temperature of the working environment should be maintained within -10°C to +40°C.

iii. 

Keep this equipment 30cm distant from the wall.

iv. 

Ensure the working environment is well ventilated.

2.  Safety Tips.

i.  Ventilation:

 This equipment is small-sized, compact in structure, and of excellent performance in 

amperage output. The fan is used to dissipate heat generated by this equipment during the welding/

cutting operation. Important: Maintain good ventilation of the louvres of this equipment. The minimum 

distance between this equipment and any other objects in or near the working area should be 30 cm. 

Good ventilation is of critical importance for the normal performance and service life of this equipment.

ii.  Thermal Overload Protection:

 Should the machine be used to an excessive level, or in a high-

temperature environment, poorly ventilated area or if the fan malfunctions the Thermal Overload Switch 

will be activated, and the machine will cease to operate. Under this circumstance, leave the machine 

switched on to keep the built-in fan working to bring down the temperature inside the equipment. The 

machine will be ready for use again when the internal temperature reaches a safe level.

iii. Over-Voltage Supply:

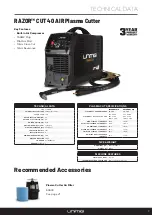
 Regarding the power supply voltage range of the machine, please refer to the 

“Main parameter” table. This equipment is of automatic voltage compensation, which enables the 

maintaining of the voltage range within the given range. In case that the voltage of input power supply 

amperage exceeds the stipulated value, it is possible to cause damage to the components of this 

equipment. Please ensure your primary power supply is correct.

iv. 

Do not come into contact with the output terminals while the machine is in operation. An electric shock 

may occur.

MAINTENANCE

Exposure to extremely dusty, damp, or corrosive air is damaging to the welding/cutting machine. To prevent 

any possible failure or fault of this welding/cutting equipment, clean the dust at regular intervals with clean 

and dry compressed air of required pressure.

Please note that: 

lack of maintenance can result in the cancellation of the guarantee; the guarantee of this 

welding/cutting equipment will be void if the machine has been modified, attempt to take apart the machine 

or open the factory-made sealing of the machine without the consent of an authorized representative of the 

manufacturer.

TROUBLESHOOTING

Caution: 

Only qualified technicians are authorized to undertake the repair of this welding/cutting equipment. 

For your safety and to avoid Electrical Shock, please observe all safety notes and precautions detailed in 

this manual.

SAFETY

6

Содержание RAZOR CUT 40 AIR

Страница 1: ...RAZOR CUT 40 AIR U14001K Operating Manual...

Страница 2: ...2...

Страница 3: ...THE BOX 10 GENERAL OPERATING TIPS 11 SETUP FOR INTERNAL AIR PLASMA CUTTING 12 SETUP FOR EXTERNAL AIR PLASMA CUTTING 15 PLASMA CUTTING TECHNOLOGY 19 PLASMA CUTTING TIPS TECHNIQUES 20 TORCH BREAKDOWN S...

Страница 4: ...ilated use fume extraction or ventilation to remove welding cutting fumes and gases In confined or heavy fume environments always wear an approved air supplied respirator Welding cutting fumes and gas...

Страница 5: ...can explode Because gas cylinders usually are part of the welding cutting process be sure to treat them carefully CYLINDERS can explode if damaged Protect gas cylinders from excessive heat mechanical...

Страница 6: ...to bring down the temperature inside the equipment The machine will be ready for use again when the internal temperature reaches a safe level iii Over Voltage Supply Regarding the power supply voltage...

Страница 7: ...CUT CURRENT RANGE 20 40A 20 40A PLASMA CUT DUTY CYCLE 40 C 25 40A 60 26A 100 20A 25 40A 60 26A 100 20A MILD STEEL CUT THICKNESS 10mm 16mm MILD STEEL SEVERANCE THICKNESS 12mm 20mm ALUMINIUM CUT THICKNE...

Страница 8: ...rload Power Error LED 7 Torch Error LED 8 Cutting Power LED 9 Plasma Torch Connection 10 Earth Clamp Connection 10 25 Dinse Rear Panel Layout 11 Air Pressure Regulator Knob 12 Air Pressure Regulator O...

Страница 9: ...rror LED Lights up when an issue with the torch system or air supply detected and cutting output is disabled as a result Flashing light means that the torch shield cap is not installed Continuous ligh...

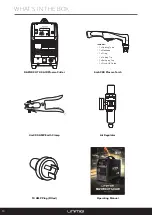
Страница 10: ...Clamp 15 AMP Plug Fitted 6m SC80 Plasma Torch Air Regulator Operating Manual RAZOR CUT 40 AIR KUMJRVC30 Operating Manual Includes 1 x Cooling Tube 1 x Electrode 1 x O ring 1 x Cutting Tip 1 x Retaini...

Страница 11: ...is below 90 20 C Preferably sit the machine some angles above the floor level the maximum angle does not exceed 15 Protect the machine against heavy rain AND against direct sunshine The content of dus...

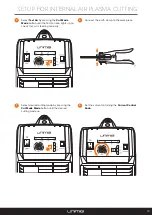
Страница 12: ...en the nut once connected to ensure a secure connection Connect the earth clamp to the positive dinse connection twist to lock in place Connect the plug into a 15 AMP socket then switch the machine ON...

Страница 13: ...s up to check that air is feeding correctly 6 Connect the earth clamp to the work piece 7 Select desired cutting mode by pressing the Cut Mode Mode button until the desired cutting mode up 8 Set the c...

Страница 14: ...ge of the plate start moving evenly in the direction you wish to cut 11 To finish the cutting release the torch switch The air flow will continue for 30 seconds to cool the torch head Do not disconnec...

Страница 15: ...to ensure a secure connection Connect the earth clamp to the positive dinse connection twist to lock in place Connect the plug into a 15 AMP socket then switch the machine ON Select EXTERNAL air supp...

Страница 16: ...Cut Mode Mode button until the Test Air icon lights up Lift the Air Pressure Regulator Knob then turn the knob until you reach an ideal reading of 0 5MPa 75psi Push the Air Pressure Regulator Knob dow...

Страница 17: ...ece Set the current to turning the Current Control Knob Select desired cutting mode by pressing the Cut Mode button until the desired cutting mode up Place and hold the torch vertical at the edge of t...

Страница 18: ...head Do not disconnect air until this cooling period has been completed Failure to do this will result in torch head damage Pull the trigger to energise the arc When the cutting arc has cut through th...

Страница 19: ...f a tough high conductive material such as hafnium and cerium This insert erodes with use also the tip orifice will erode with use Quality of the air used is paramount to longer life of electrodes and...

Страница 20: ...side of the cut to be on the finished piece you keep Torch tip height position The distance and position of the plasma torch cutting tip affect the quality of the cut and the extent of the bevel of th...

Страница 21: ...break down into oxygen and hydrogen which alters the regular chemical content of the air in the torch These elements will then dramatically change the plasma arc which causes the torch consumable par...

Страница 22: ...SC8020 10 Cutting Tip 1 0mm 40 50A PSC8020 13 Cutting Tip 1 3mm 70 80A 13 SC8030 Retaining Cup 14 SC8040 Stand Off Guide 15 SC8051 Cutting Buggy 16 PSC8026 10 Cutting Tip Contact 1 0mm PSC8026 11 Cutt...

Страница 23: ...17 6 6670 002 centrol socket 18 6 1520 001 A socket 19 7 3060 0705 fixing plate for front control pcb 20 6 4580 001 knob 21 6 2320 201 Switch 22 6 2320 001 Switch MACHINE SPARES 23 3 P628 4026 E Digit...

Страница 24: ...ed technician repair 5 Difficult Starting Worn torch parts consumables shut off input power Remove and inspect torch shield cup tip and electrode Replace electrode or tip if worn replace shield cup if...

Страница 25: ...NOTES 25...

Страница 26: ...NOTES 26...

Страница 27: ...NOTES 27...

Страница 28: ...E 180 Kerry Rd Archerfield QLD 4108 PH 07 3333 2855 FAX 07 3274 5829 EMAIL qld unimig com au VIC OFFICE 91 Yellowbox Drive Craigieburn VIC 3064 PH 03 8682 9911 FAX 03 9333 7867 EMAIL vicsales unimig c...

Отзывы: