background image

check

times

times

times

times

Amperage

The standard rule of thumb is the thicker the material, the more amperage required. On thick material, set the 

machine to full output and vary your travel speed. On thinner material, you need to turn down the amperage 

and change to a lower-amperage tip to maintain a narrow kerf. The kerf is the width of the cut material that is 

removed during cutting.

Speed

Amperage and speed are critical to producing a good quality cut. The faster you move (especially on 

aluminium), the cleaner your cut will be. To determine if you’re going too fast or too slow, visually follow 

the arc that is coming from the bottom of the cut. The arc should exit the material at a slight angle away 

from the direction of travel. If it’s going straight down, that means you’re going too slow, and you’ll have an 

unnecessary build-up of dross or slag. If you go too fast, it will start spraying back onto the surface of the 

material without cutting all the way through. Because the arc trails at an angle, at the end of a cut, slow your 

cutting speed and angle the torch in to cut through the last bit of metal.

Direction

It is easier to pull the torch towards you than push it. The plasma stream swirls as it exits the tip, biting one 

side and finishing off on the other, leaving a bevelled edge and a straight edge. The bevel cut effect is more 

noticeable on thicker material and needs to be taken into consideration before starting your cut as you want 

the straight side of the cut to be on the finished piece you keep.

Torch tip height & position

The distance and position of the plasma torch cutting tip affect the quality of the cut and the extent of the 

bevel of the cut. The easiest way to reduce bevel is by cutting at the proper speed and height for the material 

and amperage that is being cut.

Tip size and condition

The tip orifices focus the plasma stream to the workpiece. It is essential to use the correct size tip for the 

amperage being used, for example, a tip with a 1.0mm orifice is suitable for 0-40 amps whereas a 1.3mm 

orifice is better for 40-80 amps. The low-amp tip has a smaller orifice which maintains a narrow plasma stream 

at lower settings for use on thin-gauge material. Using a 25 amp tip at a 60 amp setting will blow out and 

distort the tip orifice and require replacement. Conversely, using an 80-amp tip on the lower settings will not 

allow you to focus the plasma stream as well and creates a wide kerf. The condition of the tip orifice is critical 

to the quality of the cut result, a worn or damaged tip orifice will produce a distorted plasma stream resulting 

in poor cut quality. 

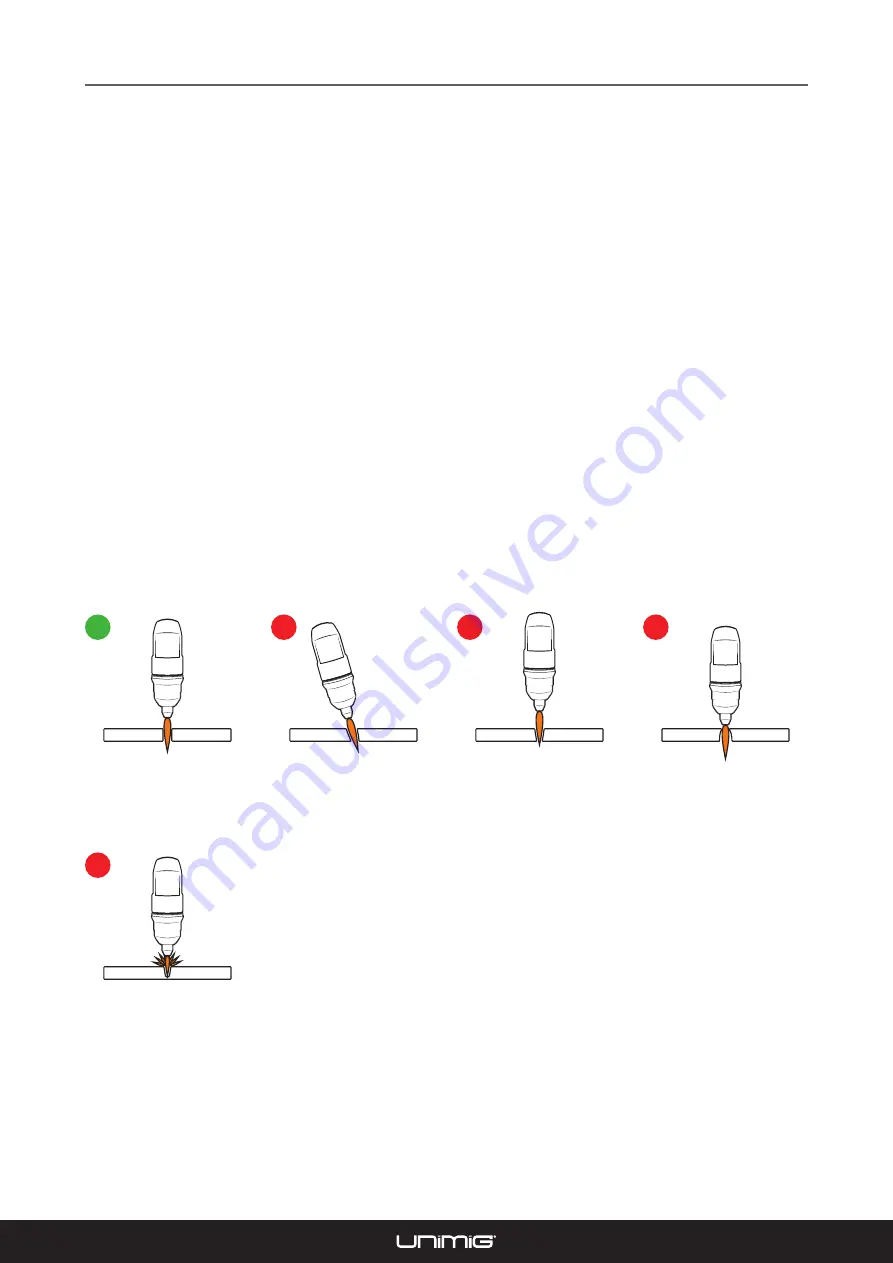
Correct torch height and 

square to the material. 

Minimum bevel & equal bevel 

Longest consumable life.

If sparks are spraying up from 

the work piece, you are moving 

the torch too fast, or you don’t 

have enough amps set.

Torch angled to the material. 

Unequal bevel, one side may 

be excessively bevelled.

Torch height too high. 

Excessive bevel, plasma 

stream may not cut all the way 

through the material.

Torch height too low. Reverse 

bevel. The tip may contact the 

work and short out or damage 

the tip.

PLASMA CUTTING TIPS & TECHNIQUES

20

Содержание RAZOR CUT 40 AIR

Страница 1: ...RAZOR CUT 40 AIR U14001K Operating Manual...

Страница 2: ...2...

Страница 3: ...THE BOX 10 GENERAL OPERATING TIPS 11 SETUP FOR INTERNAL AIR PLASMA CUTTING 12 SETUP FOR EXTERNAL AIR PLASMA CUTTING 15 PLASMA CUTTING TECHNOLOGY 19 PLASMA CUTTING TIPS TECHNIQUES 20 TORCH BREAKDOWN S...

Страница 4: ...ilated use fume extraction or ventilation to remove welding cutting fumes and gases In confined or heavy fume environments always wear an approved air supplied respirator Welding cutting fumes and gas...

Страница 5: ...can explode Because gas cylinders usually are part of the welding cutting process be sure to treat them carefully CYLINDERS can explode if damaged Protect gas cylinders from excessive heat mechanical...

Страница 6: ...to bring down the temperature inside the equipment The machine will be ready for use again when the internal temperature reaches a safe level iii Over Voltage Supply Regarding the power supply voltage...

Страница 7: ...CUT CURRENT RANGE 20 40A 20 40A PLASMA CUT DUTY CYCLE 40 C 25 40A 60 26A 100 20A 25 40A 60 26A 100 20A MILD STEEL CUT THICKNESS 10mm 16mm MILD STEEL SEVERANCE THICKNESS 12mm 20mm ALUMINIUM CUT THICKNE...

Страница 8: ...rload Power Error LED 7 Torch Error LED 8 Cutting Power LED 9 Plasma Torch Connection 10 Earth Clamp Connection 10 25 Dinse Rear Panel Layout 11 Air Pressure Regulator Knob 12 Air Pressure Regulator O...

Страница 9: ...rror LED Lights up when an issue with the torch system or air supply detected and cutting output is disabled as a result Flashing light means that the torch shield cap is not installed Continuous ligh...

Страница 10: ...Clamp 15 AMP Plug Fitted 6m SC80 Plasma Torch Air Regulator Operating Manual RAZOR CUT 40 AIR KUMJRVC30 Operating Manual Includes 1 x Cooling Tube 1 x Electrode 1 x O ring 1 x Cutting Tip 1 x Retaini...

Страница 11: ...is below 90 20 C Preferably sit the machine some angles above the floor level the maximum angle does not exceed 15 Protect the machine against heavy rain AND against direct sunshine The content of dus...

Страница 12: ...en the nut once connected to ensure a secure connection Connect the earth clamp to the positive dinse connection twist to lock in place Connect the plug into a 15 AMP socket then switch the machine ON...

Страница 13: ...s up to check that air is feeding correctly 6 Connect the earth clamp to the work piece 7 Select desired cutting mode by pressing the Cut Mode Mode button until the desired cutting mode up 8 Set the c...

Страница 14: ...ge of the plate start moving evenly in the direction you wish to cut 11 To finish the cutting release the torch switch The air flow will continue for 30 seconds to cool the torch head Do not disconnec...

Страница 15: ...to ensure a secure connection Connect the earth clamp to the positive dinse connection twist to lock in place Connect the plug into a 15 AMP socket then switch the machine ON Select EXTERNAL air supp...

Страница 16: ...Cut Mode Mode button until the Test Air icon lights up Lift the Air Pressure Regulator Knob then turn the knob until you reach an ideal reading of 0 5MPa 75psi Push the Air Pressure Regulator Knob dow...

Страница 17: ...ece Set the current to turning the Current Control Knob Select desired cutting mode by pressing the Cut Mode button until the desired cutting mode up Place and hold the torch vertical at the edge of t...

Страница 18: ...head Do not disconnect air until this cooling period has been completed Failure to do this will result in torch head damage Pull the trigger to energise the arc When the cutting arc has cut through th...

Страница 19: ...f a tough high conductive material such as hafnium and cerium This insert erodes with use also the tip orifice will erode with use Quality of the air used is paramount to longer life of electrodes and...

Страница 20: ...side of the cut to be on the finished piece you keep Torch tip height position The distance and position of the plasma torch cutting tip affect the quality of the cut and the extent of the bevel of th...

Страница 21: ...break down into oxygen and hydrogen which alters the regular chemical content of the air in the torch These elements will then dramatically change the plasma arc which causes the torch consumable par...

Страница 22: ...SC8020 10 Cutting Tip 1 0mm 40 50A PSC8020 13 Cutting Tip 1 3mm 70 80A 13 SC8030 Retaining Cup 14 SC8040 Stand Off Guide 15 SC8051 Cutting Buggy 16 PSC8026 10 Cutting Tip Contact 1 0mm PSC8026 11 Cutt...

Страница 23: ...17 6 6670 002 centrol socket 18 6 1520 001 A socket 19 7 3060 0705 fixing plate for front control pcb 20 6 4580 001 knob 21 6 2320 201 Switch 22 6 2320 001 Switch MACHINE SPARES 23 3 P628 4026 E Digit...

Страница 24: ...ed technician repair 5 Difficult Starting Worn torch parts consumables shut off input power Remove and inspect torch shield cup tip and electrode Replace electrode or tip if worn replace shield cup if...

Страница 25: ...NOTES 25...

Страница 26: ...NOTES 26...

Страница 27: ...NOTES 27...

Страница 28: ...E 180 Kerry Rd Archerfield QLD 4108 PH 07 3333 2855 FAX 07 3274 5829 EMAIL qld unimig com au VIC OFFICE 91 Yellowbox Drive Craigieburn VIC 3064 PH 03 8682 9911 FAX 03 9333 7867 EMAIL vicsales unimig c...

Отзывы: