background image

100psi Pneumatic 2 in 1 Nailer 


E&OE 

© 2017 Unimac 

2


Important Safety Instructions 

ENSURE THAT NO PART OF ANY HUMAN, ANIMAL OR CLOTHING IS PLACED IN/NEAR THE AREA 
WHERE NAILS ARE FIRED OUT OF THE GUN, REGARDLESS OF WHETHER YOU THINK THE GUN IS 
EMPTY OR LOADED WITH NAILS. 

When using pneumatic tools, basic safety precautions should always be followed to reduce the risk of personal 
injury. Please make certain that the person who is going to use this equipment carefully reads and understands 
these instructions before starting operations. 

READ AND FOLLOW ALL INSTRUCTIONS.  

There are certain applications for which this tool was designed. It is strongly recommended that this tool NOT be 
modified and /or used for any application other than for which it was designed. 

1. 

USE SAFETY GLASSES 

To prevent eye injuries, the tool operator and all persons in the 
work area must wear safety glasses with permanently-attached, 
rigid, plastic side shields. These safety glasses must conform to 
ANSI Z87.1 requirements (approved glasses have “Z87” printed 
or stamped on them). See Figure 1. 

2. 

WEAR EAR PROTECTION

 to safeguard against possible hearing 

loss. See Figure1. 

3. 

OPERATOR AND BYSTANDERS SHOULD WEAR HARD HATS

 to 

safeguard against possible injuries. See Figure1. 

4. 

USE CLEAN, DRY, REGULATED

 compressed air at 70 to 120 PSI, 

(4.8 to 8.3 BAR). See Figure 2. 

5. 

DO NOT CONNECT TOOL

 to pressure which potentially exceeds 

200 PSI (13.8BAR) 

6. 

ONLY USE AIR HOSE THAT IS RATED

 for a maximum working 

pressure of 150 PSI or 150% of the maximum system pressure, 
whichever is greater. 

7. 

NEVER USE OXYGEN, CARBON DIOXIDE

, combustible gases or 

any other bottled gas as a power source for this tool: explosion 
and serious personal injury could result. See Figure 3. 

8. 

CONNECT TOOL TO AIR SUPPLY HOSE

 with a coupling that 

removes all pressure from the tool when the coupling is 
disconnected. See Figure 4. 

9. 

DISCONNECT TOOL FROM AIR SUPPLY HOSE

 before doing tool 

maintenance, clearing a jammed fastener, leaving the work area, 
moving tool to another location, handing the tool to another 
person, or making adjustments. See Figure 5. 

10. 

NEVER USE A TOOL

 that is leaking air, has missing or damaged 

parts, or requires repair. Make sure that all screws and caps are 
securely tightened. 

11. 

DO NOT USE TOOL WITHOUT SAFETY WARNING LABEL

. If label 

is missing, damaged or unreadable, contact your Service Centre 
for a replacement. See Figure 6. 


Содержание NAL-FLOOR

Страница 1: ...017 READ THIS MANUAL CAREFULLY BEFORE USE AND KEEP FOR FUTURE REFERENCE FAILURE TO DO SO MAY RESULT IN INJURY PROPERTY DAMAGE AND MAY VOID WARRANTY Products covered by this manual may vary in appearan...

Страница 2: ...RUCTIONS 2 PRODUCT SPECIFICATIONS 4 OPERATING INSTRUCTIONS 4 Foreword 4 Power Source 4 Preparing the Tool 5 USING THE TOOL 6 Clearing a Jammed Fastener 7 MAINTENANCE 8 Clean and Inspect Daily 8 Servic...

Страница 3: ...to safeguard against possible hearing loss See Figure1 3 OPERATOR AND BYSTANDERS SHOULD WEAR HARD HATS to safeguard against possible injuries See Figure1 4 USE CLEAN DRY REGULATED compressed air at 7...

Страница 4: ...pointed away from yourself and others at all times Do not play around with the tool Respect the tool as a working implement See Figure 8 15 USE THE MALLET TO RACK THE WOOD STRIP NOT THE NAILER See Fig...

Страница 5: ...re regulator and an automatic oiler located as close to the tool as possible within 15 feet is ideal All compressed air contains moisture and other contaminates that are detrimental to internal compon...

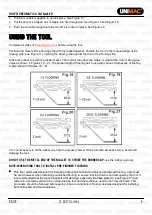
Страница 6: ...ng a jammed fastener leaving the work area handing the tool to another person or making adjustments Preparing the Tool 1 After reading and understanding this entire manual connect tool to air supply S...

Страница 7: ...of flooring nail to use with various thicknesses of flooring is also shown in Figures 18 21 It is not necessary to hit the rubber cap hard to activate it Never hit the tool with excessive force as th...

Страница 8: ...e tool to another person or making adjustments Clearing a Jammed Fastener 1 CAUTION Disconnect tool from air supply See Figure 22 2 Remove any remaining fasteners from the nailer a Pull the movable ma...

Страница 9: ...ain materials Purge excess oil first before you begin nailing Service and Repairs All quality tools eventually require servicing of replacement of parts due to wear from normal use Some user serviceab...

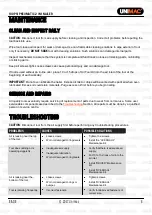
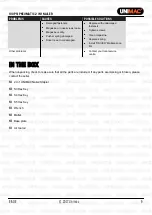
Страница 10: ...th undamaged fasteners Tighten screws Clean magazine Replace spring Install DRIVER Maintenance Kit Other problems Contact your local service centre In the Box When unpacking check to make sure that al...

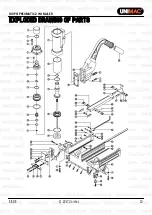
Страница 11: ...100psi Pneumatic 2 in 1 Nailer E OE 2017 Unimac 10 Exploded Drawing of Parts...

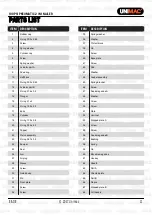
Страница 12: ...2 Actuator part B 46 Screw 13 O ring 57 4 x 3 5 47 Fixed magazine A 14 Plunger 48 Washer 15 O ring 21 x 2 49 Screw 16 O ring 14 2 x 2 5 50 Screw 17 Body 51 Plate 18 Cylinder 52 Limit nut 19 O ring 17...

Страница 13: ...hird party approval from a qualified specialist for your application before use regardless of any assurances from the retailer or its representatives This product is not intended for use where fail sa...

Отзывы: