background image

17

Using Your Radio

Changing display and sound options

Dimmer


Your radio has a dimmer function and the setting can be changed between Off, Low, 

Mid and High. Turn on the radio while pressing the 

INST

 key, the dimmer function will 

be switched High to Off, Off to Low, Low to Mid, Mid to High.

Turning the key beep on and off 

Key beep is the tone that sounds when you press a key or a button. 
Turn on the radio while pressing the 

CHANNEL UP 

or


CHANNEL DOWN

, the Key Beep 

function will be switched On or Off.

Press 

INST

 on a certain CH to toggle between the Instant CH and the previously 

selected channel. 
This key functions similar to the Emergency Channel 16CH and 67CH.
 

Note:
Pressing 

INST 

key


in Tripe / Dual Watch, or Scan Mode, these mode are canceled 

and Instant CH is called in normal RX mode.

Siren Out

Pressing 

S

IREN

 will activate the Siren Out function. This function will generate Siren 3 

times.
Press and hold 

S

IREN


to generate continuous Siren. To stop press any key. 

Содержание UM355

Страница 1: ...UM355 VHF Marine Radio For more exciting new products please visit our website Australia www uniden com au ...

Страница 2: ...titude and longitude from your GPS 7 State the nature of your distress e g are you sinking medical emergency man overboard on fire adrift etc 8 State the type of assistance you need medical towing pumps etc 9 Give number of persons aboard and conditions of any injured persons 10 Estimate present seaworthiness of your ship e g how immediate is the danger due to flooding or fire or proximity to shor...

Страница 3: ... 15 Setting the volume 15 Setting the squelch level 15 Changing the channel 15 Making a transmission 16 Boosting the transmission power 16 Instant Channel 16 Siren Out 17 Changing display and sound options 17 Dimmer 17 Turning the key beep on and off 17 Installing the Hardware 18 Mounting the radio 18 Installing flush mount bracket 20 Connecting the radio 21 Connecting accessories 23 Connecting to...

Страница 4: ...el connector functions 8 Table 3 Microphone button functions 9 Table 4 Radio specifications 26 Table 5 International Channel Frequencies and Channel Tag 29 Table 6 USA Channel Frequencies and Channel Tag 31 Table 7 Canadian Channel Frequencies and Channel Tag 33 List of Tables ...

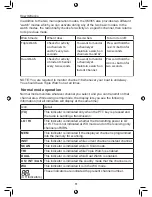
Страница 5: ...tery voltage goes too high or too low Triple Watch Operation Checks the emergency channel 16 and channel 67 in the background All marine VHF channels for the International U S and Canadian waters Siren Out Instant Channel Weather Mode One Touch 16 67 channel Manual overview Conventions This manual uses several different type styles to help you distinguish between different parts of the radio BOLD ...

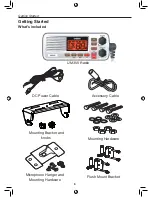
Страница 6: ...Getting Started 6 What s included UM355 Radio DC Power Cable Accessory Cable Mounting Bracket and knobs Mounting Hardware Microphone Hanger and Mounting Hardware Flush Mount Bracket Getting Started ...

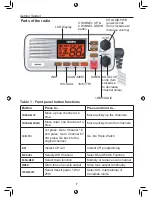
Страница 7: ... into Triple Watch inst Instant CH call Instant CH programming WX DUAL Selecty WX Channel Select Dual Watch Function scan mem Select Scan function Memory or remove scan channel SIREN Siren tone one cycle output Siren tone output continually 1W 25w UIC Select transit power 1W or 25W Select US International or Canadian mode INST WX DUAL SCAN MEM 16 67 TRI 1W 25W UIC SIREN SQUELCH knob turn clockwise...

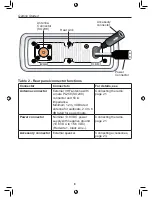
Страница 8: ... Ω impedance Minimum 1 2m 3dB rated antenna for sailboats 2 4m 6 dB rated for power boats Connecting the radio page 21 Power connector Nominal 13 8 VDC power supply with negative ground 10 8 VDC to 15 6 VDC Red wire black wire Connecting the radio page 21 Accessory connector External speaker Connecting accessories page 23 Antenna Connector SO238 Heat sink Accessory connector Power Connector ...

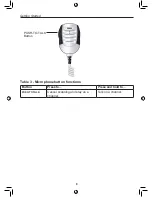
Страница 9: ...9 Getting Started Table 3 Microphone button functions Button Press to Press and hold to PUSH TO TALK Cancel scanning and stay on a channel Talk on a channel PUSH TO TALK Button ...

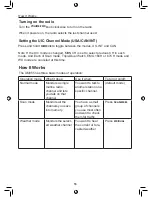
Страница 10: ...ecific channel default mode Scan mode Monitors all the channels you save into memory You have a small group of channels you use most often and want to check them for traffic Press SCAN MEM Weather mode Monitors the select ed weather channel You want to hear the current or fore casted weather Press WX DUAL Setting the UIC Channel Mode USA CAN INT Press and hold 1W 25W UIC to toggle between the mode...

Страница 11: ...ton for two seconds Dual Watch Checks for activity on Instant Channel every two seconds You want to monitor a channel yet maintain a watch on Instant Channel Press and hold the button for seconds WX DUAL two Normal mode operation Icon Detail TX This indicator is indicated only when the PTT key is pressed and the radio is sending a transmission LO HI This indicator is indicated whether the transmit...

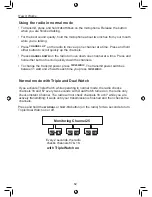
Страница 12: ...hange the transmit power press 1W 25W UIC The transmit power switches between 1 watt and 25 watts each time you press 1W 25W UIC 67 16 67 16 67 16 Every 2 seconds the radio checks channels 67 16 with Triple Watch on Monitoring Channel 25 Press and hold the WX DUAL or 16 67 TRI button on the radio for two seconds to turn Triple Dual Watch on or off Normal mode with Triple and Dual Watch If you acti...

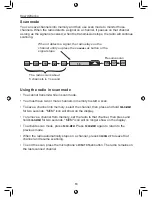
Страница 13: ...n scan mode You cannot transmit while in scan mode You must have two or more channels in memory to start a scan To save a channel into memory select the channel then press and hold SCAN MEM for two seconds MEM icon will show on the display To remove a channel from memory set the radio to that channel then press and hold SCAN MEM for two seconds MEM icon will no longer show on the display To activa...

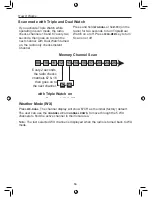
Страница 14: ... on or off Press SCAN MEM key to turn Scan on or off 67 16 Every 2 seconds the radio checks channels 67 16 then goes on to the next channel with Triple Watch on Memory Channel Scan 08 25 24 17 15 14 13 12 11 10 20 Reversed 16 67 UJ SW 20061215 17 Weather Mode WX Press WX DUAL The channel display will show 67CH as the initial factory default The user can use the CHANNEL UP or CHANNEL DOWN to move t...

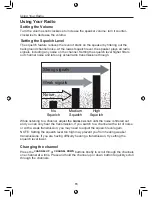
Страница 15: ...h Weak signals No Squelch Medium Squelch High Squelch Strong signals Noise While listening to a channel adjust the SQUELCH knob until the noise is filtered out and you can only hear the transmission If you switch to a channel with a lot of noise or with a weak transmission you may need to adjust the squelch level again NOTE Setting the squelch level too high may prevent you from hearing weaker tra...

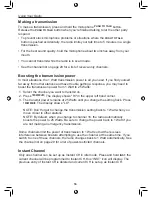
Страница 16: ...nt to transmit on 2 Press 1W 25W UIC The display shows HI in the upper left hand corner 3 The transmit power remains at 25 Watts until you change the setting back Press 1W 25W UIC The display shows LO NOTE Don t forget to change the transmission setting back to 1 Watt when you move closer to other stations NOTE By default when you change to channel 16 the radio automatically boosts the power to 25...

Страница 17: ...tton Turn on the radio while pressing the CHANNEL UP or CHANNEL DOWN the Key Beep function will be switched On or Off Press INST on a certain CH to toggle between the Instant CH and the previously selected channel This key functions similar to the Emergency Channel 16CH and 67CH Note Pressing INST key in Tripe Dual Watch or Scan Mode these mode are canceled and Instant CH is called in normal RX mo...

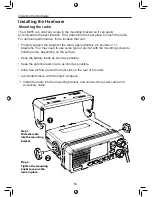
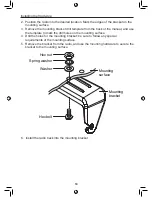
Страница 18: ...ay need to use some type of anchor with the mounting screws to hold the radio depending on the surface Keep the battery leads as short as possible Keep the antenna lead in wire as short as possible Allow free air flow around the heat sink on the rear of the radio Avoid interference with the ship s compass Installing the Hardware 1 Install the radio into the mounting bracket and connect the power c...

Страница 19: ...edges of the bracket on the mounting surface 3 Remove the mounting bracket drill template from the back of the manual and use the template to mark the drill holes on the mounting surface 4 Drill the holes for the mounting bracket be sure to follow any special requirements of the mounting surface 5 Remove the bracket from the radio and use the mounting hardware to secure the bracket to the mounting...

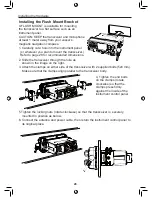
Страница 20: ...he transceiver and microphone at least 1 meter away from your vessel s magnetic navigation compass 3 Attach the clamps on either side of the transceiver with 2 supplied bolts 5x8 mm Make sure that the clamps align parallel to the transceiver body 5 Tighten the locking nuts rotate clockwise so that the transceiver is securely mounted in position as below 6 Connect the antenna and power cable then r...

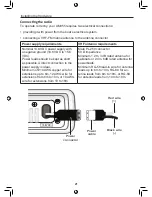
Страница 21: ...ower leads should be kept as short as possible A direct connection to the power supply is ideal Minimum of 14 AWG copper wire for extensions up to 6m 12 AWG wire for extensions from 6m to 10m or 10 AWG wire for extensions from 10 to 18m Male PL 259 connector 50 Ω impedance Minimum 1 2m 3 dB rated antenna for sailboats or 2 4m 6dB rated antenna for powerboats Minimum RG 58 lead in wire for antenna ...

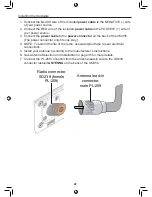
Страница 22: ... UM355 The power connector only fits one way 4 NOTE To extend the life of the radio use waterproof tape to seal electrical connections 5 Install your antenna according to the manufacturer s instructions 6 See Antenna Selection and Installation on page 35 for more details 7 Connect the PL 259 connector from the antenna lead in wire to the SO238 connector labeled AnTEnnA on the back of the UM355 Rad...

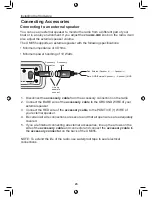
Страница 23: ...f the accessory cable to the GROUND WIRE of your external speaker 3 Connect the RED wire of the accessory cable to the POSITIVE WIRE of your external speaker 4 Be certain all wire connections are secure and that all open wires are adequately covered 5 If you are finished connecting all external accessories line up the arrows on the side of the accessory cable and connector and connect the accessor...

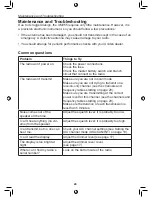
Страница 24: ...in scan mode Make sure you are not trying to transmit on a receive only channel see the channels and frequency tables starting on page 29 Make sure you are transmitting at the correct power level for this channel see the channels and frequency tables starting on page 29 Make sure the duration of each transmission is less than 5 minutes Noise comes out of the speaker all the time Adjust the squelch...

Страница 25: ... noise However in some installations it may be necessary to take measures to further reduce the effect of noise interference The UM355 radio DC battery wires antenna lead and accessory cables should be routed away from the engine and engine compartment and from power cabling carrying high currents In severe cases of noise interference it may be necessary to install a noise suppression kit Contact ...

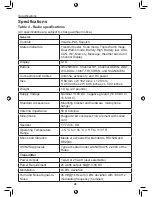
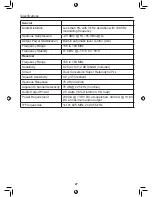
Страница 26: ...ches x L 5 04 inches Weight 1 0 kg 2 2 pounds Supply Voltage Nominal 13 8V DC negative ground 10 8 VDC to 15 6 VDC Standard Accessories Mounting bracket and hardware microphone hanger Antenna Impedance 50 Ω nominal Microphone Rugged 2 kΩ condenser mic element with coiled cord Speaker 1 77 inch 8 Ω Operating Temperature Range 15 C to 55 C 5 F to 131 F Shock and Vibration Meets or exceeds EIA standa...

Страница 27: ...Stability 1 5kHz 15 C to 55 C Receiver Frequency Range 156 to 163 MHz Sensitivity 0 25 μV for 12 dB SINAD nominal Circuit Dual Conversion Super Heterodyne PLL Squelch Sensitivity 0 2 μV Threshold Spurious Response 75 dB nominal Adjacent Channel Selectivity 78 dB 25 kHz nominal Audio Output Power 2 5 watts 10 Distortion 8 Ω load Power Requirement 230mA 13 8V DC at squelched 440 mA 13 8V DC at maxim...

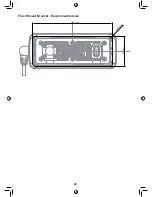
Страница 28: ...28 Flush Mount Bracket Recommended size ...

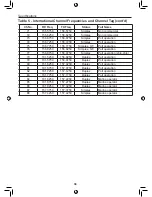
Страница 29: ...Safety Calling 17 156 8500 156 8500 Simplex 1W Govt maritime control 18 161 5000 156 9000 Duplex Port operation 19 161 5500 156 9500 Duplex Commercial 20 161 6000 157 0000 Duplex Port operation 21 161 6500 157 0500 Duplex Port operation 22 161 7000 157 1000 Duplex Port operation 23 161 7500 157 1500 Duplex Marine operator 24 161 8000 157 2000 Duplex Marine operator 25 161 8500 157 2500 Duplex Mari...

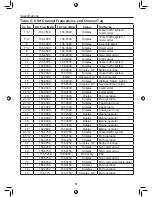
Страница 30: ...peration ship ship 78 161 5250 156 9250 Duplex Port operation 79 161 5750 156 9750 Duplex Port operation 80 161 6250 157 0250 Duplex Port operation 81 161 6750 157 0750 Duplex Port operation 82 161 7250 157 1250 Duplex Port operation 83 161 7750 157 1750 Duplex Port operation 84 161 8250 157 2250 Duplex Marine operator 85 161 8750 157 2750 Duplex Marine operator 86 161 9250 157 3250 Duplex Marine ...

Страница 31: ...cial 19 A 156 9500 156 9500 Simplex Commercial 20 161 6000 157 0000 Duplex Port operation 20 A 157 0000 157 0000 Simplex Port operation 21 A 157 0500 157 0500 Simplex Coast guard only 22 A 157 1000 157 1000 Simplex Coast guard 23 A 157 1500 157 1500 Simplex Coast guard only 24 161 8000 157 2000 Duplex Marine operator 25 161 8500 157 2500 Duplex Marine operator 26 161 9000 157 3000 Duplex Marine op...

Страница 32: ...ation 77 156 8750 156 8750 Simplex 1W Port operation ship ship 78 A 156 9250 156 9250 Simplex Non commercial 79 A 156 9750 156 9750 Simplex Commercial 80 A 157 0250 157 0250 Simplex Commercial 81 A 157 0750 157 0750 Simplex Government 82 A 157 1250 157 1250 Simplex Government 83 A 157 1750 157 1750 Simplex Coast guard 84 161 8250 157 2250 Duplex Marine operator 85 161 8750 157 2750 Duplex Marine o...

Страница 33: ...Simplex 1W State control 18 A 156 9000 156 9000 Simplex Commercial 19 A 156 9500 156 9500 Simplex Canadian coast guard 20 161 6000 157 0000 Duplex 1W Port operation 21 A 157 0500 157 0500 Simplex Canadian coast guard 22 A 157 1000 157 1000 Simplex Canadian coast guard 23 161 7500 157 1500 Duplex Marine operator 24 161 8000 157 2000 Duplex Marine operator 25 161 8500 157 2500 Duplex Marine operator...

Страница 34: ...plex Inter ship 81 A 157 0750 157 0750 Simplex Canadian coast guard 82 A 157 1250 157 1250 Simplex Canadian coast guard 83 161 7750 157 1750 Duplex Canadian coast guard 83 A 157 1750 157 1750 Simplex Canadian coast guard 84 161 8250 157 2250 Duplex Marine operator 85 161 8750 157 2750 Duplex Marine operator 86 161 9250 157 3250 Duplex Marine operator 87 157 3750 157 3750 Simplex Port operation 88 ...

Страница 35: ...ed with this radio should be installed using the following guidelines to ensure a safe distance between the antenna and persons close by Small whip antennas 3 dB or smaller should be installed with at least 1m away from any area where people are likely to be Larger antennas 6 dB or 9 dB should be installed with at least 2m away While the radio is transmitting do not come closer to the antenna than...

Страница 36: ...ion phone numbers addresses and images that may be stored on your Product Statement of Remedy If the Product is found not to conform to this warranty as stated above the Warrantor at its discretion will either repair the defect or replace the Product without any charge for parts or service This warranty does not include any reimbursement or payment of any consequential damages claimed to arise fro...

Страница 37: ... Bracket Template 22 mm 0 87 in 7 8 156 mm 6 14 in 6 5 32 5 5 mm 0 2 in 7 32 18 5 mm 0 73 in 3 4 22 mm 0 87 in 7 8 36 mm 1 42 in 1 7 16 40 mm 1 6 in 1 9 16 15 5 mm 0 61 in 5 8 53 mm 2 1 in 2 3 32 8 mm 0 31 in 5 16 ...

Страница 38: ...38 ...

Страница 39: ...39 ...

Страница 40: ... 2014 Uniden Australia Pty Limited Printed in Vietnam U01UT651ZZZ 0 ...

Отзывы: