background image

UNIDEN Model UH400SX, UH400SX-RM, UH500SX, UH500SX-RM OM

29

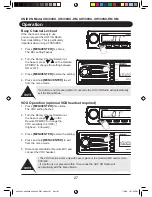
Beep On/Off

1.   Press 

[MENU/ENTER]

 seven times. The  

 Beep 

setting 

fl

 ashes.

2.   Turn the Rotary Channel Selector at the    
 

base or press

 on the Remote  


SPK/MIC to  


change the setting between ON or OFF.

3.   Press 

[MENU/ENTER] 

to store the 

 setting.

4.   Press and hold

 [MENU/ENTER]

 to exit    


from the menu mode.

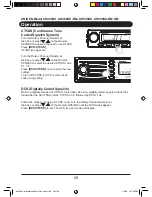
Back Light

1.   Press

 [MENU/ENTER] 

eight times. The   

 Backlight 

setting 

fl

 ashes.

2.   Turn the Rotary Channel Selector at the    
 

base or press 

 on the Remote  


SPK/MIC to change the setting between   


OFF, LO and HI.

3.   Press 

[MENU/ENTER]

 to store the 

 setting.

4.   Press and hold 

[MENU/ENTER]

 to exit    


from the menu mode.

Operation

uh400sx, uh500sx, uh400sx-RM, uhSec1:29   Sec1:29

uh400sx, uh500sx, uh400sx-RM, uhSec1:29   Sec1:29

1/2/08   1:31:29 PM

1/2/08   1:31:29 PM

Содержание UH400SX

Страница 1: ...400SX UH400SX RM UH500SX UH500SX RM OM I OWNER S MANUAL UHF RADIO TRANSCEIVER UH400SX UH400SX RM UH500SX UH500SX RM uh400sx uh500sx uh400sx RM uhI I uh400sx uh500sx uh400sx RM uhI I 1 2 08 1 31 20 PM 1 2 08 1 31 20 PM ...

Страница 2: ...UNIDEN Model UH400SX UH400SX RM UH500SX UH500SX RM OM II uh400sx uh500sx uh400sx RM uhII II uh400sx uh500sx uh400sx RM uhII II 1 2 08 1 31 21 PM 1 2 08 1 31 21 PM ...

Страница 3: ...all Function 20 Dual Watch 20 Using Repeater Channels 21 Operating the UHF CB Radio in Duplex Mode 22 Scanning 22 Open Scan OS Mode 23 Group Scan GS Mode 23 Priority Watch 24 Add Remove Channels from SCAN Memory 24 40 RX Channels 25 Manual Programming 25 Deleting a programmed RX Channel frequency 25 Selecting the Call tone 26 Roger Beep 26 Busy Channel Lockout 27 VOX Operation optional VOX headset...

Страница 4: ...UNIDEN Model UH400SX UH400SX RM UH500SX UH500SX RM OM 2 uh400sx uh500sx uh400sx RM uhSec1 2 Sec1 2 uh400sx uh500sx uh400sx RM uhSec1 2 Sec1 2 1 2 08 1 31 21 PM 1 2 08 1 31 21 PM ...

Страница 5: ...aker Signal Strength Power Meter Instant Channel Programming One touch Instant Channel recalling Dual Watch with Instant Channel Duplex Capability from CH01 CH08 per channel Group Scan and Priority Channel Watch Open Scan Scan Channel Memory On Off separately with Open Scan Group Scan Rotary Channel Select Busy Channel Lock out Function Roger Beep Function On Off 5 Different Call Tones 38 Built in...

Страница 6: ...ontrol setting Be sure the SQUELCH is adjusted properly Possibly the radio is over squelched If there is trouble with transmitting Check that the transmission line coaxial cable is securely connected to the ANTENNA connector Check that the antenna is fully extended for proper operation Check that all transmission line coaxial cable connections are secure and free of corrosion Blackening may occur ...

Страница 7: ... Channels 1 2 3 4 5 SCAN Scan On Off OS GS Open or Group Scan Liquid Crystal Display LCD SQ Rotary Squelch control VOL Rotary Volume control ON OFF On Off PUSH control MIC Front Microphone Jack 6 7 8 9 10 Controls Connectors UH400SX Front View UH500SX Front View 1 2 3 4 5 6 7 8 9 10 1 2 3 4 5 6 7 8 9 10 uh400sx uh500sx uh400sx RM uhSec1 5 Sec1 5 uh400sx uh500sx uh400sx RM uhSec1 5 Sec1 5 1 2 08 1 ...

Страница 8: ...X Rear View UH500SX Rear View Connectors 11 Power Input Connection 13 8VDC 12 Ext Speaker Jack 13 Rear MIC Jack 14 UHF Antenna Connection 11 12 14 13 11 12 14 13 uh400sx uh500sx uh400sx RM uhSec1 6 Sec1 6 uh400sx uh500sx uh400sx RM uhSec1 6 Sec1 6 1 2 08 1 31 22 PM 1 2 08 1 31 22 PM ...

Страница 9: ...4 VOL Volume Up Button for Remote SPK MIC 25 VOL Volume Down Button for Remote SPK MIC 26 POWER Power ON OFF Button 27 SQL Auto Squelch MON Monitor Button 28 DCS CTCSS DCS CTCSS Button DUAL Dual Watch Button 29 Select Up and Down Buttons 30 RJ45 type plug 31 Front MIC Jack Cover Remote LCD Speaker Microphone Remote SPK MIC optional accessory included with UH400SX RM UH500SX RM 17 18 19 20 23 24 25...

Страница 10: ...s 15 CALL Call Tone Button 16 INST Instant Channel Button 17 PTT Push To Talk Button 21 MICROPHONE 30 RJ45 type plug 31 Front MIC Jack Cover Standard Microphone 15 16 17 30 31 21 uh400sx uh500sx uh400sx RM uhSec1 8 Sec1 8 uh400sx uh500sx uh400sx RM uhSec1 8 Sec1 8 1 2 08 1 31 22 PM 1 2 08 1 31 22 PM ...

Страница 11: ...smit 12 Signal Power Level 13 CTCSS Continuous Tone Coded Squelch System 14 BCL Busy Channel Lockout 15 VOX Voice Operated Microphone 16 DCS Digital Coded Squelch 17 MON Monitor 18 RSQ Remote Mic Squelch 19 SQT Tight Squelch Level 20 BUSY Channel Active 21 DUP Duplex Channel 22 CALL Call Tone Indicators Indicators 1 5 6 7 9 10 2 3 4 14 13 12 11 21 20 19 16 15 17 18 8 7 4 14 17 2 11 10 20 18 22 16 ...

Страница 12: ... E Sleeve DIN E rubber ring and keys for vehicle installation UH500SX and UH500SX RM models only Mounting Bracket Mounting Screws Washer Stars And Screws UH500SX and UH500SX RM models only Mounting Bracket Mounting Screws Washer Stars And Screws UH400SX and UH400SX RM models only OWNER S MANUAL UHF RADIO TRANSCEIVER UH400SX UH400SX RM UH500SX UH500SX RM uh400sx uh500sx uh400sx RM uhSec1 10 Sec1 10...

Страница 13: ...peaker MS100 DIN Mounting Kit DMK8990 for compact models Remote LCD Speaker Microphone RM100 Extension cable kit RM100 EC100 VOX Headset VM091 Optional Accessories uh400sx uh500sx uh400sx RM uhSec1 11 Sec1 11 uh400sx uh500sx uh400sx RM uhSec1 11 Sec1 11 1 2 08 1 31 25 PM 1 2 08 1 31 25 PM ...

Страница 14: ...e cabinet sides near the front of the UH500SX Fit the supplied DIN E rubber ring in it s place When fitted the rubber ring will act as a seal against the DIN E sleeve At the left and right sides of the ring there will be a slot space The slots in the fitted DIN E Rubber Ring will enable proper removal of radio from the DIN E sleeve 5 Before inserting the UH500SX in the sleeve attach the cable from...

Страница 15: ...oth Removal Keys straight into the slot spaces provided by the DIN E rubber ring on the left and the right edges of the radio s dress panel You cannot remove the radio if only one key is available Press in fully and the radio will unlock from the sleeve making withdrawal from the sleeve possible Store the keys in a safe place for future use DIN E Installation UH500SX UH500SX RM Only uh400sx uh500s...

Страница 16: ...r left UH400SX side of the MIC plug and push it upwards UH500SX or to the right UH400SX At the same time tug on the MIC cord to draw back the MIC plug REAR MIC JACK Use the Rear MIC Jack if the main base is mounted where a front MIC connection is intrusive or if you wish to use the Remote LCD Speaker MIC with an optional extension cable Peel the dust cover from the rear MIC jack Push the MIC plug ...

Страница 17: ...ix the MIC Hanger into place with screws Conventional Mounting with Double Sided Tape not supplied High quality Double Sided tape can be found at good retail stores Secure the front and back pieces of the MIC Hanger using the supplied binding screws Locate a suitable mounting position Apply high quality Double Sided tape onto the flat area of the MIC Hanger back piece and then press firmly to the ...

Страница 18: ... large enough 13mm min to allow for the MIC plug of the microphone to fit through Feed RJ45 MIC plug through the hole and connect to the optional Extension Cable Connect the other end of the Extension Cable to a MIC Jack on the radio Mount the MIC Hanger using the Screw single part or Double Sided Tape two part option described on the previous page making sure the MIC Hanger is centred over the ho...

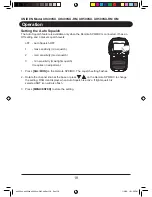
Страница 19: ...uelch control as a gate If you turn Squelch fully clockwise it raises the Squelch gate so high that no signals get through If you turn the Squelch fully counterclockwise it lowers the Squelch Gate to the extent that all signals get through weak medium and strong signals and noise To set the Squelch Gate to the desired level turn the squelch knob counterclockwise until you hear noise Then carefully...

Страница 20: ...3 min sensitivity max tight squelch It requires no adjustment 1 Press SQL MON on the Remote SPK MIC The squelch setting flashes 2 Rotate the channel knob at the base or press on the Remote SPK MIC to change the setting RSQ icon displays when Auto Squelch is active If tight squelch is selected SQT icon will also flash 3 Press MENU ENTER to store the setting Operation uh400sx uh500sx uh400sx RM uhSe...

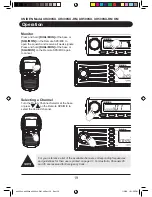
Страница 21: ...cancel Selecting a Channel Turn the Rotary Channel Selector at the base or press on the Remote SPK MIC to select the desired channel For your reference a list of the available channels corresponding frequencies and guidelines for their use is printed on page 31 For Australia Channels 05 and 35 are reserved for Emergency Calls Operation uh400sx uh500sx uh400sx RM uhSec1 19 Sec1 19 uh400sx uh500sx u...

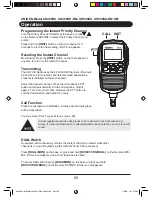
Страница 22: ...Release the PTT button to end the transmission and listen for a reply Call Function Press the microphone Call Button A three second ringing tone will be transmitted You may select from 5 types of tones see p 26 Current regulations require calling tones to be restricted to one transmission per minute If a second transmission is attempted within one minute then an error tone will sound DUAL Watch Du...

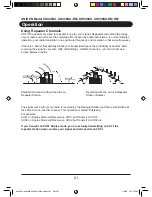
Страница 23: ...es etc tend to act as a screen between radios Standard Operation without the aid of a Operation with the aid of a Repeater Repeater Station Station Duplex The signal coming from your radio is received by the Repeater Station and the re transmitted at the same time on another channel This operation is called Duplexing For example CH01 on Duplex Mode will Receive on CH01 but Transmit on CH31 CH02 on...

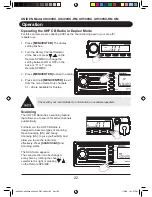
Страница 24: ...1 08 are available for Duplex Check with your local Retailer for information on available repeaters Scanning The UHF CB Radio has a scanning feature that allows you to search for active channels automatically Furthermore the UHF CB Radio is designed to have two types of scanning Open Scanning OS and Group Scanning GS to give you flexibility and allow you to use the radio more effectively Press SCA...

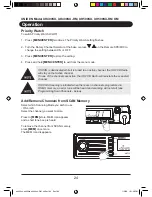
Страница 25: ...ed by the absence of the GS icon Group Scan GS Mode Includes the accessory feature Priority Watch which allows you to monitor the Instant Priority Channel while scanning see p 20 for setting Instant Priority Channel and p 24 to turn on Priority Watch To use GS Mode Scanning press and hold SCAN OS GS GS icon appears on the display GS Scanning checks the Instant Priority Channel for activity regular...

Страница 26: ...channel If none of the channels are active the UHF CB Radio will reinstate the scan start channel If OS GS Scanning is initiated when there are no channels programmed in OS GS memory an error tone will be heard and scanning will not start see Programming Scan Channels below Add Remove Channels from SCAN Memory Select which Scanning Mode you wish to use OS or GS Select the channel you want to store...

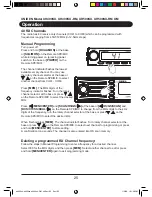
Страница 27: ...s MENU ENTER and SCAN OS GS at the base or OS GS SCAN and DCS CTCSS DUAL on the Remote SPK MIC to change from the MHz digits to the kHz digits of the frequency turn the rotary channel selector at the base or press on the Remote SPK MIC to select the desired kHz When finished press MEM The channel indictor flashes Turn rotary channel selector at the base or press on the Remote SPK MIC to select nex...

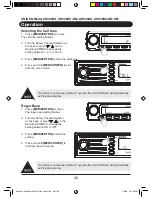
Страница 28: ...hin 10 seconds the UHF CB Radio will automatically exit the Menu Mode Roger Beep 1 Press MENU ENTER six times The roger beep setting flashes 2 Turn the Rotary Channel Selector at the base or press on the Remote SPK MIC to change the setting between ON or OFF 3 Press MENU ENTER to store the setting 4 Press and hold MENU ENTER to exit from the menu mode If a button is not pressed within 10 seconds t...

Страница 29: ...l automatically exit the Menu Mode VOX Operation optional VOX headset required 1 Press MENU ENTER three times The VOX setting flashes 2 Turn the Rotary Channel Selector at the base or press on the Remote SPK MIC to change the VOX sensitivity oF OFF 1 highest 9 lowest 3 Press MENU ENTER to store the setting 4 Press and hold MENU ENTER to exit from the menu mode 5 Disconnect standard or Remote MIC a...

Страница 30: ...store the new setting To turn off CTCSS or DCS select the oF code during setting DCS Digitally Coded Squelch DCS is a digital extension of CTCSS It provides 104 extra digitally coded squelch codes that follow after the 38 CTCSS codes CTCSS 1 38 followed by DCS 1 104 Follow the steps for setting a CTCSS code Turn the Rotary Channel Selector at the base or press on the Remote SPK MIC until the DCS c...

Страница 31: ...ng 4 Press and hold MENU ENTER to exit from the menu mode Back Light 1 Press MENU ENTER eight times The Backlight setting flashes 2 Turn the Rotary Channel Selector at the base or press on the Remote SPK MIC to change the setting between OFF LO and HI 3 Press MENU ENTER to store the setting 4 Press and hold MENU ENTER to exit from the menu mode Operation uh400sx uh500sx uh400sx RM uhSec1 29 Sec1 2...

Страница 32: ...ting flashes 2 Turn the Rotary Channel Selector at the base or press on the Remote SPK MIC to change the setting between 01 low contrast to 10 high contrast 3 Press MENU ENTER to store the setting 4 Press and hold MENU ENTER to exit from the menu mode The base LCD has a fixed contrast which cannot be changed uh400sx uh500sx uh400sx RM uhSec1 30 Sec1 30 uh400sx uh500sx uh400sx RM uhSec1 30 Sec1 30 ...

Страница 33: ...ncy MHz Duplex Mode Transmit Frequency MHz CH No Simplex Mode Transmit Receive Frequency Mhz 1 476 425 477 175 CH31 21 476 925 2 476 450 477 200 CH32 22 476 950 RX only 3 476 475 477 225 CH33 23 476 975 RX only 4 476 500 477 250 CH34 24 477 000 5 476 525 477 275 CH35 25 477 025 6 476 550 477 300 CH36 26 477 050 7 476 575 477 325 CH37 27 477 075 8 476 600 477 350 CH38 28 477 100 9 476 625 29 477 12...

Страница 34: ...UNIDEN Model UH400SX UH400SX RM UH500SX UH500SX RM OM 32 CTCSS DCS Code List uh400sx uh500sx uh400sx RM uhSec1 32 Sec1 32 uh400sx uh500sx uh400sx RM uhSec1 32 Sec1 32 1 2 08 1 31 30 PM 1 2 08 1 31 30 PM ...

Страница 35: ...anty E Used in conjunction with any equipment or parts or as a part of a system not manufactured by Uniden F Only available in the original country of sale Parts Covered This warranty covers for two 2 years the Product and included accessories Statement of Remedy In the event that the Product does not conform to this warranty at any time while this warranty is in effect the warrantor at its discre...

Страница 36: ...0SX UH500SX RM OM 34 2008 Uniden Australia Pty Limited Uniden New Zealand Limited Printed in China UTZZ01940ZZ 0 uh400sx uh500sx uh400sx RM uhSec1 34 Sec1 34 uh400sx uh500sx uh400sx RM uhSec1 34 Sec1 34 1 2 08 1 31 30 PM 1 2 08 1 31 30 PM ...

Отзывы: