background image

Содержание UH076DLX

Страница 1: ...UH076DLX Handheld UHF CB Transceiver For more exciting new products please visit our website Australia www uniden com au New Zealand www uniden co nz ...

Страница 2: ... Ion Battery Pack contained in this equipment may explode if disposed of in a fire Do not short circuit the Battery Pack Do not charge the Lithium Ion Battery Pack used in this equipment in any charger other than the one designed to charge this Battery Pack Using another charger may damage the Battery Pack or cause the Battery Pack to explode Lithium Ion batteries must be disposed of properly NOTE...

Страница 3: ...2 Adjusting the Key Beeps 12 Roger Beep 13 Selecting Channel 13 Squelch 14 To Transmit and Receive 15 Using a Repeater Channel 16 To Operate UH076DLX in Duplex Mode 17 Scanning 17 Open Scan OS Mode 17 Group Scan GS Mode 18 Programming Scan Channels 19 Priority Channel 19 Choosing a Priority Channel 19 Drop Out Delay 19 Advanced Features 20 CTCSS 20 VOX 20 Power Save 21 Back Lighting 21 Keypad Lock...

Страница 4: ...f meets JIS7 waterproof specifications 3 Rubber Grips Seal 38 Built in CTCSS codes Backlit Keypad LCD Display Duplex Mode1 Open and Group Scan Busy Channel Lockout Function VOX Function Headset Jack Keypad Lock Battery Type Lithium lon Rechargeable Low Battery Alert Battery strength Indicator Auto Battery Save Battery Cover with charge contacts Roger Beep Refer to p 23 p 26 for channel information...

Страница 5: ...act your place of purchase immediately Optional Accessories VOX Headset Heavy Duty Speaker Mic UH076DLX AC Adaptor AAD 008S M Antenna Drop in Charger DT078A External Speaker Mic SM 078 Lithium Battery X2 BP079 Owner s Manual Belt Clip and Wrist Strap Cigarette Lead Charger with Hang Up Bracket CK 078 Earphone Mic EM 078 UH76DLX ...

Страница 6: ...rophone 10 Speaker MIC Jack 11 ON OFF VOL Knob 12 Squelch Knob SQ 13 LCD Display 14 Monitor Button mon 15 Open Scan Group Scan os gs VOX 16 Channel Up Button 17 Duplex Key dup CTCSS Key ctcss 18 Channel Down Button 19 Speaker A Transmit B 1W Power C Duplex Transmit D Scanning E Monitor F Priority G Busy Channel Lock Out H Group Scanning I Channel Numbers J CTCSS K VOX L Roger Beep M Battery Level ...

Страница 7: ...te Lead Charger to Cigarette Lighter Jack OR Attaching the Antenna Attach the antenna to the UH076DLX Be sure the antenna is firmly seated NOTE The drop in charger and cigarette lead charger are not water proof Ensure the radio is dry before connecting to the charger Don t use the chargers when the ambient temperature is below 0º C 32º F or above 45º C 113º F Input Voltage Cigarette Lead Charger 1...

Страница 8: ...peratures below 20 C 4 F or above 60 C 140 F Exposing the chemicals contained within the battery pack to temperatures above 60 C 140 F may cause the battery to rupture fail or reduce performance In case of exposure to cell contents wash the affected area thoroughly and seek medical attention Additional battery cautions should be applied as described on p 2 Attaching the Beltclip 1 Hold the beltcli...

Страница 9: ...nd also charge a second Lithium Ion battery pack separately in the rear charging slot When you charge the 2nd battery be sure to push it all the way into the charge slot 1 Place the UH076DLX in the drop in charger 2 The red LED illuminates and stays ON until fully charged The charger won t overcharge the battery packs When charging is completed the charge LED is no longer illuminated Do not transm...

Страница 10: ...ty battery icon and channel number will flash transmission is disabled NOTE Recharge the battery at any time From empty the battery will take up to 5 hours to fully charge NOTE When charging with the cigarette lead charger the UH076DLX charges slowly and increases to the Battery Level indication are inhibited Switch the radio OFF then ON for an accurate display Getting Started 10 UNIDEN UH076DLX H...

Страница 11: ...screws Locate a suitable mounting position Apply high quality Double Sided tape onto the flat area of the Hang up Bracket back piece and then press firmly to the mounting position SPKR MIC Jack Cap Make sure the SPKR MIC jack cap is firmly pushed in to maintain submersible rating Connecting the SPKR MIC Release the SPKR MIC jack cap to plug in the SPKR MIC Secure the SPKR MIC plug by tightening th...

Страница 12: ... the display To turn the unit OFF rotate the ON OFF VOL knob counter clockwise The display will disappear Volume Rotate the ON OFF VOL knob clockwise or counter clockwise to adjust speaker volume to desired listening level Adjusting the Key Beeps Your radio emits a beep each time one of the keys except for the PTT or mon are pressed To turn OFF this beep Press and hold dup while turning on the rad...

Страница 13: ...p will not be heard from the speaker To turn ON Roger Beep Press and hold while turning on the radio To turn OFF Roger Beep Press and hold while turning on the radio Selecting Channel Press or to select the desired channel NOTE If you press and hold the or channel number will scroll rapidly NOTE For your reference a list of the available channels corresponding frequencies and guidelines for their ...

Страница 14: ...ty of the squelch In this case simply rotate the SQ clockwise until the weak signal is heard clearly 10 SQUELCH The squelch is used to eliminate any annoying background noise when there are no signals present Think of squelch as a gate Turn SQ fully clockwise This raises the Squelch Gate so high that only the very strong signals can get through Turn SQ fully counter clockwise until you hear a hiss...

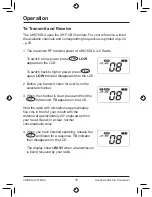
Страница 15: ...1 5w again LOW indicator disappears from the LCD 2 Before you transmit listen for activity on the selected channel 3 When the channel is clear press and hold the PTT to transmit TX appears on the LCD Hold the radio with microphone approximately five cms in front of your mouth with the antenna at approximately 45 angle away from your head Speak in a clear normal conversational voice 4 When you have...

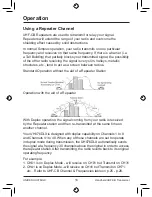
Страница 16: ...n without the aid of a Repeater Station Operation with the aid of a Repeater With Duplex operation the signal coming from your radio is received by the Repeater station and then re transmitted at the same time on another channel Your UH076DLX is designed with duplex capability on Channels 1 to 8 and Channels 41 to 48 When any of these channels are set to operate in duplex mode during transmission ...

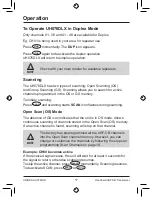
Страница 17: ...ry To initiate scanning Press scan and scanning starts SCAN icon flashes during scanning Open Scan OS Mode The absence of GS icon indicates that the unit is in OS mode Allows continuous scanning of channels stored in the Open Scan OS memory If an active channel is found scanning will stop on that channel NOTE The factory has preprogrammed all the UHF CB channels into the Open Scan channel memory H...

Страница 18: ...e are no channels programmed in GS memory an error tone will be heard and scanning will not start If the Priority channel becomes active the radio will stay on that channel for as long as the signal is present If the received signal ceases Priority scanning continues after 3 seconds NOTE If scanning stops on a channel which is not a Priority Channel the UH076DLX will continue monitoring the Priori...

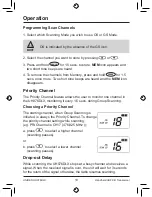
Страница 19: ...s Priority Channel The Priority Channel feature allows the user to monitor one channel in the UH076DLX monitoring it every 1 5 secs during Group Scanning Choosing a Priority Channel The starting channel when Group Scanning is initiated is always the Priority Channel To change the priority channel setting while scanning eg PRI Channel is CH17 476 825 MHz a press to select a higher channel scanning ...

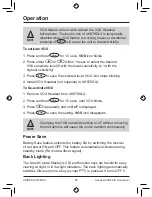
Страница 20: ... activity CTCSS code can be programmed on every channel There are 38 available CTCSS tone per channel CTCSS Scan Operation 1 Press scan to start scanning GS or OS mode 2 Press and hold ctcss to change to CTCSS scan mode 3 When a signal is sensed on a CTCSS CH the UH076DLX stops for about 400 msecs decode time to decode the CTCSS code If there is no code or the receive code does not match the one p...

Страница 21: ...set not supplied to UH076DLX To De activate VOX 1 Remove VOX Headset from UH076DLX 2 Press and hold vox for 1 5 secs until VOX blinks 3 Press repeatedly and until oF is displayed 4 Press vox to save the setting VOX icon disappears NOTE Changing the VOX sensitivity setting to oF without removing the microphone will cause the unit to transmit continuously Power Save Battery Save feature extends the ...

Страница 22: ...mmended on channels where CTCSS is being used If you hear sound from the speaker unless it s in Monitor Mode see below the BCL feature will prevent you from transmitting To activate BCL Press and hold bcl for 1 5 secs until BCL appears on display To De activate BCL Press and hold bcl for 1 5 secs until BCL disappears from the display Monitor This feature enables users to listen in for weak signals...

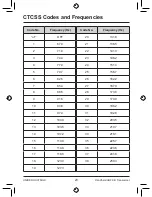
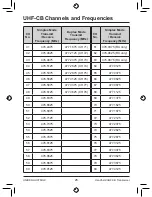
Страница 23: ...F 20 131 8 1 67 0 21 136 5 2 71 9 22 141 3 3 74 4 23 146 2 4 77 0 24 151 4 5 79 7 25 156 7 6 82 5 26 162 2 7 85 4 27 167 9 8 88 5 28 173 8 9 91 5 29 179 9 10 94 8 30 186 2 11 97 4 31 192 8 12 100 0 32 203 5 13 103 5 33 210 7 14 107 2 34 218 1 15 110 9 35 225 7 16 114 8 36 223 6 17 118 8 37 241 8 18 123 0 38 250 3 19 127 3 ...

Страница 24: ...his allows for additional channels to be added up to 80 Channels This simply means that the new narrowband radio you have purchased will have more channels than older radios Please refer to the guidelines above and the channel chart for further channel information A list of currently authorised channels can also be obtained from the ACMA website in Australia and the MED website in New Zealand Inte...

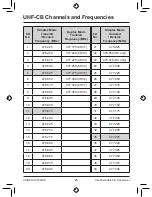
Страница 25: ... RX only 3 476 475 477 225 CH33 23 476 975 RX only 4 476 500 477 250 CH34 24 477 000 5 476 525 477 275 CH35 25 477 025 6 476 550 477 300 CH36 26 477 050 7 476 575 477 325 CH37 27 477 075 8 476 600 477 350 CH38 28 477 100 9 476 625 29 477 125 10 476 650 30 477 150 11 476 675 31 477 175 12 476 700 32 477 200 13 476 725 33 477 225 14 476 750 34 477 250 15 476 775 35 477 275 16 476 800 36 477 300 17 4...

Страница 26: ...5 477 2375 CH 73 63 476 9875 RX only 44 476 5125 477 2625 CH 74 64 477 0125 45 476 5375 477 2875 CH 75 65 477 0375 46 476 5625 477 3125 CH 76 66 477 0625 47 476 5875 477 3375 CH 77 67 477 0875 48 476 6125 477 3625 CH 78 68 477 1125 49 476 6375 69 477 1375 50 476 6625 70 477 1625 51 476 6875 71 477 1875 52 476 7125 72 477 2125 53 476 7375 73 477 2375 54 476 7625 74 477 2625 55 476 7875 75 477 2875 ...

Страница 27: ...iod This warranty to the original retail purchaser is only valid in the original country of purchase for a Product first purchased either in Australia or New Zealand If a warranty claim is made this warranty will not apply if the Product is found by Uniden to be A Damaged or not maintained in a reasonable manner or as recommended in the relevant Uniden Owner s Manual B Modified altered or used as ...

Страница 28: ... Zealand as the case may be none of which can be excluded Procedure for obtaining warranty service Depending on the country in which the Product was first purchased if you believe that your Product does not conform with this warranty you should deliver the Product together with satisfactory evidence of your original purchase such as a legible copy of the sales docket to Uniden at the addresses sho...

Страница 29: ......

Страница 30: ......

Страница 31: ......

Страница 32: ...THANK YOU FOR BUYING A UNIDEN PRODUCT 2014 Uniden Australia Pty Limited Uniden New Zealand Ltd Printed in Vietnam U01UT961AZZ 0 ...

Отзывы: