background image

45

Reverse Mode

This key will allow you to observe the reverse frequency of the repeater. While pressing

RVRS

, the standard pair frequency will be displayed. For a list of the standard pair

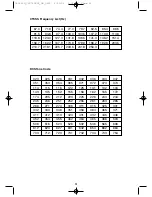
frequencies, refer to the table "Reverse List" in the Appendix. If the frequency that you have
chosen does not have an offset frequency, the display will indicate 

ERROR

and 

NO

REVERSE

.

Channel Step Selection

You can set frequency step, 5 kHz - 100 kHz or Auto in Chain search frequency. The default
receive mode should be the proper mode setting in almost all cases. You may wish to set
some VHF channels for NFM mode, depending on any adjacent channel interference
problems. WFM is typically only used for broadcast frequencies, such as TV audio or FM
radio.

See 

STEPS

in "Menu Description" for details.

Mute On/Off

To manually turn ON the Mute function, press and hold 

MUTE

until 

MUTE ON

is displayed. 

You will not hear any audio. To turn it OFF, press and hold 

MUTE 

again.

Receiving Mode Selection

You can also set the receiving mode, AM or NFM in Chain Search mode.

See 

MODE

in "Menu Description" for details.

Frequency and Channel Tuning with the VFO Control

The 

VFO

knob can be used for stepping frequencies or through memory channels.

To switch the setting for the 

VFO

control, press the 

VFO

. This will change modes from

Channel to Frequency or Frequency to Channel.

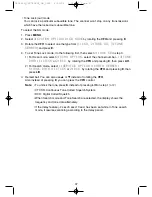
1. In scan hold mode, when the setting for the 

VFO

is channel, rotate the 

VFO

to move up

(to step up through channels) or down (to step down through channels).

2. In Chain Search mode, when the setting for the 

VFO

is frequency, rotate the 

VFO

to move up

to step up through frequencies sequentially or to down to step down through frequencies. To
change the step, you will need to go into the Chain Search menu and adjust the step for the
desired memory location.

Remember! When you set Additional Features through the menu screen, you can also
use  

or 

instead of rotating the 

VFO

.

Also instead of pressing 

E

, you can press the 

VFO

control.

UB343ZH_UBC785XLT_OM_0622  6/22/06  3:01 PM  Page 45

Содержание UBC785XLT

Страница 1: ...UBC785XLT SCANNER 1000 Channel memory State of the art Base station scanner UB343ZH_UBC785XLT_OM_0628 6 28 06 10 27 AM Page i...

Страница 2: ...UB343ZH_UBC785XLT_OM_0622 6 22 06 3 01 PM Page ii...

Страница 3: ...r On 18 Setting the Squelch 18 Understanding the Menu System 19 Menu Description and Numeric Keypad Equivalents 20 Programming 24 Storing Frequencies into Channels in Menu Mode 24 Deleting a Stored Fr...

Страница 4: ...ch Skip 39 Changing the step 39 Remote Interface 40 PC Control Mode 40 Clone Mode 41 Additional Features 44 Care and Maintenance 46 Troubleshooting 47 Specifications 48 Glossary of Terms 49 Declaratio...

Страница 5: ...band plan The chart below identifies the scanner band numbers the frequency range the modulation mode and the default step size settings 1 25 0000 29 9950 FM 5 2 30 0000 79 9875 FM 12 5 3 80 0000 82...

Страница 6: ...2 5 10 157 4375 160 5875 FM 12 5 11 160 6000 162 0250 FM 12 5 12 162 0300 173 9900 FM 10 13 174 0000 215 9500 WFM 50 14 216 0000 224 9950 FM 5 15 225 0000 399 9500 AM 50 16 400 0000 405 9875 FM 12 5 1...

Страница 7: ...0000 160 5937 FM 6 25 11 160 6000 162 5937 FM 6 25 12 162 6000 173 9937 FM 6 25 13 174 0000 215 9500 WFM 50 14 216 0000 224 9950 FM 5 15 225 0000 399 9500 AM 50 16 400 0000 405 9875 FM 12 5 17 406 00...

Страница 8: ...UBC785XLT 1000 CHANNEL RSM 1 2 3 4 5 6 7 8 0 9 E 1 100 301 400 601 700 101 200 401 500 701 800 901 1000 201 300 501 600 801 900 SELECT 1 3 4 5 6 7 8 9 10 11 1213 14 15 16 17 2 33 Antenna Connector 34...

Страница 9: ...Priority Channel Indicator Lock Out Mode Indicator Scan Search Direction Indicator Chain Search Mode Indicator Service Search Mode Indicator Scan Mode Indicator Receiving Mode Indicators Signal Meter...

Страница 10: ...ter the text is entered press This shortcut card is designed to assist you in getting through the menu screens using the direct entry mode for commonly used features Please read the manual thoroughly...

Страница 11: ...the cursor forward or back and then press Rotate the VFO control to enter the tag and use HOLD or LIMIT to move the cursor and then press MENU MENU MENU MENU MENU after each Frequency entered To begi...

Страница 12: ...ld be able to provide you with information regarding the laws in your community Changes or modifications to this product are strictly prohibited or operation of this product in any way other than as d...

Страница 13: ...nsmission continues When the transmission ends the scanning cycle resumes until another transmission is received What is Searching The UBC785XLT can search each of its 22 bands to find active frequenc...

Страница 14: ...ice Allows you to search the aircraft frequencies at the press of a button and to choice the step from 12 5 kHz or 8 33 kHz Unique Data Skip Allows your scanner to skip unwanted data transmissions and...

Страница 15: ...ilable channels To obtain frequency information for your area contact your local dealer Information on the Internet If you have access to the internet you may want to visit one of the following websit...

Страница 16: ...s are missing or damaged immediately contact your place of purchase UBC785XLT Scanner AC Adapter AD 773 Cigarette Cord DC Cord Mounting Bracket Telescopic Antenna Operating Guide Other Printed Materia...

Страница 17: ...nnector on your scanner makes it easy to use the scanner with a variety of antennas such as an external mobile antenna or an outdoor base station antenna Always use 50 ohm coaxial cable such as RG 58...

Страница 18: ...tion Be sure to avoid obstructions behind the mounting surface Follow these steps to mount the scanner in your vehicle 1 Choose a mounting location then use the supplied mounting bracket as a template...

Страница 19: ...Follow these steps to connect the supplied DC power cord 1 Connect the power cord s black wire to a chassis ground such as a metal screw attached to a metal part of the vehicle s frame Be sure that t...

Страница 20: ...the scanner 1 Insert the adapter s barrel plug into the DC 13 8 V jack on the back of the scanner 2 Plug the adapter into a standard AC outlet Note Use only the AC adapter supplied with your scanner...

Страница 21: ...e cable between each scanner s REMOTE jacks See Clone Mode on page 41 You can also upload or download the programmed data to or from a PC using an optional PC interface kit available through your loca...

Страница 22: ...sure that the VOL is set to a comfortable listening level 3 Think of the Squelch Control as a gate Turn the SQUELCH control fully counter clockwise This raises the Squelch Gate so high that only very...

Страница 23: ...emember are rotate the through the menu and press E or VFO to execute the command For simplicity we have chosen to rotate the VFO control up or down in order to scroll through the menu and the E key f...

Страница 24: ...ou can change the Auto receive mode to AM FM WFM and NFM 4 ALPHA TAG You can name to each channels and banks with up to 16 charactors 3 DELAY Set the delay for the search ranges This applies to all th...

Страница 25: ...r programming a frequency This will bring up the Tone Data menu without having to navigate the Menu By doing this you will receive all transmissions on the frequency regardless of the subaudible tone...

Страница 26: ...entered into memory The default setting is OFF 5 PC CONTROL Use this function to set the transfer speed baud rate at which your personal computer PC communicates with the scanner when downloading inf...

Страница 27: ...mode as soon as the scanner stops on any channel the scanner will begin to search for any subaudible tone that is being used on a transmitted frequency The scanner will check each CTCSS tone sequenti...

Страница 28: ...rotating the VFO and pressing E Then enter the frequency 6 Enter the alpha tag and press E See page 26 7 The following display appears Select the action by rotating VFO then press E If you want to pr...

Страница 29: ...ing E you can press the VFO control Note Channels with no frequencies are automatically locked out Editing a Stored Frequency 1 Press MENU 2 Select 2 SCAN OPTION by rotating the VFO and pressing E 3 S...

Страница 30: ...VFO or using or and pressing E 4 The cursor appears on the display Rotate the VFO to select the letter and then press or to move the cursor right or left Both capital and lower case letters are avail...

Страница 31: ...example program police frequencies in channels 1 through 10 and fire emergency into channels 51 through 60 and so on Put the frequency that you listen to the most or the most important frequency into...

Страница 32: ...rammed or locked out channels 4 When a transmission is received the scanner stops on that channel When the transmission ends scanning resumes automatically Scan Hold Feature If you want to stop on a c...

Страница 33: ...ATTENUATOR by rotating the VFO and pressing E 3 Select 1 ON by rotating the VFO and pressing E Note Attenuation will only be active for the specified channel In Search mode it is applied to the Searc...

Страница 34: ...you set a 5 second delay you will only hear 5 seconds of the conversation and then the scanner will resume scanning whether or not the conversation is finished Remember You can also use or instead of...

Страница 35: ...ocked out Channel 1 Press HOLD 2 Select a locked out channel by using the keypad then press HOLD 3 Press L O The L O disappears Restoring All Locked out Channels You can restore all locked out channel...

Страница 36: ...Priority Channel but you can change it to any one of the 100 available channels in each bank 1 Press HOLD 2 Select a new Priority Channel using the keypad then press HOLD again 3 Press and hold PRI fo...

Страница 37: ...uencies by the same way as step 3 and 4 above Remember You can also use or instead of rotating the VFO Also instead of pressing E you can press the VFO control In Search Hold mode you can change lowes...

Страница 38: ...the VFO control Note If CHAIN SEARCH is OFF only 1 range can be searched When searching stops press RSM to resume searching When you rotate the VFO while searching you can change the search direction...

Страница 39: ...you want to resume searching OR 2 Change the Search Frequency range To cancel all skipped frequencies press and hold L O for 2 seconds in Search Hold mode Storing Search Frequencies You can quickly s...

Страница 40: ...the following SQ modes Carrier SQ mode default setting The scanner will stop on any active frequencies or squelch opening regardless of whether any subaudible tone has been programmed on your scanner...

Страница 41: ...otating the VFO and pressing E than press L O 2 For Search mode select 1 SERVICE OPTION CHAIN SEARCH 5 TONE DATA 1 CTCSS or 2 DCS by rotating the VFO and pressing E than press L O Remember You can als...

Страница 42: ...pressing E ATTENUATOR for more information see page 29 1 Press MENU 2 Select 1 SERVICE OPTION CHAIN SEARCH 4 ATTENUATOR by rotating the VFO and pressing E 3 Select 1 ON by rotating the VFO and pressi...

Страница 43: ...re programmable 1 To skip over a frequency press L O when stopping at the frequency you want to skip 2 To cancel a skip during search press HOLD or LIMIT select the desired frequency by rotating the V...

Страница 44: ...le into the remote port which is on the rear of the scanner Plug the other end of the cable DB 9 serial connector into a personal computer s serial port A few PC s may require an adapter most will not...

Страница 45: ...nner eu PC Control Parameter For your information Transfer speed 2400 4800 9600 19200 bps adjustable Start Stop 1 bit 1 bit Data Length 8 bit Parity bit None Code ASCII code Flow Control None Return C...

Страница 46: ...he two scanners turn the radios ON Prepare each scanner for clone mode as follows 1 Press MENU 2 Select 3 SYSTEM OPTION 6 CLONE by rotating the VFO and pressing E 3 Determine the scanner that has the...

Страница 47: ...ss decimal key To exit the Clone mode press MENU repeatedly Note Once you have completed the cloning of the scanners reset the scanners by turning the scanners OFF and then ON again This is particular...

Страница 48: ...e VFO and pressing E 3 Select 1 ON by rotating the VFO and pressing E Key Beep Option To choose key beep sound 1 ON or 2 OFF 1 Press MENU 2 Select 3 SYSTEM OPTION 3 KEY BEEP by rotating the VFO and pr...

Страница 49: ...To turn it OFF press and hold MUTE again Receiving Mode Selection You can also set the receiving mode AM or NFM in Chain Search mode See MODE in Menu Description for details Frequency and Channel Tuni...

Страница 50: ...antenna away from the source of the noise If possible a higher elevation may provide better reception Cleaning Disconnect the power to the unit before cleaning Clean the outside of the scanner with a...

Страница 51: ...AC Adapter 2 Turn ON the wall switch of your room You could be using an outlet controlled by the wall switch 3 Move the AC Adapter to another wall outlet Improper reception 1 Check the antenna connec...

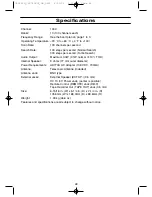
Страница 52: ...aker 8 ohms 77 mm outer diameter Power Requirements AD773U AC Adapter 13 8V DC 700mA Antenna Telescopic Antenna included Antenna Jack BNC type External Jacks External Speaker EXT SP 3 5 mm DC 13 8 V P...

Страница 53: ...in close proximity of each other make it difficult to hear the conversation you are interested in With CTCSS squelching you can eliminate the possibility of hearing unwanted conversations by selectin...

Страница 54: ...computer by means of third party software You can change the transfer speed on the scanner needed to be compatible with your PC See page 40 Screen Mask Screen Mask reduces the amount of information th...

Страница 55: ...051 114 143 174 245 266 332 411 452 506 612 703 025 053 115 145 205 246 271 343 412 454 516 624 712 026 054 116 152 212 251 274 346 413 455 523 627 723 031 065 122 155 223 252 306 351 423 462 526 631...

Страница 56: ...Hz 3 7 5KHz 4 10KHz 5 12 5KHz 6 20KHz 7 25KHz 8 50KHz 9 100 KHz 0 AUTO 1 AM 2 FM 3 WFM 4 NFM 5 AUTO 1 ON 2 OFF 1 NONE 2 1 SECOND 3 2 SECONDS 4 4 SECONDS 5 INFINITE 6 2 SECONDS 7 5 SECONDS 8 10 SECONDS...

Страница 57: ...NONE 2 1 SECOND 3 2 SECONDS 4 4 SECONDS 5 INFINITE 6 2 SECONDS 7 5 SECONDS 8 10 SECONDS 1 CTCSS 2 DCS 3 OFF 1 ON 2 OFF 1 ON 2 OFF 1 5KHz 2 7 5KHz 3 10 KHz 4 12 5 KHz 5 25 KHz 6 50 KHz 7 100 KHz 8 AUTO...

Страница 58: ...OFF 3 KEY BEEP 1 ON 2 OFF 4 ENTER LOCK 1 ON 2 OFF 5 PC CONTROL 1 2400 bps 2 4800 bps 3 9600 bps 4 19200 bps 5 OFF 6 CLONE MASTAR SLAVE 7 DATA SKIP 1 ON 2 OFF 8 SQ MODE 1 CSQ 2 TONE SQ 3 TONE SEARCH 9...

Страница 59: ...8512 Japan declare under our sole responsibility that this equipment Uniden Bearcat model UBC785XLT is in compliance with the essential requirements and other relevant provisions of the EMC R TTE and...

Страница 60: ...2006 Uniden Corporation All rights reserved UBZZ01343ZZ 0 Printed in P R C UB343ZH_UBC785XLT_OM_0622 6 22 06 3 01 PM Page 56...

Отзывы: