background image

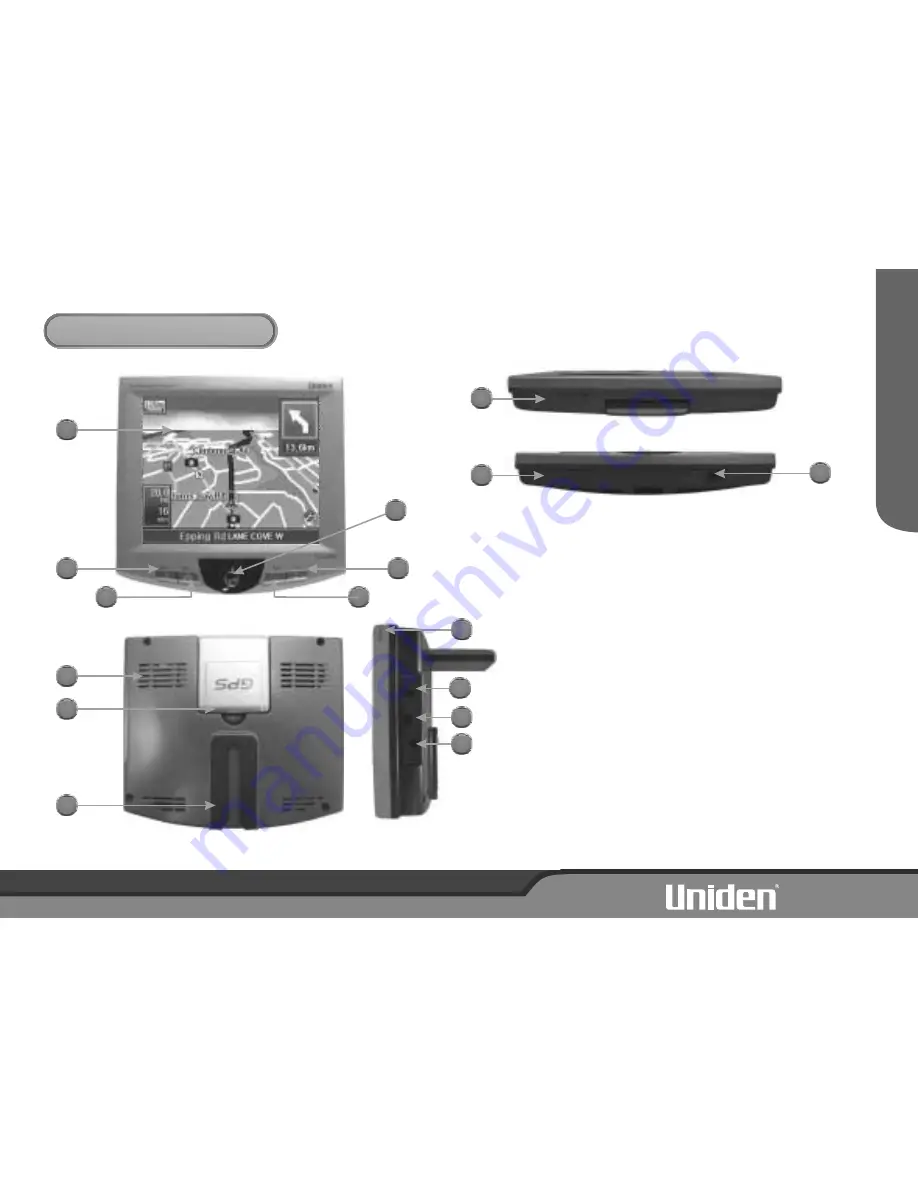
CONTROLS & VIEWS

FRONT

BACK

SIDE

1 Screen ON/OFF/Dim Button

2 LCD Touch Screen

3 Main menu Button

4 Map Button

5 Mark Button

6 Volume Button

7 Joystick/Navi Button

8 Speaker

9 GPS Antenna

12 USB Cable Connector

13 +12V DC Power Jack
14 Reset Button

15 Not used

10 Mount Slot
11 Stylus Pen

15

9

1

12

2

4

3

8

10

13

11

TOP

BOTTOM

OPERA

TION

14

15

2

5

7

6

Содержание GNS8600

Страница 1: ......

Страница 2: ......

Страница 3: ...S signal reception can be affected by the location of satellites tall buildings tunnels bridges etc If the GNS8600 is not receiving a signal you will need to change your location until a signal is rec...

Страница 4: ...Main Unit 12V Cigarette Power Cord USB Cable for software upgrades 1 x Mount Stand This Owners Manual Software CD Start Here Carry Case 1 ii 1 3 2 Guide QuickStart Car Navigation System Owner s Manual...

Страница 5: ...reas Do not mount where the driver s view will be obstructed or where safe operation of the vehicle is may be obstructed Ensure the mount location Allows room to raise the GPS antenna horizontally All...

Страница 6: ...e pressing down evenly to remove any air bubbles Fig 1 Fig 2 Slide onto mount clip Turn or angle the unit to view the display 3 iv 1 2 3 4 3 4 1 2 Connect Power Raise GPS Antenna Do not connect this u...

Страница 7: ...our position Your position will be indicated by the pointer in the centre of the displayed map If the unit continues to indicate searching for satellite beyond 15 minutes try holding the GNS8600 outsi...

Страница 8: ...iptions 24 Map Screen Icons 26 PointsOfInterestTable 27 Troubleshooting 28 Warranty 29 Car Navigation Other Great Features Updateable Software for Navigate to pre programmed State City locations Navig...

Страница 9: ...en 3 Main menu Button 4 Map Button 5 Mark Button 6 Volume Button 7 Joystick Navi Button 8 Speaker 9 GPS Antenna 12 USB Cable Connector 13 12V DC Power Jack 14 Reset Button 15 Not used 10 Mount Slot 11...

Страница 10: ...nsure your GNS8600 is looked after Always transport and store the GNS8600 using the carry case Keep the GNS8600 free from dust by regularly cleaning the screen with an LCD cleaner Do not leave unatten...

Страница 11: ...EDITOR SAFETY WARNING MAP SETTINGS SIMULATION ADDRESS INTERSECTION MY POI POI RECENT ROUTES SPEED TIME RESET START TRANSIT END GO MARK MIN MAX MUTE TEST SAVE RENAME POI list see page 27 EXIT SCREEN C...

Страница 12: ...0 will give voice guide and display alert see displays below of Fixed Speed Camera Red Light Camera or Black Spots you are approaching SAFETY WARNING SYSTEM Fixed Speed or Red Light Camera Location 5...

Страница 13: ...120m 600m 1k 2k 8k 30k 100k 400k Touch the scale icon Touch to Zoom in Touch to Zoom out Touch to adjust the volume Touch to the left or right of the volume indicator to decrease or increase volume T...

Страница 14: ...the map with your position always moving towards the top of the display Turn Guide Mode During navigation you may select the way navigation is shown The current Turn Guide Mode appears in the top tool...

Страница 15: ...4 You may press the icons to scroll down the list of Cities Use the keyboard to spell the name and the list of cities will be reduced as more letters are entered 5 Touch the city name The Street list...

Страница 16: ...to scroll down the list of Cities Use the keyboard to spell the name and the list of cities will be reduced as more letters are entered 5 Touch the city name The Street list will appear 6 Use the to s...

Страница 17: ...e POI sub category list appears 6 Touch the POI sub category The POI list for that category will appear 7 Use the keyboard to spell the name and the list of POI will be reduced as more letters are ent...

Страница 18: ...delete saved route Navigate by MAP You may search a destination to navigate to using the map view 1 Touch The Map toolbar appears with map of your current position 2 Touch the Scale Bar Zoom to view...

Страница 19: ...any screen you may use the joystick or zoom in out to move around the map to find a position then touch then follow step 2 Or you may touch at any time then follow step 1 1 Use the Scale Bar Zoom In...

Страница 20: ...a category icon for this position The icon will appear in the map view The icons are Quick Access icons Quick Access icons show in the Navi menu Quick Access icons cannot be RENAMED 4 Touch to rename...

Страница 21: ...isplay is shown 2 Touch to reset the displayed statistics The Trip Computer display will remain on the screen until another display is chosen To return to Map Screen touch TIME DATA 1 Touch The Speed...

Страница 22: ...tion is described in the following pages Allows you to change settings which affect how the GNS8600 calculates the route to a selected destination Allows you to view and edit the My POI list including...

Страница 23: ...he right 2 Touch current setting to adjust to desired level The road speed settings increment in 5km h steps 3 Touch to exit Route Option Road Speed Adjusting road speed will increase or decrease your...

Страница 24: ...view the map location of a selected My POI Touch to return from map display 5 You may choose from the following to alter the selected My POI detail Delete My POI Edit My POI Rename My POI Touch to del...

Страница 25: ...with each touch 3 Touch to exit Safety Warning Speed Warning Safety Warning Speed Warning Item Description Safe Mode Select ON or OFF to enable touchscreen while driving Speed Camera Select ON or OFF...

Страница 26: ...Select to set Auto map level when vehicle speed is faster than 80km h Select to set Auto map level when vehicle speed is slower than 40km h Auto Zoom under 40km h MAP Settings allows you to select wh...

Страница 27: ...he Simulation display will appear with the set destination showing 5 Touch The navigation display appears 6 Follow the instructions for navigation pages 8 to select a start location When a destination...

Страница 28: ...the car navigation mode games mode and display screen adjustments mode Touch to enter car navigation mode Touch to access Touchscreen Calibration Product Information Volume Brightness Touch to access...

Страница 29: ...r to decrease brightness Touch to the right of the level indicator to increase brightness 1 Touch Touch the yellow level indicator to decrease volume Touch to the right of the level indicator to incre...

Страница 30: ...cle in a desired square ii If a circle cannot be placed in a square bloack then a sound will be heard Choose another block iii The computer will then counter the move iv The last move is shown by yell...

Страница 31: ...en GPS data is available the GPS ACTIVATED style icon shows When the GNS8600 displays Searching for satellites the GPS INACTIVE icon shows If there is no GPS signal move to a clear view of the sky You...

Страница 32: ...Right Take the Left Lane Take First Exit Take Secend Exit Make a U Turn if possible Turn Right followed by Turn Left The following figures are provided to help with interpreting the voice guide you w...

Страница 33: ...Facility Cinema Library Casino School Scenic Panoramic View College University Winery Fire Brigade Zoo Hospital Polyclinic Opera House Police Station Caltex Petrol Boat Launching Ramp Hotel Motel Petr...

Страница 34: ...ment Office Hotel Condominium Hotel or Motel Museum Museum Park Amusement Park Beach Camping Ground Caravan Site Holiday Area Parking Open Parking Area Parking Garage Petrol Petrol Station Railway Rai...

Страница 35: ...ly touching screen Check volume Touch Make sure GPS antenna is raised to a horizontal position Make sure the unit has a clear view of the sky Check brightness see page 22 Check dimmer press hold butto...

Страница 36: ...ntor Elements of Warranty Warranty Duration Parts Covered Statement of Remedy Uniden Australia Pty Limited ABN 58 001 865 498 Uniden New Zealand Limited Warranty only available in original country of...

Страница 37: ...30...

Страница 38: ...31...

Страница 39: ...32...

Страница 40: ...THANK YOU FOR BUYING A UNIDEN PRODUCT 2005 Uniden Australia Pty Limited Uniden New Zealand Ltd Printed in Korea...

Отзывы: