background image

 17

M

O

D

E

History

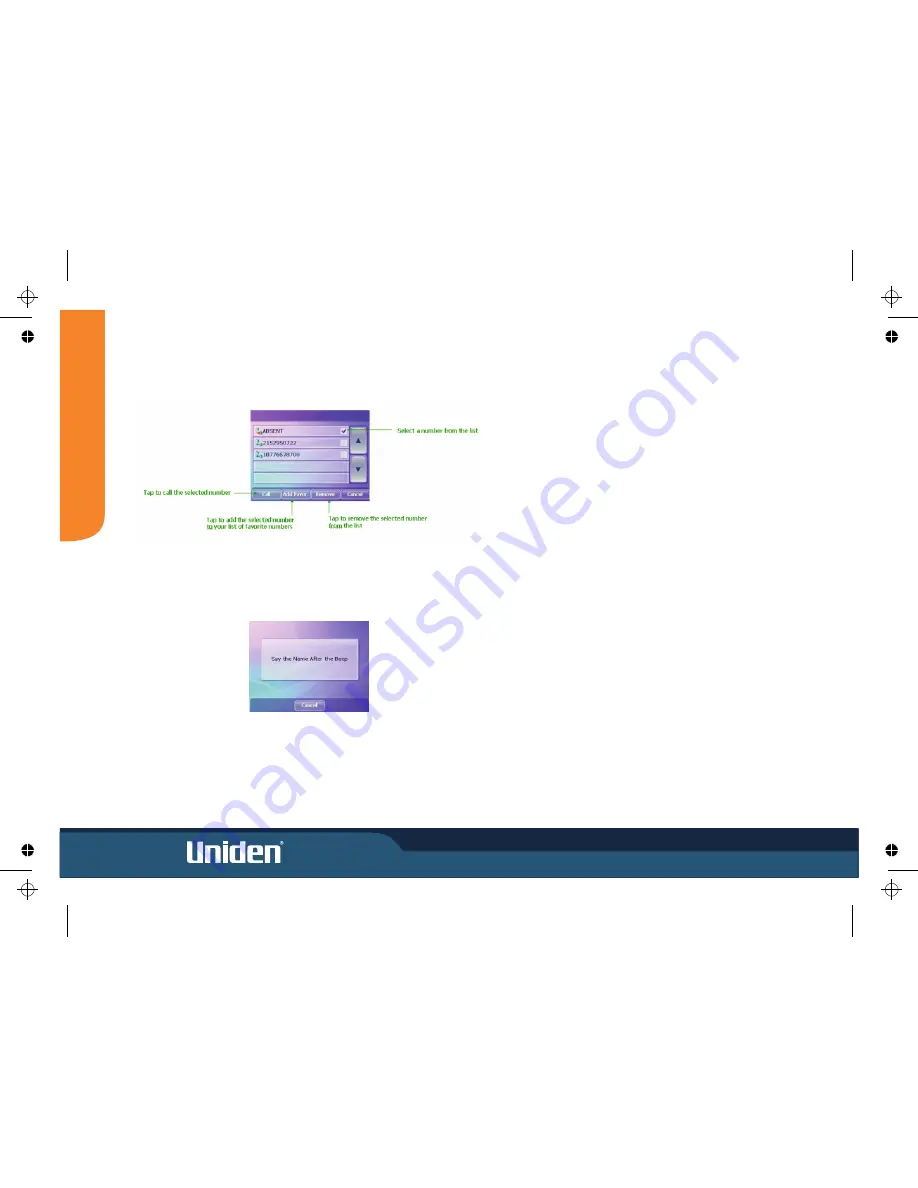
Tapping 

History

 accesses a list of your previously called or received numbers.

Voice Call

Tapping 

Voice Call

 allows you to make a call by speaking the name of a previously 

recorded voice call number on your phone.

NOTE: 

Voice calling must be set up on your phone to use this feature.

Содержание GNS 8360

Страница 1: ...Car Navigation System Operation Manual Quick Start Guide OPERATION MANUAL GNS8360 GNS8365BT...

Страница 2: ......

Страница 3: ...not receiving a signal you will need to change your location until a signal is received The US Government reserves the right to make changes to the Global Positioning System in accordance with the Dep...

Страница 4: ...following items are missing This Owners Manual Software CD Start Here 1 ii Suction Cup Mount QUICKSTART GUIDE Stylus Pen Carrying Case SD Memory Card SD Card Reader External GPS Antenna Box Contents...

Страница 5: ...not mount within any Airbag deployment areas Do not mount where the driver s view will be obstructed or where safe operation of the vehicle may be obstructed Ensure the mount location Allows room to r...

Страница 6: ...arette Lighter Lead into the DC Power socket of your GNS8360 and connect the other end to the 12V 24V cigarette lighter socket QUICKSTART GUIDE MOUNTING 3 iv Attach main unit Secure unit to bracket fi...

Страница 7: ...When the powers on it will run the GNS8360 Navigation software loaded on the SD card The GNS8360 Main Menu screen appears This Quick Start Guide is now complete GNS8360 GNS8360 GNS8360 NAVIGATION The...

Страница 8: ...reen Touchscreen Intuitive technology Built in GPS antenna 400MHz processor SIRF III GPS Bluetooth capability for hands free Mobile phone use GNS8365 BT model only Updateable Software for Operation Ma...

Страница 9: ...y 3 4 Map Zoom In Out 5 Stereo Speaker 6 Mount Holder Bracket 7 GPS Antenna 8 Secure Digital Card Slot 9 Audio Out Jack 10 GPS Antenna 11 Power On Off Button 12 Volume Control 13 Power Supply Jack 14...

Страница 10: ...steps to ensure your GNS8360 is looked after Always transport and store the GNS8360 using the carry case Keep the GNS8360 free from dust by regularly cleaning the screen with an LCD cleaner Do not lea...

Страница 11: ...e than 200 files are read Running more than one mode To perform multitasking for example navigation plus audio playback 1 Select an application in the main menu Navi Music to get on 2 Press to come ba...

Страница 12: ...the main menu If you press the main menu key the music continues and you can choose other available applications Repeat Repeat All Play All Repeat 1 Track Repeat All Touch to select the desired optio...

Страница 13: ...y card that is inserted into the device it automatically searches and shows both the file list and the movie start screen If the supplied SD memory card is short of capacity do not delete the map file...

Страница 14: ...SD card then you can save more files For optimal performance view only images up to 1MB in size Enlarge Reduce Arrow shaped buttons left right up and down appear enabling an image to be enlarged redu...

Страница 15: ...game The initial card selected will be reversed and the game time will begin Once your game time is over you can start new game by pressing the New Game button Score Each single failure of a card pai...

Страница 16: ...tings are applied immediately The screen setting tabs appear When accessing the screen setting tab the last setting status appears If a screen with changes is exited without touching the Save button t...

Страница 17: ...10 MODE Setting Options Calibrate Screen Opening Screen Setting...

Страница 18: ...MODE 11 BUILT IN BATTERY SPECIFICATION...

Страница 19: ...Bluetooth system Settings Tapping the Settings button opens the Settings Screen GNS8365 BT BLUETOOTH GNS8365 BT Model Only Pairing your Phone with the as a Hands Free Device GNS8365 BT Ensure that Bl...

Страница 20: ...fault pin code is 0000 Tap OK to record your entry The will pair with your phone You may need to enter the PIN code or perform other functions on your phone to complete the pairing Please watch your p...

Страница 21: ...ot initiate calls using the in headset mode GNS8365 BT GNS8365 BT GNS8365 BT GNS8365 BT GNS8365 BT GNS8365 BT GNS8365 BT Using your Phone to Connect to GNS8365 BT Tapping Find Me will cause the to ent...

Страница 22: ...st Screen This screen allows you to connect to a device add devices and remove devices Managing Bluetooth Devices You may have multiple phones set up for connection with your Delphi You can add and re...

Страница 23: ...ng Favorites accesses a list of your previously stored favorite numbers Adding Favorites If you have no Favorites on the Favorites list the following screen is displayed Tap Yes to display the touch p...

Страница 24: ...of your previously called or received numbers Voice Call Tapping Voice Call allows you to make a call by speaking the name of a previously recorded voice call number on your phone NOTE Voice calling m...

Страница 25: ...manual and a back up copy of the GNS8360 Navigation software CD Contents 1 User Guide GNS8360 Owner s Manual PDF GNS8360 Navigation manual PDF 2 GNS8360 Navigation Program MobileNavigator 3 End User...

Страница 26: ...Check volume Make sure GPS antenna is Searching For Satellites still raised to a horizontal position showing Make sure the unit has a clear view of the sky Make sure power supply is 12V or 24V Check p...

Страница 27: ...0 Harris Road Rockdale NSW 2216 East Tamaki Auckland Fax 02 9599 3278 Fax 09 274 4253 www uniden com au www uniden co nz UNIDEN GNS8360 CAR NAVIGATION Limited One Year Warranty Please keep your sales...

Страница 28: ...THANK YOU FOR BUYING A UNIDEN PRODUCT 2007 Uniden Australia Pty Limited Uniden New Zealand Ltd Printed in China...

Страница 29: ...GNS8360 GNS8365 BT Car Navigation System Navigation Manual NAVIGATION MANUAL...

Страница 30: ...dergrond Copyright dienst voor het kadaster en de openbare registers Apeldorn All rights reserved 2 Copyright note The product and the information contained herein may be changed at any time without p...

Страница 31: ...detailed description of the software Although iGO can easily be discovered by experience it is still recommended that you read through this manual to clearly understand the exact function of each butt...

Страница 32: ...e route excluded by your preferences 27G 4 5G Screens with map 27G 4 5 1G Turn preview No 1 29G 4 Table of Contents 1G Warnings and safety information 8G 2G General information 9G 3G Operating iGO Con...

Страница 33: ...6 1G Route data displayed for destination and via points 38G 4 6 1 1G Route line 39G 4 6 1 2G Distance Left 39G 4 6 1 3G Method 39G 4 6 1 4G Time Left 39G 4 6 1 5G Estimated Arrival 40G 4 6 1 6G Desti...

Страница 34: ...arameter settings 61G 5 4 1G Method 61G 5 4 2G Route 61G 5 4 2 1G Shortest 61G 5 4 2 2G Fastest 61G 5 4 2 3G Economical 61G 5 4 3G Vehicle 61G 5 4 4G Road types to include exclude 62G 5 4 4 1G Unpaved...

Страница 35: ...Clear Data 72G 5 7 6 5G Reset Advanced Settings 72G 6G Find 73G 6 1G Find GO Main menu 73G 6 2G Selection by tapping the map 73G 6 3G Using the Find menu 74G 6 3 1G Find an Address Street Intersectio...

Страница 36: ...r further information please consult the Page 8 1 Warnings and safety information iGO is a navigation system that helps you find your way to your selected destination It will determine your exact loca...

Страница 37: ...t corner This will show a detailed description of the current settings screen 9 2 General information iGO is a navigation system optimised for in car use It provides door to door navigation for both s...

Страница 38: ...onfirm your selection As soon as you leave the screen the selected value becomes effective 10 3 Operating iGO Controls iGO is designed for easy operation All controls are operable by fingertips Wherev...

Страница 39: ...e thumb jumps there immediately As with the list selectors there is no need to confirm your selection As soon as you leave the screen the selected value becomes effective 3 1 4 Switches When a functio...

Страница 40: ...ter letters or numbers when it is inevitable In these cases a full screen keyboard pops up that can easily be operated with your fingertips You can choose between a separate ABC and numeric keypad or...

Страница 41: ...etters only the ABC keyboard appears If you choose the Greek language an additional keyboard appears with Greek letters Similarly Hebraic and Cyrillic letters are available when Hebrew or Russian is c...

Страница 42: ...ains numbers on huge buttons The special keys you find on the other keyboards except Space are available here as well Although QWERTY type keyboards also contain number keys when entering a house numb...

Страница 43: ...ion or change a setting 4 1 Main menu iGO starts by displaying the Main menu This is the root of the screen hierarchy but you need to return here very rarely while using the program Screens are also a...

Страница 44: ...e SD card 4 2 About screen Tap About on the Main menu screen to open this screen The About screen is not used in normal navigation It is there to inform you about the map licenses you have the creator...

Страница 45: ...are current position in latitude longitude format elevation speed date time and calculated accuracy Note Accuracy can be affected by several factors the GPS cannot take into account Use this accuracy...

Страница 46: ...gnal quality x black with a red cross means there is no connection with the GPS device This should never be the case if your device has a built in GPS x red means the GPS is connected but no GPS posit...

Страница 47: ...version of iGO is primarily intended for land navigation That is why maps in iGO look similar to paper roadmaps when using daytime colours and 2D map mode However iGO provides much more than regular...

Страница 48: ...it screens Note If you need to zoom out briefly to locate your position on the map use the Overview mode instead of zooming out and back in The Overview mode is a 2D North up view that can be started...

Страница 49: ...ct iGO to decrease the display backlight when the night colours are used Set the desired backlight levels for both daylight and night modes Page 66 Note The colours mentioned and screenshots included...

Страница 50: ...t adjusts the displayed information to the current view of the map It is important as the driver must be able to read the map at a glance Tip If you do not want to be bothered by street names during n...

Страница 51: ...t It is also the location saved in the track log Page 46 Note the Lock on Road feature can be turned off in Advanced settings Page for 70 pedestrian use When switched off the arrow is displayed where...

Страница 52: ...e History list Page later There they are shown together with their address and GPS Coordinates 80 Tip There is a quick way to save the current GPS position as a Pin Press the Record button hardware bu...

Страница 53: ...d the two POIs have the same icon this icon will be displayed instead of the multi POI icon Note When navigating POI icons can be disabled together with street names Page 58 If you still need this inf...

Страница 54: ...ourney 4 4 10 3 The active leg of the route The active leg is the section of the route you are currently driving If you have not added any Via points the whole route will be the active leg When Via po...

Страница 55: ...p screens the Map screen and the Cockpit screen The way they show the map is the same but their look and controls are optimised for different purposes The Map screen is to be used mainly without a GPS...

Страница 56: ...te menu 2 n a Zooms in optional 3 n a Zooms out optional 4 n a Tilts down optional 5 n a Tilts up optional 6 Indicates that Lock to GPS position and heading is inactive Re enables Lock to Position Sma...

Страница 57: ...turn n a On Map screen only when a route is active Contents differ when a route is active Appears only when a route is active Appears only when a route is active and the next turn is near 4 5 1 Turn p...

Страница 58: ...se semi transparent buttons are only displayed if Zoom Tilt is enabled in the Quick menu Page 42 This function modifies the vertical viewing angle of the map in 3D mode You can change the angle in a w...

Страница 59: ...ps the automatic zooming or automatic tilting respectively To reactivate Smart Zoom tap this button When Smart Zoom is enabled scaling or tilting the map also stops the automatic zooming or automatic...

Страница 60: ...show the new rotation mode Tap the icon again to enter Overview mode This mode looks similar to the North up mode with one difference the zoom level in this mode has a fixed default to give you a bet...

Страница 61: ...s there is a GPS position and navigation is possible When only one arc is shown the position is 2D no altitude available and position error may be significant yet iGO is ready to navigate x A black di...

Страница 62: ...is icon also functions as a button leading to the Track Log screen Page where you can stop the recording or make the track log visible on the map 46 During track log playback a green icon will blink T...

Страница 63: ...s location before the destination of the route This is the way to build a multi point route in reverse order when you wish to insert a stopover go to A but first get some fuel at B or want to influenc...

Страница 64: ...nly available on the Map screen and if there are no POIs near the cursor i e only the address is shown in the Popup Info window x POI opens the list of POIs near the selected point These are the POIs...

Страница 65: ...x Distance to next via point x Time to next via point x Time to next manoeuvre next route event x Speed x Speed limit x Arrival at next via point x Arrival at destination default value for the right f...

Страница 66: ...ed 49 53 As a reminder you can open this screen two ways tapping the Info button in the Route menu Page or tapping one of the Route Data fields on the Cockpit screen As a reminder you can open this sc...

Страница 67: ...that via point The rest of the line remains grey 4 6 1 2 Distance Left This value can also be displayed in one of the Route data fields on the Cockpit screen as Distance to destination This is the di...

Страница 68: ...he following 5 squares are normally grey Some of them turn red and show a graphical symbol in case warning s are attached to the planned route These are warnings so icons always show information for t...

Страница 69: ...it to screen Tap this button to display an overview of the whole recommended route You will jump to the Map screen with a 2D North up view so that you can check where the route takes you 4 6 4 Paramet...

Страница 70: ...conventional top down view This 2D view is also the end of the tilt range so it can also be accessed by tilting the map up Conversely 3D mode can be switched on by tilting down in 2D mode Map view mod...

Страница 71: ...at come with the map Manage built in POI visibility The maps in iGO come with a huge number of POIs Displaying all of them would make the maps too crowded to see how POI items are shown on the map see...

Страница 72: ...ups Manage My POI By highlighting then tapping again the My POI switch on the Manage POI main screen you can manage the POI groups and items that you have created Note The group Unnamed only appears i...

Страница 73: ...ou can edit the attributes name icon visibility level of a previously created My POI group x Left right arrows if your groups fill several pages these buttons will let you browse through them The gree...

Страница 74: ...ure is enabled tapping the screen activating the Cursor a radiating red dot on either of the map screens also opens a pop up box with the selected street name house number and the name of the nearby P...

Страница 75: ...e not shown in the map normally Tip If you wish to see the track log currently being recorded tap on it twice to make it visible In this screen you have the following options x Record this will initia...

Страница 76: ...aved track logs x Enable auto saving when auto saving is enabled you do not need to turn track log saving on and off manually iGO will automatically start recording the track log as soon as GPS positi...

Страница 77: ...frequently use when the window appears automatically provided that the manual route recalculation is set Page 57 Drop Next Via Point Delete Route You can modify the route to skip the next via point if...

Страница 78: ...scratch iGO will warn you before deleting route data This function has a special role if you have used the Avoid feature during your journey When you arrive at your destination the route line disappe...

Страница 79: ...ed list item on the map This will help you identify route events in the list Avoid Tap this button to show a list of possibilities for modifying the route They let you recalculate the route avoiding t...

Страница 80: ...ents iGO is tweaked to give you a smooth and easy to follow playback even at this speed This mode is useful if you want to have a look at the route before you start your journey Tap anywhere on the sc...

Страница 81: ...the list the previous via point will be promoted to be the final destination x Optimise you can optimise the order in which you will drive through the via points if there is no specific order you wou...

Страница 82: ...age 15 33 while some of its sub screens are accessible from other parts of the program 5 1 General settings These are the basic settings of iGO 5 1 1 Safety Mode Safety mode will disable the touch scr...

Страница 83: ...ht Colours Using the automatic night mode iGO will change between the daylight and night colour schemes a few minutes before sunrise and a few minutes after sunset based on the time and location infor...

Страница 84: ...stead of the previous one Move the slider to its rightmost position to turn off the alternative speed warning Then the settings of the upper slider will determine the warning for all roads 5 1 4 3 Alt...

Страница 85: ...Automatic recalculation was selected x Drop Next Via Point Delete Route iGO will remove the next via point from the list and recalculate the route without it If you have only one target left the label...

Страница 86: ...detailed fast They influence when iGO hides and shows certain map features while zooming in or out Setting a higher detail level will result in objects appearing sooner when zooming in Although the m...

Страница 87: ...iGO sounds 5 3 1 Master sound volume switch The loudness of iGO is independent of your PNA settings When you run iGO the position of this fader determines the device volume level When you exit the pro...

Страница 88: ...e in the car may be too loud to clearly understand the voice guidance messages and to perceive the key sounds Using Dynamic Volume you can instruct iGO to increase the volume when your speed exceeds a...

Страница 89: ...erent route types 5 4 2 1 Shortest Choosing Shortest will result in a route that has the smallest total distance of all possible routes between the given points This is usually preferred by pedestrian...

Страница 90: ...m but only as much as necessary In this case a warning icon will be shown on the Route Information screen Page and the road not matching your preference will be displayed in alternate colour on the ma...

Страница 91: ...he owners These roads are excluded from your routes by default Use this switch if your vehicle is authorised to enter 5 4 4 6 Toll Roads Toll roads are included in your routes by default If you wish t...

Страница 92: ...lect a measurement unit that is not supported by the chosen voice guidance language you will see a red warning message under the selector 5 5 4 Set Date Time Format You can set the date and time forma...

Страница 93: ...ually done in a 3D view with the current direction towards the top of the map By default iGO uses the same look of the map in both Map and Cockpit modes Use this switch to instruct iGO to always open...

Страница 94: ...he left of the landscape Cockpit screen There are three route data fields at the bottom of the Cockpit screen There are three route data fields on the left of the Cockpit screen Their content is fixed...

Страница 95: ...ting system at Start Settings Backlight or you can set the backlight level separately for both daylight and night modes thus enhancing the effect of the night colour scheme 5 7 4 Smart Zoom Smart zoom...

Страница 96: ...in the middle again On the other hand you are not allowed to rotate the map in Overview mode This mode is a strictly north up orientated mode Note when this automatic feature is disabled you can still...

Страница 97: ...ck to Position the view changes smoothly Note Smart Zoom can only be re enabled when it is activated at the top of this page With Smart Zoom turned off neither does the Lock button appear nor will the...

Страница 98: ...efore the program decides to recalculate Lower values make iGO insensitive to position errors higher values will result in quicker reactions Recalculation delay This is a setting that helps suppress t...

Страница 99: ...re versions of the user database or you wish to save one particular state e g saved POIs and track logs of your holiday look for the backup file on the SD card rename it or save it to your PC Tip If y...

Страница 100: ...lose all your Pins 5 7 6 4 Clear Data This button will delete all user data It is a reset to factory settings Tapping this button means you lose all your saved data and customised settings iGO will w...

Страница 101: ...Find GO Main menu As just mentioned the fastest way to find your destination and start navigating is to tap Find GO in the Main menu Page This will put you on the Find screen and as soon as you pick a...

Страница 102: ...et Intersection or City Searching for a city a street an intersection or an exact address can all be done in the Find Address module If you know at least a part of the address this is the quickest way...

Страница 103: ...currently in just start Find Address and read the first line of the list This function leads to a reliable result only if GPS position is available and you have not disabled Lock to Position by movin...

Страница 104: ...st You can select the one you are looking for by tapping the appropriate list item Note When more than 300 matching items a list of more than 60 pages exist for the entered pattern s iGO stops searchi...

Страница 105: ...cted you need to select a settlement by entering a part of its name or postcode then selecting from the list of available matching items as described before Note In Australia you can skip this part by...

Страница 106: ...you need to enter fewer letters to get the list of results You may also choose the shorter of the two streets first This way it will be faster to choose the second one from the list of crossing stree...

Страница 107: ...vailable intersections of the previously selected street displayed in the top centre of the screen The crossing of the two streets will be the selected point 6 3 1 5 An example for a full address sear...

Страница 108: ...6 3 2 Find in History If you have used Find before or saved map points as POIs marked points with a pin or picked and used points of the map before they all appear in the History list This list is or...

Страница 109: ...nds after minutes When finished tap the longitude on the right and enter it as you did latitude This time the hemisphere changing button tells iGO whether the point is located East or West from the me...

Страница 110: ...h will be carried out around the current location given by the GPS if it is available If no GPS position is available the last known GPS position grey arrow on the map will be used x Cursor the search...

Страница 111: ...Tapping OK will return to the map with the selected POI in the centre or starts navigating to it if Find GO was selected Tapping the arrow in the top left corner returns to the search results Tip If y...

Страница 112: ...O function at the Main menu it is only two taps to start navigating to one of your Favourites Note If you try to access a favourite destination that you have not yet set up iGO will lead you to the se...

Страница 113: ...torun functionality If you choose not to initiate a reset please look for the iGO 2006 strip 85 7 Troubleshooting guide Thank you again for purchasing our product We hope you will enjoy every minute o...

Страница 114: ...eding because iGO failed to warn me For an accurate speed warning the actual speed limits of each street and road must be present correctly on the map This is a relatively new feature of digital maps...

Страница 115: ...ur new POI as if it was opened from the Cursor menu Sometimes the operating system disables the autorun feature The best you can do is to soft reset your PNA That should restore autorun functionality...

Страница 116: ...shown in iGO on the GPS Data screen Page Lower numbers indicate better accuracy where 1 0 is near perfection Use it as a general reference only Note that several other factors affect the real accuracy...

Страница 117: ...used as a general reference It will not be able to take into account your future speed or the traffic delays In iGO this value is shown as Estimated Arrival on the Route Information screen Page 40 ETE...

Страница 118: ...he current direction of the map Map orientation should not be mixed up with Screen orientation 32 NMEA National Marine Electronics Association This is the name of a communication protocol format This...

Страница 119: ...or analysing your manoeuvres during the trip See also Page 46 Track up A kind of map orientation when the map is rotated to look always in the direction of your heading See also North up and Map Orien...

Страница 120: ...2007 Uniden Australia Pty Limited Uniden New Zealand Ltd Printed in China THANK YOU FOR BUYING A UNIDEN PRODUCT...

Отзывы: