background image

16

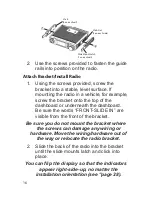
L-Tab

(2 on each rail)

L-Tab Slot

(2 on each side)

Slide Mount Latch

(1 on each rail)

2.  Use the screws provided to fasten the guide 

rails into position on the radio.

Attach Bracket/Install Radio 

1.  Using the screws provided, screw the 

bracket into a stable, level surface. If 

mounting the radio in a vehicle, for example, 

screw the bracket onto the top of the 

dashboard or underneath the dashboard. 

Be sure the words “FRONT-SLIDE IN” are 

visible from the front of the bracket.

Be sure you do not mount the bracket where 

the screws can damage any wiring or 

hardware. Move the wiring/hardware out of 

the way or relocate the radio bracket. 

2.  Slide the back of the radio into the bracket 

until the slide mounts latch and click into 

place. 

You can flip the display so that the indicators 

appear right-side-up, no matter the 

installation orientation (see “page 28).

Содержание CMX660

Страница 1: ...2017 Uniden America Corporation U01UT418ZZZ 0 Irving Texas Printed in Vietnam CMX660 PROFESSIONAL MOBILE CB RADIO Owner s Manual...

Страница 2: ......

Страница 3: ...A 12 Safety Notice 13 INSTALL MICROPHONE HANGER CONNECT MICROPHONE 14 Install Microphone Hanger 14 Connect Microphone 14 Disconnect the Microphone 15 INSTALL RADIO BRACKET INSTALL RADIO 15 Attach Side...

Страница 4: ...t Weather Alert Mode 25 MENU OPERATION 25 Set Dimmer 25 Set Key Beep 26 Set Roger Beep 27 Set Battery Check 27 Set FLIP 28 PREVENTIVE MAINTENANCE 28 MAINTENANCE 28 TROUBLESHOOTING 29 SERVICING YOUR RA...

Страница 5: ...asily under the seat to free up space in the vehicle s cabin Its rugged components and materials are capable of withstanding harsh environments Please read this Owner s Manual carefully to ensure you...

Страница 6: ...FCC Rules or in violation of type acceptance requirements in Part 2 of the rules This is an FCC rule and applies to all CB radio operators FEATURES 40 AM Channels 7 Weather Channels Channel Monitor SQ...

Страница 7: ...7 WHAT S IN THE BOX CMX660 Radio Microphone Microphone Hanger with Hardware Not Shown Printed Materials CMX660 Slide Mount Bracket with Hardware CMX660 DC Power Cord with Fuse...

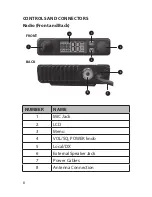
Страница 8: ...8 CONTROLS AND CONNECTORS Radio Front and Back 1 8 7 FRONT BACK 6 4 2 5 3 NUMBER NAME 1 MIC Jack 2 LCD 3 Menu 4 VOL SQ POWER knob 5 Local DX 6 External Speaker Jack 7 Power Cables 8 Antenna Connection...

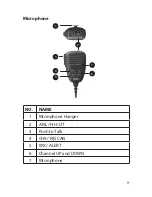
Страница 9: ...9 Microphone 1 2 3 4 5 6 7 NO NAME 1 Microphone Hanger 2 ANL HI CUT 3 Push to Talk 4 CH9 19 SCAN 5 WX ALERT 6 Channel UP and DOWN 7 Microphone...

Страница 10: ...re with bracket installation The basic steps to install this unit are Connect Power Connect Antenna Install Microphone Hanger Connect Microphone Install Radio Bracket Install Radio CONNECT POWER Unide...

Страница 11: ...ower cord from the radio to the positive battery terminal or other convenient point Then connect the black power cord to the vehicle chassis or negative battery terminal Connect Power 1 Connect the po...

Страница 12: ...y important To achieve the maximum transmission distance Uniden strongly recommends that you install only a high quality antenna You have just purchased a superior radio don t diminish its performance...

Страница 13: ...n SWR higher than 2 1 can damage the radio Safety Notice The antenna used for this radio must be properly installed and maintained and must provide a separation distance of at least 16 9 inches 43 cm...

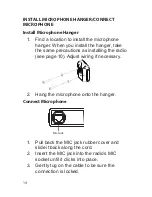
Страница 14: ...he same precautions as installing the radio see page 10 Adjust wiring if necessary 2 Hang the microphone onto the hanger Connect Microphone Mic Jack 1 Pull back the MIC jack rubber cover and slide it...

Страница 15: ...the MIC jack s lock tab tug gently on the MIC cord until it disconnects If you are using the extension cable disconnect the cable from the radio and the MIC from the other end of the extension cable...

Страница 16: ...he bracket onto the top of the dashboard or underneath the dashboard Be sure the words FRONT SLIDE IN are visible from the front of the bracket Be sure you do not mount the bracket where the screws ca...

Страница 17: ...xcept Channel 9 may be used for normal communication The FCC reserves Channel 9 for emergencies involving the immediate safety of individuals or protection of property Use Channel 9 to render assistan...

Страница 18: ...ng In Menus other settings Channel number Menu mode on TX error Mode Indicator CB or WX Mode is on CB WX Menu Volume Setting SQ Setting Rotary Select mode on FLIP setting on TX Power No CB signals rec...

Страница 19: ...see page 26 Blinks during ON OFF selection in menus Roger Beep Roger Beep sound is off WX mode is on Roger Beep sound is on see page 27 CB mode is on WX mode is off Blinks during ON OFF selection in...

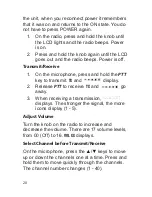
Страница 20: ...rophone press and hold the PTT key to transmit TX and display 2 Release PTT to receive TX and go away 3 When receiving a transmission displays The stronger the signal the more icons display 1 5 Adjust...

Страница 21: ...iter detects static noise peaks and clips those peaks to preserve the integrity of the received signal HI CUT High Cut attenuates signals higher than a specific threshold You can set either ANL or HI...

Страница 22: ...ls are not reduced The number of bands on the LO DX icon show which setting is active Three bands indicate DX is active Two bands indicate L1 is active One band indicate L2 is active 1 Press DX displa...

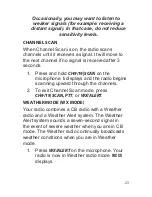
Страница 23: ...n the microphone S displays and the radio begins scanning upward through the channels 2 To exit Channel Scan mode press CH9 19 SCAN PTT or WX ALERT WEATHER MODE WX MODE Your radio combines a CB radio...

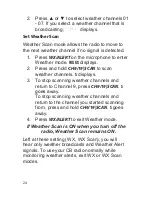
Страница 24: ...her channels S displays 3 To stop scanning weather channels and return to Channel 9 press CH9 19 SCAN S goes away To stop scanning weather channels and return to the channel you started scanning from...

Страница 25: ...Weather Alert on ALT displays for a moment and displays 2 Press and hold WX ALERT to turn Weather Alert off The icon goes away MENU OPERATION Press on the radio to access the 5 CMX660 menus Dimmer Key...

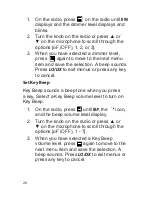
Страница 26: ...Press LO DX to exit menus or press any key to cancel Set Key Beep Key Beep sounds a beep tone when you press a key Select a Key Beep volume level to turn on Key Beep 1 On the radio press until BEP the...

Страница 27: ...exit menus or press any key to cancel Set Battery Check Turning Battery Check on lets the radio display a notification BAT Lo or BAT HI if the battery power supply is in the upper high or lower low r...

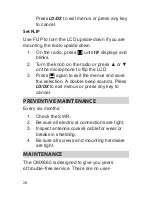
Страница 28: ...flip the LCD 3 Press again to exit the menus and save the selection A double beep sounds Press LO DX to exit menus or press any key to cancel PREVENTIVE MAINTENANCE Every six months 1 Check the SWR 2...

Страница 29: ...ce with the same type fuse Use only the fuse specified for your CMX660 Failure to do so may void your warranty TROUBLESHOOTING In the event of system malfunction perform the following procedures PROBL...

Страница 30: ...alternator If you do not get satisfactory results after performing these checks visit the Uniden website www uniden com for troubleshooting and FAQ information SERVICING YOUR RADIO It is the user s r...

Страница 31: ...ce 50 ohms unbalanced Power Input 13 8VDC Current Drain TX AM Full Modulation 1 5A max RX At no signal 400mA max Operating Temperature 22 F to 140 F 30 C to 60 C Accessories DC Power Cord with Built I...

Страница 32: ...9 Pounds Antenna Connector M Type TRANSMITTER UNIT NOMINAL Output Power Watts 4 Hum and Noise dB 40 Frequency Tolerance 0 002 Spurious Rejection dBc 70 RECEIVER UNIT NOMINAL Sensitivity at 10 dB S N d...

Страница 33: ...dance ohms 8 WEATHER RADIO UNIT NOMINAL Usable Sensitivity for 12dB SINAD dBm 112 Distortion 0 5W output 1KHz 3KHz DEV 3 Maximum Audio Output Power W 3 Alert Sense dB 110 Alert Frequency Hz 1040 to 10...

Страница 34: ...e the equipment Avis de conformit la FCC Ce dispositif a t test et s av re conforme l article 15 des r glements de la Commission f d rale des communications FCC Ce dispositif est soumis aux conditions...

Страница 35: ...Canada Son fonctionnement est soumis aux deux conditions suivantes 1 cet appareil ne doit pas causer d interf rences nuisibles et 2 il doit pouvoir accepter les interf rences incluant celles pouvant n...

Страница 36: ...d by someone other than an authorized Uniden service center for a defect or malfunction covered by this warranty E used in any conjunction with equipment or parts or as part of any system not manufact...

Страница 37: ...ER OR PROVIDE FOR THE REIMBURSEMENT OR PAYMENT OF INCIDENTAL OR CONSEQUENTIAL DAMAGES Some states do not allow this exclusion or limitation of incidental or consequential damages so the above limitati...

Страница 38: ...h the Product Include evidence of original purchase and a note describing the defect that has caused you to return it The Product should be shipped freight prepaid by traceable means to warrantor at U...

Страница 39: ...Confidential information 10 3 Stop transmitting 10 36 Correct time is 10 4 OK message received 10 37 Wrecker needed at 10 5 Relay message 10 38 Ambulance needed at 10 6 Busy stand by 10 39 Your messag...

Страница 40: ...Unable to copy use phone 10 17 Urgent business 10 63 Net directed to 10 18 Anything for us 10 64 Net clear 10 19 Nothing for you return to base 10 65 Awaiting your next message assignment 10 20 My loc...

Страница 41: ...o channel 10 85 My address is 10 28 Identify your station 10 91 Talk closer to microphone 10 29 Time is up for contact 10 93 Check my frequency on this channel 10 30 Does not conform to FCC rules 10 9...

Страница 42: ......

Страница 43: ......

Страница 44: ......

Отзывы: