background image

22

Terms  of  Warranty: 

Uniden  Aust  warrants  to  the  original  retail 

purchaser  only  that  the  BW4351  (“the  Product”),  will  be  free  from 
defects  in  materials  and  craftsmanship  for  the  duration  of  the  warranty 
period,  subject  to  the  limitations  and  exclusions  set  out  below. 
 

Warranty  Period: 

This  warranty  to  the  original  retail  purchaser  is  only 

valid  in  the  original  country  of  purchase  for  a  Product  first  purchased 
either  in  Australia  or  New  Zealand  and  will  expire  two  (2)  year  from  the 
date of the original retail sale. If a warranty claim is made, this warranty 
will not apply if the Product is found by Uniden to be:

A. Damaged or not maintained in a reasonable manner or as recommended 

in the relevant Uniden Owner’s Manual;

B. Modified, altered or used as part of any conversion kits, subassemblies 

or any configurations not sold by Uniden Aust;

C. Improperly  installed  contrary  to  instructions  contained  in  the  relevant 

Owner’s Manual

D. Repaired by someone other than an authorized Uniden Repair Agent in 

relation to a defect or malfunction covered by this warranty; or

E. Used  in  conjunction  with  any  equipment,  parts  or  a  system 

notmanufactured by Uniden.      

 
Parts  Covered: 

This  warranty  covers  the  Product  and  included 

accessories.

 
User-generated Data: 

This warranty does not cover any claimed loss of 

or damage to user-generated data (including but without limitation phone 
numbers,  addresses  and  images)that  may  be  stored  on  your  Product. 

Satisfactory  evidence  of  the  original  purchase  is  required  for  warranty 
service.  Please  refer  to  our  Uniden  website  for  any  details  or  warranty 
durations offered in addition to those contained below.

The  warrantor  is  Uniden  Australia  Pty  Limited  ABN  58  001  865  498 
(“Uniden Aust”). 

BW4351

Important: 

Warrantor:

Содержание BW4351

Страница 1: ...1 BABY MONITOR BW4351 For more exciting new products please visit our website Australia www uniden com au OWNER S MANUAL...

Страница 2: ...sk of swallowing Keep packaging material away from children risk of suffocation Never place the Baby Unit in the cot or within the reach of your child Make sure that cables are out of the reach of you...

Страница 3: ...nd or interfere with the normal flow of air Warning to Parents and Other Users To avoid damage to your equipment follow these simple precautions Do not drop puncture or disassemble any part of the equ...

Страница 4: ...NG STARTED 6 INSTALLATION 10 General Placement Considerations 10 Powering the Camera 11 Powering the Monitor 12 SYSTEM MENUS 13 Monitor Function Settings 13 Camera Settings 14 Alert Settings 16 System...

Страница 5: ...purchase immediately Never use damaged products Need help Get answers at our website www uniden com au for Australian model All trademarks are registered trademarks of their respective owners WHAT S I...

Страница 6: ...6 1 3 2 4 GETTING STARTED 6 8 7 5 CAMERA...

Страница 7: ...n the back of the camera to turn on off it 3 It will be turned on when the VOX alert mode is actived 4 When pairing is successful it will be shinning for 1 minute 5 After the camera is plugged in it w...

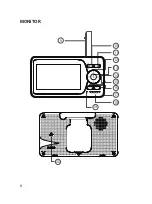
Страница 8: ...8 11 12 13 14 15 16 17 19 9 10 20 18 MONITOR...

Страница 9: ...aker volume In Menus Scroll left In Live View Tilt down Decrease screen brightness In Live view Pan right Increase speaker volume In Menus Scroll right 13 OK In Menus Press down to select a menu or ac...

Страница 10: ...void having a direct light source in view of the camera ceiling or floor lamps Carefully plan where and how the camera will be positioned and where you will route the cable that connects the camera to...

Страница 11: ...n the camera at the back of the camera 2 Connect the other end of the USB cable into the USB power adaptor 3 Connect the USB power adaptor into a 240 volt AC standard indoor power outlet 4 Switch on t...

Страница 12: ...into a 240 volt AC standard indoor power outlet 6 Press and hold the POWER button to turn the unit on or off Let the monitor charge for 6 hours prior to first time use so the built in rechargeable mon...

Страница 13: ...automatic notification to you This chapter will introduce the user definable settings item by item Access Monitor Menu In states of live view press MENU button on the monitor can enter into MENU list...

Страница 14: ...dd Camera and press OK to confirm 3 When the device prompts Start pairing please press the SET button on the camera press the SET button on the camera and at this point the device enters pairing mode...

Страница 15: ...pauses Select All to play all the lullabies in a loop After settings are completed press MENU to return 3 You can also play music quickly through the music play button on the panel 4 Notice In the cur...

Страница 16: ...igh Off as needed and press OK to confirm 3 Press BACK button to exit Temperature alert settings When it is too hot or too cold in your baby s room the temperature alert will push a notification to yo...

Страница 17: ...prevent you from forgetting to feed your baby as busy or for other reasons which may remind you 1 Select Alert Settings press OK to enter the settings page and select Alerts Settings 2 Select the time...

Страница 18: ...press OK to confirm 4 Press BACK button to exit Power saving mode You can set the monitor to automatically enter Power saving mode The monitor will automatically enter energy saving state according to...

Страница 19: ...to confirm The device begins to execute a factory reset 4 Press BACK button to exit View version information View version information of the monitor and camera 1 Select Settings and press OK to enter...

Страница 20: ...farther apart if the unit emits a loud screeching noise There is an irregular beeping coming from the monitor That is the Alert tone Go to the Alert screen to turn the alert volume down or off The pi...

Страница 21: ...nication Range up to 150m Line of Sight GENERAL CAMERA Image Sensor 1 6 5 Color CMOS Video Resolution 640 x 480 Viewing Angle 45 H Rotation Angle Pan 350 Tilt 55 Night Vision up to 3m Power Consumptio...

Страница 22: ...ersion kits subassemblies or any configurations not sold by Uniden Aust C Improperly installed contrary to instructions contained in the relevant Owner s Manual D Repaired by someone other than an aut...

Страница 23: ...lure This warranty is in addition to and sits alongside your rights under either the COMPETITION AND CONSUMER ACT 2010 Australia or the CONSUMER GUARANTEES ACT New Zealand as the case may be none of w...

Страница 24: ...24 2020 Uniden Australia Pty Ltd Printed in PRC v1 0...

Отзывы: