background image

10

WPP 15 E | Version 1.02

Before commissioning

9 Before commissioning

Step 1: bleed the hydraulic system; for this purpose, 

turn the switching valve in anti-clockwise direc-
tion. Operate the pump lever several times to re-
move the air from the hydraulic system. Then 
once again close the switching valve.

Step 2: check all lines and connections are not leaking. 

Check all machine parts are undamaged and 
operate as intended.

10 Operation

10.1 Adjusting the table height

Adjust the correct table working height using the sup-
port bolts to safely work on the hydraulic workshop 
press.

Step 1: lift the press table on one side and keep it in this 

position.

Step 2: pull the support bolt from the frame bore on the 

side the table was lifted.

Step 3: lift the press table to the desired height or 

slightly above the corresponding frame bore.

Step 4: insert the support bolt into the corresponding 

frame bore.

Step 5: lower the press table onto the support bolt. 

Step 6: also carry out these steps on the second side so 

the table is positioned horizontally.

10.2  Setting up the work area

The work area must have been set up properly to be 
able to safely process the workpiece. 

WARNING!
Risk of death!

Non-observance of these instructions causes a risk 
of death.
-  Do not work on the hydraulic workshop press under 

the influence of alcohol, drugs or medication and/
or if you are very tired or suffer from conditions im-
pairing your concentration.

-  The hydraulic workshop press must be operated by 

one person only. Additional persons must keep out 
of the work area during operation.

ATTENTION!
Risk of pinching!

Incorrectly working on the hydraulic workshop press 
causes a risk of injury to fingers and hands.
-  Securely position the workpiece for processing on 

the support blocks and/or secure it to the support 
blocks.

-  Do not reach into the operating range of the hy-

draulic workshop press during operation.

-  Do not reach into the press and keep away from 

moving parts!

Wear head protection!

Wear hearing protection!

Wear protective goggles!

Wear protective gloves!

Wear safety shoes!

Wear protective clothing!

NOTE!

Carry out the following before operating the hydrau-
lic workshop press for the first time.
-  Check all screw connections on the installed, hy-

draulic workshop press and retighten if necessary.

-  Fill the pump with hydraulic oil or top it up and seal 

the filler neck using the yellow, plastic vent plug.

-  Remove any air from the hydraulic system.

ATTENTION!
Risk of pinching!

Pinching may result from the press table not having 
been fully supported on the support bolts.
-  Check the table is fully supported on the support 

bolts before adjusting the table height.

-  Make sure the safety splints have been attached 

correctly!

Содержание WPP 15 E

Страница 1: ...WPP 15 E WPP 15 E Operating instructions Hydraulic workshop press WPP 15 E...

Страница 2: ...responsibility 4 2 3 Operating staff qualification 4 2 4 Personal protective equipment 5 2 5 Safety identifications on the workshop press 5 3 Intended use 6 3 1 Foreseeable misuse 6 3 2 Remaining ris...

Страница 3: ...hinen de Please submit any information and experiences you make during application of the machine as these may be valuable for product improvements 1 3 Disclaimer All data in these operating instructi...

Страница 4: ...ating instructions where necessary Operators shall clearly manage and specify the re sponsibilities for installation operation trouble shooting maintenance and cleaning Operators must make sure that a...

Страница 5: ...ersons at work Staff must wear the personal protective equipment indicated in individual sections of these operating instructions when carrying out the different tasks on the machine The personal prot...

Страница 6: ...misuse If the intended purpose of the workshop press is ob served there is no actually foreseeable misuse that may cause hazardous situations involving personal injury 3 2 Remaining risks Even when o...

Страница 7: ...tect them from humidity and dirt Transport using industrial trucks pallet trucks The hydraulic workshop press must be positioned on an even stable surface e g a pallet and be secured with bolts in the...

Страница 8: ...ve grille Pressure barb set 7 Setup The hydraulic workshop press must be set up and oper ated in dry well ventilated indoor areas only It must be positioned securely and set up on an even stable surfa...

Страница 9: ...ress table onto the support bolts in the frame 8 2 Installing the pump unit Fig 7 Installing the pump unit Step 1 screw the pump unit onto the outside of the frame using the screws and shims see Fig 7...

Страница 10: ...not work on the hydraulic workshop press under the influence of alcohol drugs or medication and or if you are very tired or suffer from conditions im pairing your concentration The hydraulic workshop...

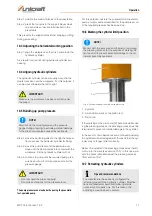
Страница 11: ...has been built up 10 6 Marking the cylinder limit position Fig 9 Cylinder limit position mark on the piston rod 1 Cylinder 2 Limit position mark on the piston rod 3 Piston rod If the marking on the pi...

Страница 12: ...aped oil using a clean and lint free cloth We recommend to have specialist staff clean and check the hydraulic workshop press at minimum once a year 11 2 Maintenance and repairs Maintenance and repair...

Страница 13: ...e hydraulic pipes and connections checked by an authorised person In the event of increased usage periods frequent or increased pressure pulses or severe external influ ences the machine must be check...

Страница 14: ...fied upon approval shall be excluded The statutory period of liability for defects of two years shall not apply to commercial customers 2 The period of liability for defects shall be one year from the...

Страница 15: ...intent or gross negligence liability shall be excluded 9 The scope of our liability as per product liability legislation shall remain unaffected 14 Spare parts 14 1 Spare parts orders Spare parts are...

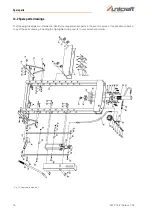
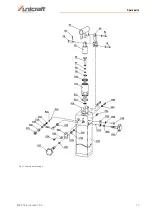
Страница 16: ...ts drawings The following drawings are intended to identify the required spare parts in the event of service If applicable submit a copy of the parts drawing including the highlighted components to yo...

Страница 17: ...Spare parts WPP 15 E Version 1 02 17 Fig 11 Spare parts drawing 2...

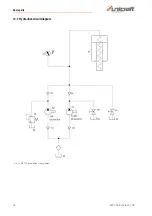
Страница 18: ...18 WPP 15 E Version 1 02 Spare parts 14 3 Hydraulics circuit diagram Fig 12 WPP 15 E hydraulics circuit diagram...

Страница 19: ...as any other applicable directives subse quently added including the changes applicable at the time the declaration was made Relevant EU directive 1997 23 EC Directive for pressurised devices until 18...

Страница 20: ...www unicraft de...

Отзывы: