


Warning: Ensure the Flux2 Display installation does not block your field of view. By carefully positioning the suction
cup mount and properly articulating the mounting arm, the Flux2 Display can be visually positioned in front of the
vehicle’s A-pillar or dash pad rather than blocking your view out the windshield.
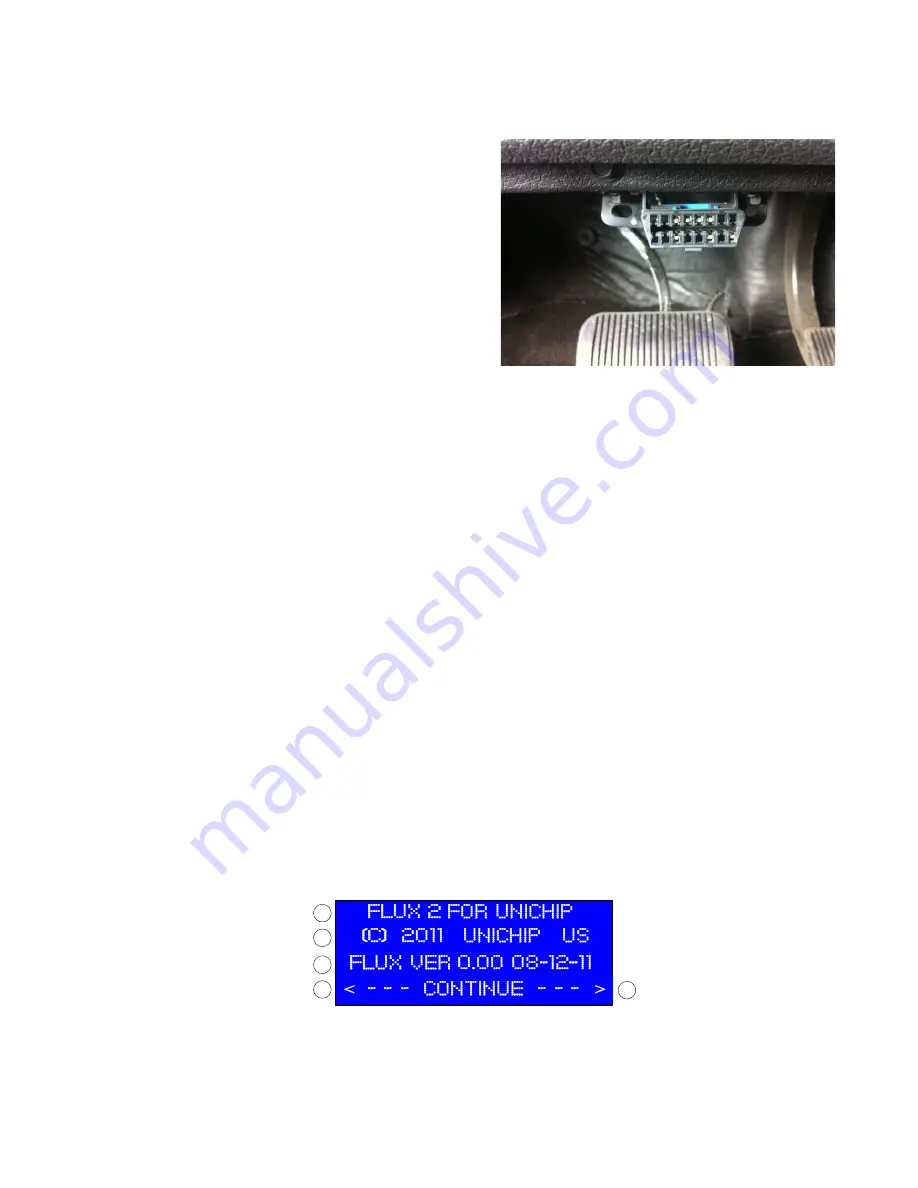
Note: (1) Your vehicle’s OBD2 port is located
underneath the dashboard, near the steering column.
The port may be open and exposed or it may be behind
a trim panel. The connector is in the same shape as the
OBD2 Plug on the Flux2 harness. If the vehicle’s OBD2
port is exposed, it will probably have a slip off cover
that must be removed to connect Flux2.
(2) By regulation, the OBD2 port will be located within
two feet (61 cm) of the steering wheel and you will not
need tools to access the port.
Warning: The OBD2 connector plug often has a cover and is not mounted very securely. Pushing on the OBD2
connector case can cause the case to separate from the connector resulting in damage. Use caution and both hands
when connecting to avoid pushing the OEM port into a position which precludes a connection. Some VW vehicles, in
particular, are prone to this.
c.
Next connect the Unichip Connection Loom to the Unichip Performance Computer; the Unichip Performance Computer
Connector has both a female and male plug. Disconnect the exiting 24-pin connector from the Unichip Computer and insert it
into the female plug side of the Unichip Connection Loom and then plug the male plug side into the Unichip.
Note: If you have another map switching device (like a 2-way or 5-way mechanical switch or the Bluetooth Flux
Receiver), you should disconnect that device before installing the Flux2. Although you won’t damage the Flux2
Display, some positions of those other devices will inhibit the Flux2 Display’s map switching capability).
Warning: Use care when routing the looms as poor routing may allow the loom to cause interference with vehicle
controls. Use Zip ties to securely attach the loom to the car. Do not leave extra loom loosely around the passenger
compartment
d.
Connecting external accessories. If you have purchased the EGT or Boost add-on kits, connect the cables provided with
the sensor into the appropriate connector on the back of the Flux2 display. Ensure you connect the kit’s 4-pin Molex Plug into
the correct port on the back of the Flux2 Display.
Warning: Use care when routing the looms as poor routing may allow the loom to cause interference with vehicle
controls. Use Zip ties to securely attach the loom to the car. Do not leave extra loom loosely around the passenger
compartment
4.
Launch
.
Once installation is completed, either start the vehicle or turn the ignition key on to power up the factory
computer and hit any button on the Flux2 Display to turn it on. You will see a version information screen that will automatically
switch to the first caution display 5 seconds after launching. You can also press the buttons on either side of
<
---
---
---
---
CONTINUE
CONTINUE
CONTINUE
CONTINUE ---
---
---
---
>
to proceed to the first caution display immediately.
Whether using the Flux2 Display or doing anything else in your vehicle, SAFELY OPERATING YOUR VEHICLE MUST
ALWAYS BE YOUR PRIORITY. Excessive focus on the Flux2 Display while operating your vehicle is dangerous and
the lack of attention afforded to operating the vehicle may lead to an accident which results in damage or loss of live.
Pressing the
I ACCEPT
I ACCEPT
I ACCEPT
I ACCEPT
> button on the first and second caution display indicates your understanding of the
dangers associated with using a display system in your vehicle.


