background image


12 


10.6. 

USB 


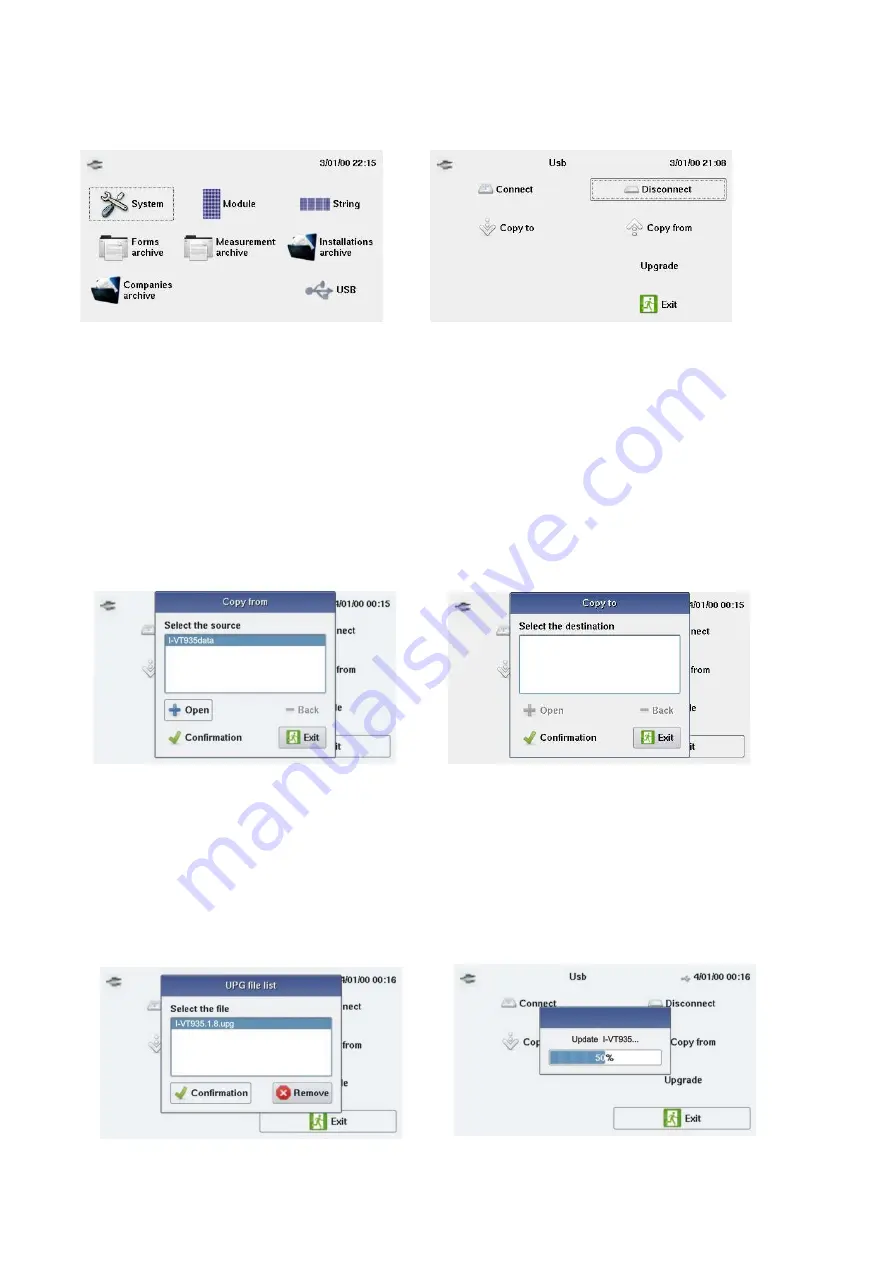
Select this icon to access the USB port management menu and its controls. 


Main screen 

USB menu screen 


The USB port can be used to control the following devices. 


10.6.1.  USB-Bluetooth adapter 

this device allows the instrument to communicate with the "UT925 Remote Unit" to obtain the measurements from the 

atmospheric  probes.  The  instructions  for  adjusting  the  USB-BLUETOOTH  ADAPTER  are  given  in  Chapter  10.1, 

"System". 


10.6.2.  USB pen drive 

USB memory is used to transfer archives (measurements or settings) from the instrument to the PC and vice versa. This 

is done by selecting the "Copy to…" or "Copy from…" command; a window then appears on the screen for the selection 

of the destination folder or the "source" folder. 


"Copy from..." message box 

"Copy to..." message box 


The "Copy to..." command corresponds to a transfer from the instrument onto the USB pen drive. 

The "Copy from..." command corresponds to a transfer from the USB pen drive to the instrument. 


The pen drive is also used to update the instrument's firmware. To carry out the update, make sure you have copied the 

file with the "upg." extension to the USB key. Once the USB key connection is established, select "Update" in the menu; 

a window in which to select the update file appears on the monitor. Select the file to be loaded, then click on "Confirm". 

The progress bar displays the progress of the update; when it is complete, you are prompted to restart the instrument. 

Press OK to finish the procedure. 


File selection window 

Update progress bar window 

Содержание I-V Tracer 935

Страница 1: ...1 I V Tracer 935 USER S MANUAL UNAOHM S r l Via G Di Vittorio 49 20068 Peschiera Borromeo MI Italia Tel 39 0236577787 Fax 39 0251650195 Web www unaohm it E mail sales unaohm it ...

Страница 2: ...ER The operator must refer to these instructions whenever this danger symbol appears The CE marking indicates conformity with European directives in particular LVDand EMC Equipment protected by double insulation The rubbish bin with a line through it indicates that in the European Union the product mustundergo selective disposal in compliance with Directive WEEE 2002 96 EC This equipment must not ...

Страница 3: ...measurements Mains power may be used only to recharge the internal batteries with the instrument switched off Respect the environmental conditions Use personal protection equipment systematically Never use it on systems of which the voltage or category is higher than that indicated For replacement of the internal battery contact an authorized service center only These components have specific safe...

Страница 4: ...NTS 14 11 1 Electrical connections 14 11 2 Remote Unit 15 11 3 Module or String 15 11 3 1 Interpreting the measurement results 21 11 4 Other functions 22 11 4 1 FS full scale function 22 11 4 2 Zoom Function 22 12 TECHNICAL CHARACTERISTICS 24 12 1 Reference conditions 24 12 2 Specifications 24 12 3 Environmental conditions 24 12 4 Construction specifications 25 12 5 Electromagnetic compatibility 2...

Страница 5: ...e MPP voltage up to 1000 VDC measurement of the short circuit current and the MPP current up to 10 ADC graphic representation of the I V curve with marker at the MPP graphic representation of the power curve with marker at the MPP comparison of the measurements with the panel nameplate data and indication of the result OK NO calculation of the efficiency of the solar panels and display of the diff...

Страница 6: ...nt measurements 8 Multi function keypad including the following keys up arrow key right arrow key OK button to confirm selection left arrow key down arrow key On off key Return to main menu key BATT Ch LED active only with external power supply connected lit while battery is charging which takes place ONLY when the instrument is Off FULL CH LED INDICATOR active only with external power supply conn...

Страница 7: ...provided with the instrument be used This type of power supply unit is specific to the instrument and ensures electrical safety If the battery is fully discharged the charging time is approx 5 hours 7 3 Mains power supply unit The mains power unit accepts voltages ranging from 90V to 260V 50Hz The protecting fuses are inside the mains power unit and are not accessible NOTE If the fuses blow do not...

Страница 8: ... software Display The date and time can be displayed at all times in the top bar of the display pressing the key opens a window in which you can select one of the following conditions Local the date and time are not displayed Date Time the current date and time are displayed simultaneously Date only the current date isdisplayed Time only the current time isdisplayed Setting the date and time the c...

Страница 9: ...ecessary Language press the key to open the language selection window Touch the desired language on the screen to confirm the selection and exit Memory used this displays the percentage of the instrument s memory occupied by the data entered and the stored measurements Note that the available memory of the instrument is 84 MBytes 10 2 Module Archive Selecting this icon opens a window with the foll...

Страница 10: ... PV module manufacturer 0 to 50 10 3 Company Archive Select this icon to access the client record management look up and deletion functions via the following menus New select this icon to enter a new record Click in the desired field to open the keypad when you have finished typing confirm your entry by pressing ENTER Note the Tax code field must be filled in List press this icon to open the list ...

Страница 11: ...record select the desired line and press Delete Measurements Archive Windows 10 5 Installations Archive Press this icon to access the installations archive in order to create manage and if necessary delete measurement records The available functions are New select this icon to enter the new installation entry window When the field of an item is selected the data entry keypad opens when you have fi...

Страница 12: ...he screen for the selection of the destination folder or the source folder Copy from message box Copy to message box The Copy to command corresponds to a transfer from the instrument onto the USB pen drive The Copy from command corresponds to a transfer from the USB pen drive to the instrument The pen drive is also used to update the instrument s firmware To carry out the update make sure you have...

Страница 13: ...serted in the port USB BLUETOOTH ADAPTER or USB PEN DRIVE During the connection of the inserted device a connection progress indicator appears on the monitor Connection message box Connection progress window Disconnect select this command to start the safe disconnection of the connected device The disconnection progress bar appears on the monitor once disconnection is complete it is possible to di...

Страница 14: ... into the instrument or the Remote Unit if used PANEL TEMPERATURE PROBE the temperature probe must be positioned on the back of the panel aligned to a cell if you are measuring a string of panels place the probe on a panel in the middle of thestring Plug the connector directly into the instrument or the Remote Unit if used 11 1 Electrical connections The inputs for the V DC voltage and I DC curren...

Страница 15: ...u Choose the Remote Unit Bluetooth Adapter option In the Bluetooth Address MAC option enter the MAC number marked on the BLUETOOTH RS232 adapter connected to the remote unit Click on Apply to confirm Insert the USB BLUETOOTH adapter into the USB port The instrument is now ready to receive measurements from the remote unit The LED on the USB BLUETOOTH adapter will light only when measurements are a...

Страница 16: ...nd in the probe measurements or the remote connection if active the measurement session is aborted An error message appears on the screen check the connection and correct operation of the probe or the connection to the remoteunit Single panel measurement window Error message box Error message box Panel measurement graph When STRING measurement is selected a dialog box opens the number of panels in...

Страница 17: ... Comparison Pressing this button opens a window for entry of the brand and model of the panel measured in order to compare the measurements with the nameplate data the measured values will appear alongside the nominal characteristics of the panel For a more accurate comparison the age and corresponding presumed percentage of panel performance degradation are requested if you do not want to enter t...

Страница 18: ...monitor highlighting the measured radiation value Irr W m and the Phase 1 Measurement button Press this button to make the measurements If the solar radiation value is not correct a warning message appears on the screen When the phase 1 measurements have been made a window with a Phase 2 Measurement button appears If the solar radiation condition is correct pressing this button starts the second m...

Страница 19: ...easurements Selecting this command displays the temperature and solar radiation measurements The Mod Temp and Amb Temp options are available for the reference Indicates whether the measurements are being made using the module temperature probe or the ambient temperature probe previously selected The Remote Connection message is present whenever the probes are connected via the remote unit Images o...

Страница 20: ... the Measurements Archive Menu accessed from the main menu page 9 of the MEASUREMENTS ARCHIVE chapter Dialog box for saving the measurements Module or String Module or String on selecting one of these commands the Electrical Data Measured table is displayed OPC conditions and STC reference standard if comparison previously requested Power This command displays on the I V curve graph of the panel o...

Страница 21: ...le for the test s purposes Result of the measurements Result Conditions Note OK Tol Pnom Pmax Pnom Tol Pnom DEGRADATION NOT TAKEN INTO ACCOUNT Tol Pnom1 Pmax Pnom1 Tol Pnom1 DEGRADATION TAKEN INTO ACCOUNT NO requirements not satisfied Tol Pnom Pmax Pnom Tol Pnom DEGRADATION NOT TAKEN INTO ACCOUNT Tol Pnom1 Pmax Pnom1 Tol Pnom1 DEGRADATION TAKEN INTO ACCOUNT Where Pmax Pnom DPmax degradation not ta...

Страница 22: ...reased height of the graph gives a better view To return to the normal viewing mode press the FS button again Full screen view 11 4 2 Zoom Function The zoom function can be used to enlarge a portion of the graph and allow a more detailed analysis of a given part of the curve shown To use the zoom function touch the screen with the stylus and drag to highlight the portion of the graph you want to e...

Страница 23: ...23 In each time this button is pressed the magnification increases Out each time this button is pressed the magnification decreases until the normal display is restored STC Ok STC Ok ...

Страница 24: ... to 10 A 1 0 01 A POWER I V MEASUREMENT 10 W to 10 KW 1 0 1 W SERIES RESISTANCE I V MEASUREMENT 0 1 Ω to 100 Ω 2 0 1 Ω 0 01 Ω I V GRAPH I V CURVE OF THE PANEL or STRING OF PANELS MPP GRAPH POWER CURVE WITH MARKER ON MPP POINT DATA LOGGER RECORD STORAGE INCLUDING CLIENT DETAILS PLANT CHARACTERISTICS GRAPHS INTERNAL MEMORY CAPACITY 80 MB FOR A TOTAL OF 10 000 RECORDS POSSIBILITY OF USING USB EXTERNA...

Страница 25: ...L x W x H 270 x 250 x 130 mm Weight approximately 2 5 kg battery included 12 5 Electromagnetic compatibility Emissions and immunity in an industrial setting compliant with IEC 61326 1 12 6 Mechanical protection IP 54 per IEC 60529 with lid closed IK 04 per IEC 50102 ...

Страница 26: ...abase of modules then transfer the new data to the instrument 13 2 Installation The software is automatically installed when the CD supplied is inserted If your PC is not set up to start the CD automatically click on My Computer in the Start menu then right click on CD ROM Unit and select Open by left clicking this opens the window displaying the contents of the CD Double click on the I VT935_SETU...

Страница 27: ...ng functions Modules press this button to access the archive where the Brand and Module folders arestored Selecting the Brand folder lets you enter a new brand edit a brand in the list or delete a module brand and all models associated with it When you select the module folder you can enter edit and delete data for a selected single panel Press close to return to the main menu ...

Страница 28: ...tion let you select the curves you want to display by checking the corresponding box es After making your selection press the Graph button on the screen to open the graph window Right click with the mouse on the desired area of the graph a menu pops up to let you print the graph or perform other authorized operations Graph press this button to view the electrical measurement data and corresponding...

Страница 29: ...YES button or cancel NO button the deletion Installations press this button to access the installations tab a list of the installations stored in the database is displayed The right side of the tab displays the complete record of the selected installation below this in the Measurements section is a list of measurements belonging to the record The Installations tab ...

Страница 30: ...be completed When you have finished click on OK to save the new record or Cancel to exit without saving Modify this command is used to edit the record of the selected tab When the button is pressed the record fields are made available so the desired changes can be made Mouse click in the field to be edited and type the changes When finished press the OK button to save the changes or Cancel to exit...

Страница 31: ...cancel the operation Select OK to delete the installation or NO to cancel the operation Companies press this button to access the companies tab which displays a list of the companies stored in the database The right side of the tab displays the complete record of the selected company below this in the Installations section is a list of the installations belonging to this record The Companies tab ...

Страница 32: ...n be completed When you have finished click on OK to save the new record or Cancel to exit without saving Modify this command is used to edit the record of the selected company Clicking on the command makes the record fields available for the desired changes to be made Mouse click in the field to be edited and type the changes When finished press the OK button to save the changes or Cancel to exit...

Страница 33: ...allation or NO to cancel the operation Import Export this function is used to manage the transfer of the entire database or part of it from the PC to a pen drive or vice versa This procedure can be used to transfer the new settings of the various tabs from the PC to the instrument The same procedure is used to transfer the measurement archives from the instrument to the PC When the function button...

Страница 34: ...ort this command opens a dialog box in which you can select the path of the folder to be imported See the example in the figure below When you have selected the folder to be imported click on Open To finish the procedure follow the instructions provided on screen Export selecting this command opens a dialog box in which you can select the path of the folder to be exported See the example in the fi...

Страница 35: ...35 Delete this command lets you delete selected items in the database Clicking on the command opens a Confirm cancellation window Click on YES to confirm or NO to cancel ...

Страница 36: ...t use alcohol solvents or hydrocarbons 14 2 Metrological check Like all measuring or testing devices the instrument must be checked regularly This instrument should be checked at least once a year For checking and calibration contact one of our accredited metrology laboratories information and contact details available on request at our Chauvin Arnoux subsidiary or the branch in your country 14 3 ...

Страница 37: ...he following cases Inappropriate use of the equipment or use with incompatible equipment Modifications made to the equipment without the explicit permission of the manufacturer s technical staff Work done on the device by a person not approved by the manufacturer Adaptation to a particular application not anticipated in the definition of the equipment or not indicated in the user s manual Damage c...

Страница 38: ...ent value exceeds the maximum range value supported by the instrument The measured current value is too low The instrument can t detect the current value Check if the cables are correctly connected The solar radiation value is not steady during the measure ...

Страница 39: ...y value exceeds the maximum range value supported by the instrument One or more cables are not connected Check the electrical connections The measured power value exceeds the maximum range value supported by the instrument ...

Страница 40: ...ections The measured voltage value exceeds the maximum range value supported by the instrument The measured voltage value is too low The instrument can t detect the voltage value Check if the cables are correctly connected 40 ...

Страница 41: ...lem persists please contact our after sales service Communication error during the measure The instrument tried to reset the internal part of the instrument unsuccessfully Turn off and then turn on the instrument If the problem persists please contact our after sales service The instrument s internal temperature is too high Wait for the cooling before perform other tests ...

Страница 42: ...TC photovoltaic cell temperature compliant the standard CEI EN 60904 5 is over limit The remote unit not connected or turned off The instrument is not able to detect the temperature of the probe Check the insertion of the temperature probe ...

Страница 43: ... The instrument is not able to detect the solar radiation Check the insertion of the pyranometer or any shade of the same The detected solar radiation value is less than the minimum set in the system menu ...

Отзывы: