background image

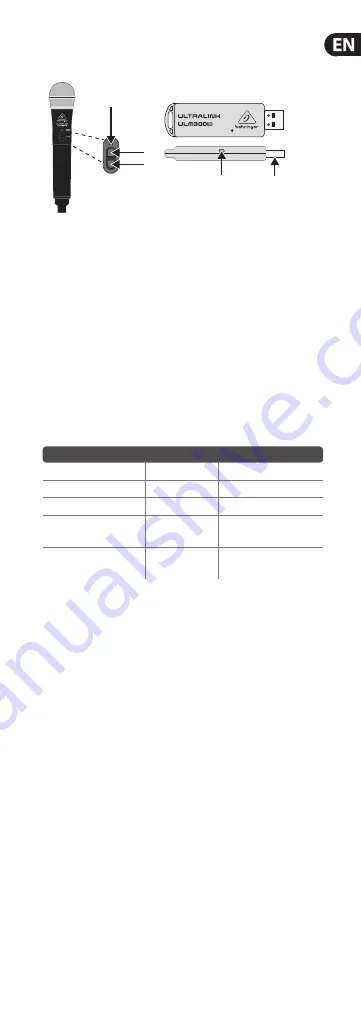
ULTRALINK ULM300USB Controls

Type of product: Wireless Microphone

ULM300USB Controls

1. USB 

connector

2. 

POWER/STATUS

 LED

3. 

VOLUME UP

 Button (—Power on/-Volume up/-Unmute)

4. 

VOLUME DOWN

  Button (-Volume down/—Mute/

—Power off  from Mute)

NOTE:

 “—” (long dash) = long press; “-” (hyphen) = short press.

LED Status Key

The following table describes LED behavior on both the microphone and 
the USB wireless receiver:

Activity

LED Color

LED Behavior

No Signal

Amber

Flashes on/off  slowly

Connected, Active

Green

Solid

Connected, Muted

Green

Flashes on/off  quickly

Connected, Active, 
Low Battery

Green/Red

Alternating colors

Connected, Muted, 
Low Battery

Green/Red

Alternating colors, 
fl ashes on/off 

ULM300USB Getting Started

1. 

Plug the USB wireless receiver to the designated USB socket on 
wireless-enabled BEHRINGER mixers, powered speakers or other 
compatible products, or to a USB port on a computer. The POWER/
STATUS LED on the receiver will slowly fl ash amber.

2. 

Press and hold the VOLUME UP button on the wireless microphone 
to switch it on and commence transmission. Both the LEDs on the 
wireless microphone and USB wireless receiver will light solid green 
once connected. 

3. 

Once switched on, the wireless microphone will be set at its previous 
operating volume level. Use the VOLUME UP and VOLUME DOWN 
buttons to adjust the volume.

4. 

A long press of the VOLUME DOWN button will put the wireless 
microphone into mute. The mute condition is indicated by rapid 
green fl ashing of the LED. If the user does not unmute within 
10 minutes, the wireless microphone will power down to save 
battery life.

5. 

A further long press of the VOLUME DOWN button when in mute will 
switch off  the wireless microphone. 

6. 

A short press of the VOLUME UP button will unmute the wireless 
microphone. When the wireless microphone is unmuted, it will 
return to the previous volume level. 

(2)

(3)

(4)

(2)

(1)

Model: ULM300D

Model: ULM300M

Содержание ULM300USB

Страница 1: ...Quick Start Guide ULTRALINK ULM300USB High Performance 2 4 GHz Digital Wireless System with Handheld Microphone and Dual Mode USB Receiver A54 00001 48685...

Страница 2: ...ULTRALINK ULM300USB Hook Up XENYX QX2442USB Laptop B115MP3...

Страница 3: ...s or to a USB port on a computer The POWER STATUS LED on the receiver will slowly flash amber 2 Press and hold the VOLUME UP button on the wireless microphone to switch it on and commence transmission...

Страница 4: ...erto USB de un ordenador El piloto POWER STATUS del receptor comenzar a parpadear lentamente en color naranja 2 Mantenga pulsado el bot n VOLUME UP del micr fono inal mbrico para encenderlo y que comi...

Страница 5: ...ble avec les micros sans fil ou encore au port USB d un ordinateur La LED POWER STATUS du r cepteur clignote lentement en orange 2 Maintenez le bouton VOLUME UP du micro enfonc afin de le mettre sous...

Страница 6: ...an den USB Port eines Computers an Die POWER STATUS LED des Empf ngers blinkt langsam gelb 2 Halten Sie die VOLUME PLUS Taste des Drahtlosmikrofons gedr ckt um es einzuschalten und die bertragung zu...

Страница 7: ...os produtos compat veis ou a uma porta USB no seu computador O LED POWER STATUS no receptor piscar vagarosamente em cor mbar 2 Aperte e segure o bot o VOLUME UP no microfone sem fio para lig lo e inic...

Страница 8: ...ISM band 2 404 2 468 GHz 17 channels USB current consumption 70 mA 5 VDC Battery type 2 x AA LR6 Alkaline cells Battery life 24 hrs Dimensions H x W x D Microphone 260 x 53 x 53 mm 10 2 x 2 1 x 2 1 Wi...

Страница 9: ...ialesqueaparecenaqu sonpropiedad desusrespectivosdue os MIDAS KLARKTEKNIK LABGRUPPEN LAKE TANNOY TURBOSOUND TCELECTRONIC TCHELICON BEHRINGER BUGERAyDDAsonmarcascomercialesomarcas registradasdeMUSICGro...

Страница 10: ...n MUSIC Group gew hrten beschr nkten Garantie finden Sie online unter music group com warranty LEGAL RENUNCIANTE OMUSICGroupn oseresponsabilizaporperdaalgumaque possasersofridaporqualquerpessoaquedepe...

Страница 11: ...o correct the interference by one or more of the following measures Reorient or relocate the receiving antenna Increase the separation between the equipment and receiver Connect the equipment into an...

Страница 12: ...Dedicate Your Life to Music...

Отзывы: