Ultra electronics Magicard Pronto Скачать руководство пользователя страница 23

Ultra Electronics Ltd 

Magicard Pronto User Manual 


- 23 -


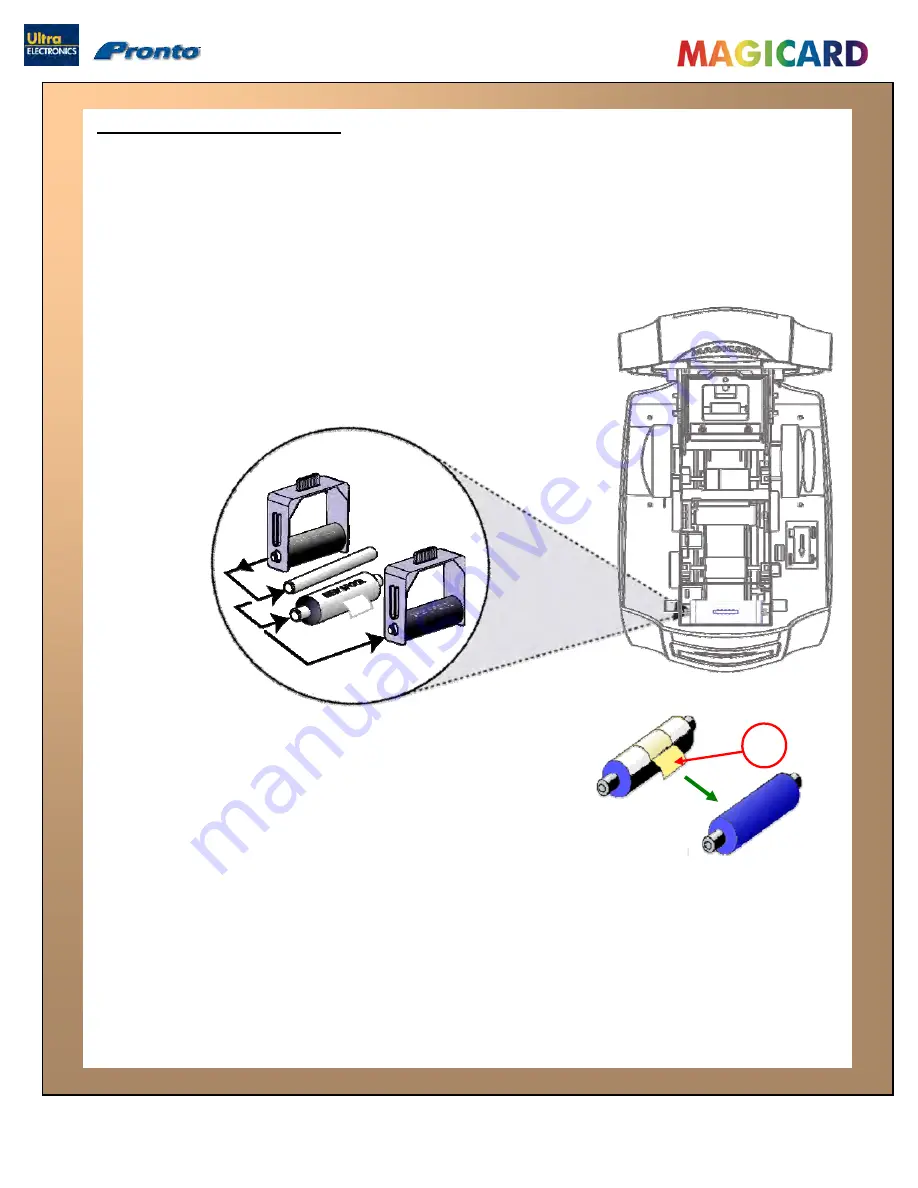
Replacing the Cleaning Roller 

A new cleaning roller is supplied with every new Dye-Film roll. 
 

– 

Open the Printer, remove the used Dye-Film

then :-


Pu

ll out the Cleaning Cassette. 

(This is the positioned towards the front of the Printer – just behind the front 

Card slot – see below).


Slide out

Cleaning Rol


Slide the metal 


1. 

2.


3.


 the metal bar, then remove and discard the used 

ler.


bar into the new Cleaning Roller.


4.


Pull the tab (

A

) to carefully remove the Cleaning Roller’s 

protective cover.  This will reveal the Roller’s “tacky” surface. 


5.


Place the new Cleaning Roller into the Cleaning Cassette, 

and refit the Cleaning Cassette into the Printer.


Содержание Magicard Pronto

Страница 1: ...User Manual Document No 689 Issue 2 02 06 2009...

Страница 2: ...lling a print job 13 Choosing the right dye film 14 Choosing the right cards 15 Card material 15 Card size 15 Card thickness 15 To obtain good quality prints the Card must be 15 Printable area of the...

Страница 3: ...to spill any liquid on the Printer Ensure that the Power Supply cable is not longer than 2 metres in length and includes a properly earthed connection When handling the Printer avoid touching the ther...

Страница 4: ...CD ROM please follow the simple steps in this guide on installing your Printer This guide helps you make your printing experience more enjoyable and secure Unpacking Please ensure you have all the it...

Страница 5: ...ronto Printer IMPORTANT Do not connect USB yet Normal Office environment with A properly earthed Power Supply Ambient temperature 10 to 30OC 50 to 86OF Protection from direct sunlight and chemicals Pr...

Страница 6: ...er 1 Remove the Cleaning Cassette and slide out the Spindle Bar 2 Remove and discard the used Roller 3 Place the new Roller into the Cleaning Cassette and replace the Spindle Bar 4 Pull the Paper Tab...

Страница 7: ...ded spool into the rear slots and the take up spool into the front slots Close the Printer Connect the Power Supply Select the correct adapter for your region and connect to Power Supply unit Plug in...

Страница 8: ...on run Type D autorun where D is the Drive letter for your CD Drive then press the Return key 2 Now follow the on screen instructions to install the Printer Driver 3 When the installation is complete...

Страница 9: ...o User Manual 9 USING YOUR PRONTO PRINTER USING YOUR PRONTO PRINTER Printer Parts Printer Parts 1 1 Lid Latch 2 Thermal Print Head 3 Power Button multi coloured 4 Hand feed Cleaning Card entry slot 5...

Страница 10: ...owered off RED Indicates an error condition Read the displayed error message from the PC screen e g out of Dye Film GREEN Indicates a Ready condition the Printer is ready to accept a print job YELLOW...

Страница 11: ...Pronto User Manual 11 Powering ON Powering OFF Press and hold approx 2 seconds Press the button once and release Printer begins initialising after initialising Printer goes to Ready x1 x1 hold until...

Страница 12: ...request a card to be fed into the front card slot x2 Press the Power Button twice in quick succession within 0 5 seconds the button s colour will change to yellow busy Feeding cards insert a card int...

Страница 13: ...nual 13 When the button FLASHES RED YELLOW remove the card from the front card slot Cancelling a print job Any print job can be cancelled This can be done while the printer is downloading the image or...

Страница 14: ...ng costs are critical monochrome printing is a fraction of the cost of colour printing Printer model Type of images you want to print Cards per Ribbon Ribbon Panel Layout Part Number Pronto Colour 1 s...

Страница 15: ...mm high Minimum 0 015 0 38mm Standard 0 030 0 76mm Maximum 0 063 1 60mm Card thickness To obtain good quality prints the Card must be Glossy white Free from dirt and grease Free from surface contamin...

Страница 16: ...agnetic stripe on the rear of a magnetic stripe Card The Pronto Mag Printer can encode both HI CO and LO CO Magnetic stripe Cards When feeding Magnetic Stripe Cards make sure the stripe is on the left...

Страница 17: ...are and Firmware at www magicard com support technical support Installing the UltraDriver 1 Important before loading the Driver make sure the USB cable is NOT connected to the Printer Load the Driver...

Страница 18: ...nto Printer is connected to the PC via the USB cable and powered ON When the Printer is detected by the PC the Driver installation will be completed and the Printer will be ready to use CAUTION If the...

Страница 19: ...clear explanation of each Driver setting To view the Driver s Help file go to the Printer Preferences as described above and click on the Help button in any of the Tabs The Printer Driver settings 1...

Страница 20: ...t Add or Remove Programs 3 Select the Magicard Pronto entry and click on Change Remove 4 Now just follow the prompts from the Printer Uninstall application 1 On the PC go to the Windows logo then Cont...

Страница 21: ...can damage the Print Head A clean Printer also produces better quality magnetic encoding THE MAGICARD CLEANING SYSTEM There are three main parts to your Printer s cleaning system 1 Clean the rollers u...

Страница 22: ...leaning Card each time you replace the Dye Film A Remove the Dye Film Leave the Lid open B Take a new Cleaning Card from it s foil packaging C Start the cleaning routine by selecting the Driver Prefer...

Страница 23: ...towards the front of the Printer just behind the front Card slot see below Slide out Cleaning Rol Slide the metal 1 2 3 the metal bar then remove and discard the used ler bar into the new Cleaning Ro...

Страница 24: ...printhead using the Cleaning Pen We recommend that you clean the Print Head each time you replace the Dye Film Take the Cleaning Pen from your Pronto Cleaning Kit Open the Printer and carefully run t...

Страница 25: ...BLUE Monochrome Blue Resin 1000 images MA1000K GREEN Monochrome Green Resin 1000 images MA1000K GOLD Monochrome Gold Resin 1000 images MA1000K SILVER Monochrome Silver Resin 1000 images Product Code...

Страница 26: ...e printers recommended specification 3 Clean the printer rollers No film detected please load a new roll of film to continue Code 07 00 The printer detects an invalid RFID film tag 1 Make sure you are...

Страница 27: ...etect the RFID PCB 2 Try installing a new roll of ribbon 1 Turn off the power then make sure the printhead cable is connected Print Head Error switch printer off and reconnect print head Code 13 00 to...

Страница 28: ...printer does not detect the RFID PCB 2 Try installing a new roll of ribbon The printer has printed more than 700 cards since the rollers were last cleaned It needs to be cleaned to prevent deteriorat...

Страница 29: ...d not running smoothly along the platen runway 2 Contact Magicard Technical Support for advice on clearing the Platen Vertical white line down one or both ends of Card 1 Incorrect Driver setting 1 Ens...

Страница 30: ...ver settings for colour format 2 A used roll of Dye Film has been fitted 2 Replace Dye Film with a new roll Table 6 Driver Related Problems Problem Probable Cause Solution Slow data download from Comp...

Страница 31: ...e Film rolls from any source other than Ultra Electronics or have been used to print on anything other than Card surfaces which are approved by Ultra and which will generally be made of PVC be complet...

Страница 32: ...FOR THE UK EUROPE AND REST OF WORLD Ultra Electronics Card Systems Waverley House Hampshire Road Granby Estate Weymouth Dorset DT4 9XD UK Tel 44 0 1305 784738 Fax 44 0 1305 777904 Email Support Techni...

Страница 33: ...Ultra Electronics Ltd Magicard Pronto User Manual 33 CONTACT US SUPPORT www magicard com Support Supporto Apollo...

Отзывы: