background image

DIGITAL TERRESTRIAL TERMINAL

USER MANUAL

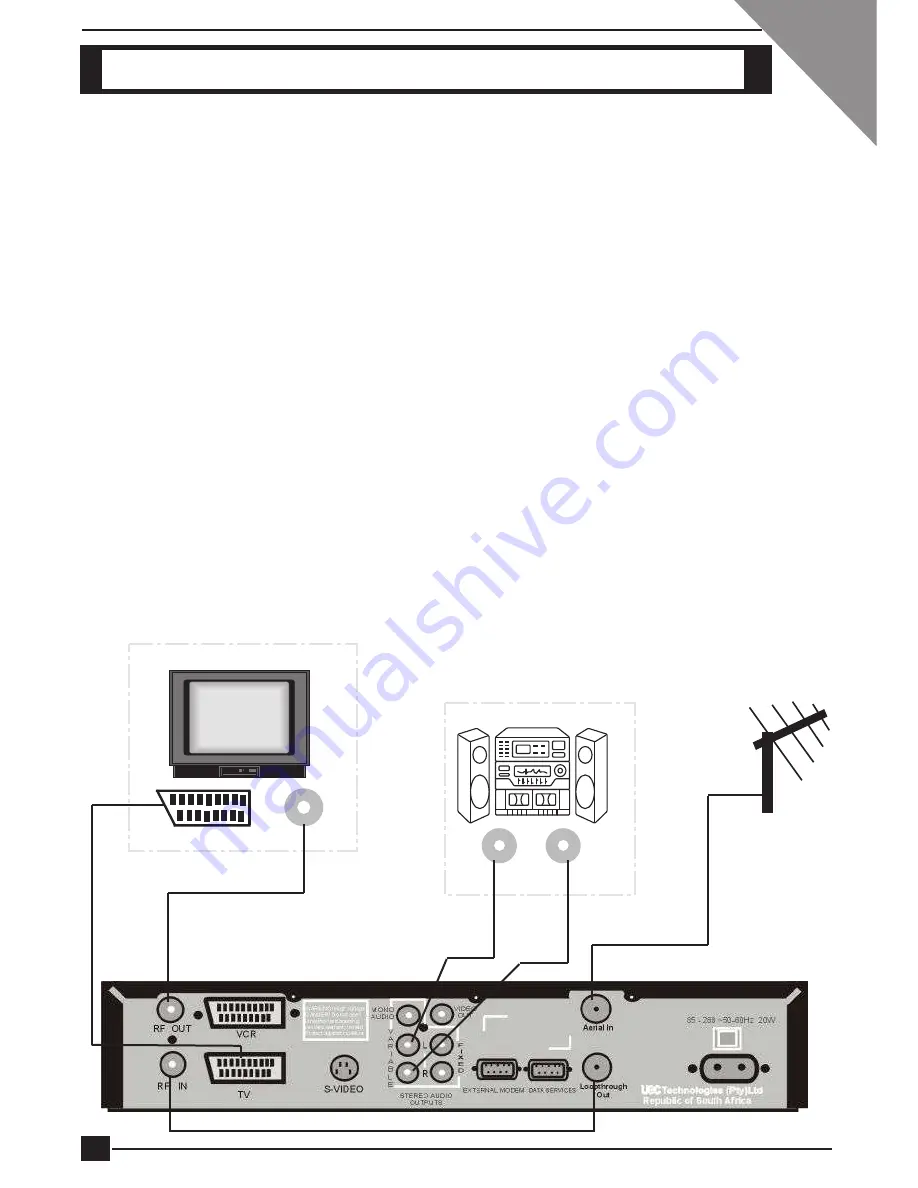
SETUP3:   DTT, TV, Hi-Fi

NOTE:  Do not connect or disconnect the Terminal to or from the Terrestrial

Network while connected to the Mains supply.

1

Connect the Antenna to the Aerial In socket on the Terminal.  Connect a RF
flylead (supplied) from the Loopthrough Out socket on the Terminal to the RF
In socket on the Terminal.  (Refer to [1] on illustration below)

2

Refer to Set-Up1.  Make those connections first and then proceed to step 3.

3

Connect a flylead between the variable stereo sound outputs on the Terminal
and the audio inputs on the Hi-Fi.  (Refer to [3] on illustration below)

TV

Hi-Fi

SCART to SCART

RF In

Audio
Input

L

R

[1]

[1]

[3]

[3]

10

Содержание DTT

Страница 1: ...he Smart Card 13 Getting Started 14 Switching the Decoder On at the Mains 14 Tuning Your TV 14 Information Plate 15 Reminders 16 Soundtracks 17 Subtitles 17 Teletext 18 Signal Source Selection 18 Electronic Programme Guide 19 Display by Time 19 Display by Channel 20 Theme Search 20 Reminder List 20 Using the Menus 21 Parental Guidance 22 Blocking Options 22 Service Blocking 23 Change PIN 24 Soundt...

Страница 2: ...hooting guide to assist you if you have difficulty operating the DTT correctly or in the event of technical difficulties The operation of the Decoder can be upgraded via the Digital Terrestrial Network thus the menus in the manual may differ slightly from those displayed on your television This manual the menus and the features downloaded in this document and the information contained herein are t...

Страница 3: ...ight or near a heater Never stack other electronic equipment on top of the Terminal ATTACHMENTS Do not use any attachment that is not recommended by the manufacturer as it may cause a hazard damage the equipment SERVICING Do not attempt to service this product yourself Any attempt to do so will invalidate the warranty Refer all servicing to a qualified service agent LIGHTNING If the Terminal is in...

Страница 4: ...n signal sources Displays the clock Allows access to soundtrack options Mutes the Volume Allows accessto the Information Plate and to the Extended Information i Allows access to Subtitles and Teletext TV Allows access to the various TV Bouquets available and switches from a Radio service to a TV srevice TV Allows access to the various Radio Music Bouquets available and switches from a TV service t...

Страница 5: ...l Decreases the volume level Is used as an escape key to escape from the selected option Exits from the Menu Allows access to the Menu If pressed while in the Menu Exits to normal viewing Allows access to the Electronic Programme Guide OK Used to confirm all selections made in the Menus and to set Reminders Cursor Keys used for scrolling through the Menu and list boxes and when scrolling through c...

Страница 6: ...VCR 4 Video to Non SCART input TV or VCR 5 Terrestrial Antenna In 6 RF In connector From VCR 7 SCART connector to TV or AUX input 8 To S Video connector on the TV 9 Variable Left and Right Audio to Hi Fi or TV 10 For Stereo Fixed Audio recording Left and Right 11 To External Modem 12 Communication Port 13 Loopthough to RF In 6 14 Mains Input 6 ...

Страница 7: ...d on your Hi Fi Consult your local installer for assistance in setting up an audio video configuration best suited to your requirements HINTS FOR QUALITY TV SYSTEM CONFIGURATIONS 1 Where possible connect cables via audio video outputs inputs SCART or RCA rather than RF connectors 2 Use an appropriate correctly installed Terrestrial system 3 Ensure that the system is properly earthed and protected ...

Страница 8: ...T connector on your TV SCART connections only Refer to 2 on illustration below 3 If your TV set does not have a SCART connector then use a RF flylead to connect the RF Out socket of the Terminal to the RF In socket of your TV Refer to 3 on illustration below 4 If your TV set has a S Video connector connect to the S Video connector on the Terminal Also connect Mono Audio on the Terminal to Audio In...

Страница 9: ...first and then proceed to step 3 3 Using a RF flylead connect the RF Out socket of the Terminal to the RF In socket on the VCR Refer to 3 on illustration below 4 Using the RF flylead supplied with the VCR connect the RF Out socket of the VCR to RF In socket on the TV Refer to 4 on illustration below 5 Using another SCART cable connect the VCR SCART on the decoder to the SCART connector on the VCR ...

Страница 10: ... Terminal Connect a RF flylead supplied from the Loopthrough Out socket on the Terminal to the RF In socket on the Terminal Refer to 1 on illustration below 2 Refer to Set Up1 Make those connections first and then proceed to step 3 3 Connect a flylead between the variable stereo sound outputs on the Terminal and the audio inputs on the Hi Fi Refer to 3 on illustration below TV Hi Fi SCART to SCART...

Страница 11: ...t the RF Out socket of the VCR to RF In socket on the TV Refer to 3 on illustration below 4 If using a SCART to SCART cable not supplied connect the TV SCART connector on the Terminal to the SCART connector on the TV Refer to 4 on illustration below 5 Using another SCART cable connect the VCR SCART on the decoder to the SCART connector on the VCR Refer to 5 on illustration below 6 Connect the VARI...

Страница 12: ... the Volume or Channel When pressed together resets the Terminal Use only when the Terminal stops responding to the RCU P V TV TV and FRONT PANEL DISPLAY DTT in standby 24hr clock displayed Service No 53 selected Green light Audio service selected Rotating bar searching for service information Four flashing bars and red light Service not found poor signal Yellow light Mail message Red light Error ...

Страница 13: ...d your decoder The Smart Card looks similar to a credit card and is inserted into the slot behind the right hand front flap of the decoder See illustration below A valid Smart Card entitles you to view and listen to all the services you choose to subscribe to INSERTING THE SMART CARD 1 Open the right hand flap on the front panel of the decoder see illustration Swing the flap downwards to expose th...

Страница 14: ...isplay 4 Tune your TV set until you obtain the test pattern shown on the left A channel number will be displayed on the decoder front panel display e g 46 5 Once you have obtained this test pattern on your TV set press OK on the remote control 6 Check that there is no interference on the other channels your TV was tuned to If there you notice any interference you need to change the UHF channel tha...

Страница 15: ... follow are listed when NEXT is highlighted Pressing i while the Information Plate is displayed provides a synopsis of the programme being viewed The Local time is also displayed on the TV when the Information Plate is displayed Refer to illustration below 3 To alternate between NOW and NEXT programmes on the Information Plate use the LEFT and RIGHT arrow keys on the RCU 4 When NEXT is selected an...

Страница 16: ...e set This Reminder will display a message on the TV screen when your programme is about to start Press OK on the RCU when this message appears and the decoder will change to that channel See illustration below 2 The second type of reminder is set in the same way as above but in this case with the Information Plate displayed and NEXT active press OK on the RCU twice A reminder is set This reminder...

Страница 17: ...d in the selection box 3 Once you have the correct option in the selection box see illustration above press OK on the RCU 4 The new soundtrack will be heard SUBTITLES If subtitles are available they are normally displayed on the screen as part of the programme 1 If subtitles are not available the following information box will appear on the screen when you press on the RCU 2 If subtitles are curre...

Страница 18: ...e screen press EXIT on the RCU SIGNAL SOURCE SELECTION Switching between signal source devices is automatic by using the UHF button green button on the RCU To select between the available signal sources a single press release of the UHF button in normal viewing mode i e not in the Menu or EPG switches to the next source This is an override selection in that it will switch to VCR even if the VCR is...

Страница 19: ...search all the channels subscribed to according to Time for an entire week Reminders may also be set here 2 Display by Channel allows you to search a specific channel for an entire week Reminders may also be set here 3 Theme Search allows you to search for particular events programmes in various categories 4 Reminder List allows you to view all the reminders that were set either in the Display by ...

Страница 20: ...DIGITAL TERRESTRIAL TERMINAL USER MANUAL DISPLAY BY CHANNEL THEME SEARCH REMINDER LIST 20 ...

Страница 21: ...u or vertical list box 2 Select a highlighted menu option and go one level lower within the menu hierarchy by pressing OK on the RCU This applies to the Main Menu screen and all sub menu screens 3 Use EXIT to return to the previous menu go one level higher within the menu hierarchy 4 Use or buttons to move the highlight to the option you require Press OK To change any setting or values first press...

Страница 22: ...TE To use or change your Parental PIN code your Smart Card must be in the decoder BLOCKING OPTIONS 1 Press Menu on the RCU The Main Menu list is displayed with Parental Guidance highlighted Press OK on the RCU 2 A Security Check screen is displayed Enter the Parental Guidance PIN code using the digit buttonson the RCU 3 The Parental Guidance sub menu is displayed see illustration above with Blocki...

Страница 23: ...ess EXIT or to return to normal viewing press Menu on the RCU SERVICE BLOCKING This option is different from Blocking Options in that this feature is used to block out an entire channel irrespective of the age restriction where as Blocking Options only blocks a programm on a channels For example if you do not want your kids to watch the Cartoon channel then you would use the Service Blocking optio...

Страница 24: ... normal viewing The channel is now blocked CHANGE PIN This option should be used to change the Parental PIN code from the factory set code to a code of your preference When selected from the Parental Guidance sub menu the following is displayed on the screen 1 At the Old PIN code prompt enter the current PIN code 2 The highlight automatically moves to the New PIN code prompt Enter your New PIN cod...

Страница 25: ...hosen the preferred language press OK on the RCU 4 Scroll down to Accept these settings and press OK You will now be back at the Main Menu Press EXIT or MENU Normal viewing will resume The service provider can send global messages over the air When a message has been received the yellow front panel indicator will be illuminated and an envelope symbol will appear on the TV screen To read the messag...

Страница 26: ...U The Main Menu will be displayed Scroll down to Colours and Transparency Press OK The Colours and Transparency menu is displayed 2 To choose a colour scheme press OK with Colour settings highlighted This will allow you to choose another colour scheme 3 Use the or button on the RCU to choose a new colour scheme Once you have made your choice press OK Scroll down to Accept these settings and press ...

Страница 27: ...necessary changes and then select Acccept these changes and press OK to save all changes made Refer to the on screen help for assistance when using this feature This is where the setup of the decoder is done With the exception of two of the sub menus in this section it is recommended that you do not make changes to the settings in these sub menus The PIN code for Advanced Options is 9949 If there ...

Страница 28: ...u is displayed Scroll down to the Local Time option and press OK Local Time is highlighted 3 Press OK and you will be able to change the time displayed using the or arrow keys on the RCU The time can be increased or decreased in intervals of 30 minutes 4 When finished press OK on the RCU Scroll down to Accept these settings and press OK The Local time will be updated 5 Press EXIT or Menu on the RC...

Страница 29: ...at the UHF channel has been set properly in the case of RF connections being used Poor Picture Quality See No Picture above Check the signal level if it is low you may need to re align the antennae No Sound See No Picture above Check that the volume level of the TV and DTT are correct Check that the DTT and TV are not in Mute mode Remote Control does not Work Point the RCU directly at the DTT Fron...

Страница 30: ...R Remodulator RF Input VHF UHF 47 MHz to 862 MHz Remodulator Digital RF Output UHF channels 21 to 69 AUDIO DVB Standard MPEG2 Layer1 and 2 Musicam Sample Frequencies 32 44 1 48 kHz VIDEO DVB Standard MPEG2 MP ML Video Format PAL Video RAM 16 Mbits Host Supplied Audio Video I and P frame support Format Conversion Pan Scan Letterbox GENERAL Front Panel Buttons 5 buttons Mains Voltage 210 250 V AC 50...

Страница 31: ...tails Name AL BAHA Est For Applications of Technology Postal Address P O Box 941721 Amman 11194 JORDAN Location Sameer Mahmoud Al Zu bi Street Bldg No 1 First Floor Apt No 1 Tla a Al Ali Al Sharqi Amman JORDAN Telephone 962 6 5512452 962 6 5512457 962 6 5523056 962 6 5523058 Fax 962 6 5512459 HOTLINES 31 ...

Страница 32: ...DIGITAL TERRESTRIAL TERMINAL USER MANUAL NOTES 32 ...

Отзывы: