background image

13

www.udirc.com

1. Make sure the electrodes are correct.
2. Do not mix new with old batteries.
3. Do not mix different kinds of batteries.
4. Do not charge the non rechargeable battery.

Notice:

Pre-flight Operation Instruction

Frequency Pairing

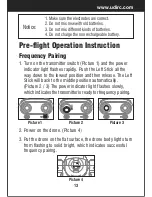
1. Turn on the transmitter switch (Picture 1) and the power 
    indicator light flashes rapidly. Push the Left Stick all the 
    way down to the lowest position and then release. The Left
    Stick will back to the middle position automatically. 
    (Picture 2 / 3) The power indicator light flashes slowly, 
    which indicates the transmitter is ready for frequency pairing.

2. Power on the drone. (Picture 4

3. Put the drone on the flat surface, the drone body lights turn
    from flashing to solid bright, which indicates successful 
    frequency pairing.

Picture 2

Picture 1

Picture 3

Picture 4

Содержание VOYAGER U845Wifi

Страница 1: ... Manual U36W Altitude Hold Mode Aerial Photography Real time FPV WiFi Control Heading Hold Mode Low Battery Alarm Out of Range Alarm One Button Take Off Landing High Low Speed Mode Custom Route Mode Piglet ...

Страница 2: ...Drone Battery 6 Charging Instruction for Drone Battery 6 Check List Before Flight 7 Instruction for Drone and Transmitter 8 Pre flight Operation Instruction 13 Functions Introduction 19 Spare Parts Installation Instruction 24 To know your APP 25 Spare Parts 35 Troubleshooting Guide 37 ...

Страница 3: ...t and relevant APP The users promise to use the drone and relevant APP for legal purpose and agree to obey above rules and local laws and regulations We undertake no liability for those accidents caused by environment illegal behavior improper operation and refitting of the drone after sale of the product We have entrusted the distributor to provide technology support and after sale service If you...

Страница 4: ...a flying RC drone Do not fly a RC drone in rainy storm thunder and lighting weather for the safety of user around people and their property 2 Use correctly For safety elements please only use UDIRC s spare parts to replace the damaged parts Improper assembly broken main frame defective electronic equipment or unskilled operation all may cause unpredictable accidents such as drone damage or human i...

Страница 5: ...istance Do not fly the drone near tall building high voltage cable or other place with signal interference Or may cause signal interruption and the drone will out of control which may result of accident 9 Do not touch the hot motor to avoid being burnt 10 Please use the recommended charger only Power off the drone before cleaning the RC drone Check the USB cable charging plug etc regularly to ensu...

Страница 6: ...y Check the charger s wire plug surface regularly Do not use any broken charger If do not fly the drone more than one week maintain the drone battery with about 50 power to keep its performance and working life For faster charging it is recommended to use an adapter with 5V 2A output current not included to charge the battery Charging Instruction for Drone Battery 1 Connect the drone battery with ...

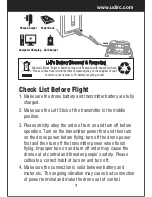
Страница 7: ...eft Stick of the transmitter in the middle position 3 Please strictly obey the order of turn on and turn off before operation Turn on the transmitter power first and then turn on the drone power before flying turn off the drone power first and then turn off the transmitter power when finish flying Improper turn on and turn off order may cause the drone out of control and threaten people s safety P...

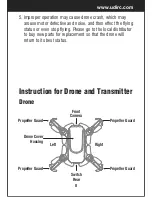
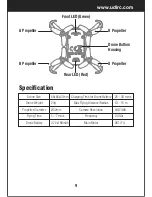
Страница 8: ... the flying status or even stop flying Please go to the local distributor to buy new parts for replacement so that the drone will return to its best status Instruction for Drone and Transmitter Drone Propeller Guard Propeller Guard Propeller Guard Propeller Guard Switch Rear Right Left Camera Front Drone Cover Housing ...

Страница 9: ...lying Time 66x66x37mm 23g Ø32mm 3 7Vx180mAh 25 30 mins Charging Time for Drone Battery 640 480 0614 4 5 7 mins 2 4Ghz 10 15 m Camera Resolution Frequency Max Flying Distance Radius Main Motor B Propeller A Propeller Drone Bottom Housing A Propeller B Propeller Rear LED Red Front LED Green ...

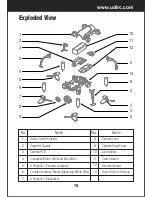
Страница 10: ...or Red and Blue Wire 5 B Propeller Counterclockwise 6 Counterclockwise Motor Black and White Wire 7 A Propeller Clockwise Camera Lens Camera Head Cover Lipo Battery Switch Board Receiver Board Drone Bottom Housing Name 8 9 10 11 12 13 No Exploded View 1 2 3 2 4 5 6 7 8 9 5 4 7 2 6 13 2 12 11 10 ...

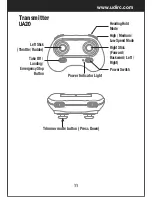
Страница 11: ... button Press Down Transmitter Left Stick Throttle Rudder Right Stick Forward Backward Left Right High Medium Low Speed Mode Heading Hold Mode Take Off Landing Emergency Stop Button Power Switch Power Indicator Light UA20 UA20 UA20 ...

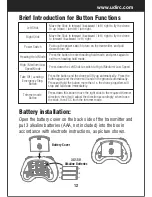
Страница 12: ... exit from heading hold mode Trimmer mode Button Press down this button move the right stick to the required trimmer direction then it will adjust the direction accordingly when loose the stick then ESC from the trimmer mode Take Off Landing Emergency Stop Button Press the button and the drone will fly up automatically Press the button again and the drone will land on the ground automatically Pres...

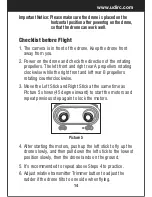
Страница 13: ...indicator light flashes rapidly Push the Left Stick all the way down to the lowest position and then release The Left Stick will back to the middle position automatically Picture 2 3 The power indicator light flashes slowly which indicates the transmitter is ready for frequency pairing 2 Power on the drone Picture 4 3 Put the drone on the flat surface the drone body lights turn from flashing to so...

Страница 14: ...e while the right front and left rear B propellers rotating counterclockwise 5 It s recommended to repeat above Steps 4 to practice 6 Adjust relative transmitter Trimmer button to adjust the rudder if the drone tilts to one side when flying 4 After starting the motors push up the left stick to fly up the drone slowly and then pull down the left stick to the lowest position slowly then the drone la...

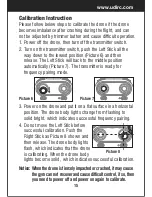
Страница 15: ... ready for frequency pairing mode Picture 6 Picture 7 3 Power on the drone and put it on a flat surface in a horizontal position The drone body lights change from flashing to solid bright which indicates successful frequency pairing 4 Do not move the Left Stick before successful calibration Push the Right Stick as Picture 8 shown and then release The drone body lights flash which indicates that th...

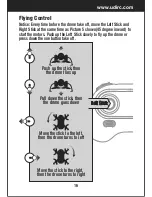
Страница 16: ... shown 45 degree inward to start the motors Push up the Left Stick slowly to fly up the drone or press down the one button take off Left Stick Move the stick to the left then the drone turns to left Move the stick to the right then the drone turns to right Push up the stick then the drone flies up Pull down the stick then the drone goes down ...

Страница 17: ...ight Stick Push up the stick then the drone flies forward Pull down the stick then the drone goes backward Move the stick to the left then the drone turns to left Move the stick to the right then the drone turns to right ...

Страница 18: ... push forwards Left and right turning trimmer When take off if the drone head rotates to left then press down the left stick in the center and push left stick to right Otherwise push to left Left and right side flying trimmer When take off if the drone tilts to left then press down the left stick in the center and push the right stick to right side Otherwise push to left ...

Страница 19: ...same time as Picture 5 shown 45 degree inward to start the motors Push up the Left Stick to fly up the drone to certain altitude and then release the stick Picture 9 2 Method 2 One Button Landing Press the Take Off Landing Emergency Stop Button once shortly picture 9 and the drone will land on the ground automatically When using this function you can not touch the left stick if not then the functi...

Страница 20: ...Altitude Hold Mode Altitude hold mode indicates that the drone maintains a consistent altitude while allowing roll pitch and yaw to be controlled normally It makes easier to control the drone for beginner and more stable for aerial photography Push the Left Stick up down to fly the drone up down at certain altitude and then release the Stick The Stick will back to the center position Altitude Hold...

Страница 21: ...out the orientation left is left and right is right all the time regardless of where your drone is pointing at Heading Hold Mode High Medium Low Speed Mode Switch High Medium Low Speed Mode Switch 2 Medium Speed Mode is suitable for skillful pilots to play in the gentle breeze Medium speed Mode Mode 2 1 Low Speed Mode is suitable for beginner Low Speed Mode Mode 1 3 High Speed Mode is suitable for...

Страница 22: ...old Mode is designed for beginners and users who fly the drone in daylight or at a far distance When the drone in heading hold mode push the Right Stick to forward backward left right and the drone will fly to forward backward left right accordingly Prerequisite Position the drone in such a way that its front is your front see Picture 1 Tip Do not change the orientation of the transmitter see Pict...

Страница 23: ...n low battery When the transmitter in low battery the transmitter will beep Di di di to remind the user to land the drone to replace the batteries as soon as possible Or the drone may be out of control Out of Range Alarm When the drone is going to fly out of the max remote control distance the transmitter will beep Didi didi didi to alarm the user to fly back the drone immediately Or the drone may...

Страница 24: ...Diagram When disassemble pull up the propeller in the vertical direction Picture 11 and remove as Picture 12 Notice Because the propeller is blowing up structure it should keep a bit gap between the motor housing and the propeller Picture 13 Spare Parts Installation Instruction About 0 5mm ...

Страница 25: ... aim the groove of the motor housing buckle and then press down Picture 15 2 For mobile phone with Android system please search Flyingsee in Google Play Download and Install the APP Flyingsee The APP is suitable for mobile phone with iOS and Android system please download from the mobile phone software store 1 For mobile phone with iOS system please search Flyingsee in APP Store To know your APP ...

Страница 26: ...choose udirc return to desktop after successful connection 1 Power on the drone Put the drone on the flat surface in horizontal position 3 Click on the icon Flyingsee and click on to enter remote control interface to experience real time transmission 3 Scan the QR code on the right or the QR code in the box to download Flyingsee ...

Страница 27: ...4 Click on to enter Virtual Control Interface At this time the drone LED lights change from flash to solid bright which indicates successful frequency pairing and the drone is ready to be controlled via APP Important Tip Ensure the drone is put it on a flat surface in horizontal position so that the drone can work well Or it may be failed to control Virtual Control Interface 00 00 EMERGENCY ...

Страница 28: ... operation of Drone Help Media Remote Control Interface 3 Home Page Icon Click on the icon and back to home page Click on the icon to enter virtual reality mode to experience first person view only available when using with a VR headset Click on the icon again to exit from virtual reality mode Virtual Reality Mode ...

Страница 29: ...s icon and the propellers will stop immediately The drone will fall down to the ground straightly Tip Do not use the emergency stop function unless in emergency situation Flight Route Setting Mode Emergency Stop SETTING Trimming Save Reset Transmission quality 480P To show the drone s WiFi signal strength Remote Control Signal Click on this icon to set some parameters and click again to exit Click...

Страница 30: ...le for flying left right and forward backward Click on the icon again to exit from gravity induction control mode Virtual Control Stick Gravity Induction Mode If the mobile phone shakes to the left right the Right Ball will move accordingly causing the drone to fly left right If the mobile phone shakes to forward backward the Right Ball will roll forward backward causing the drone to fly forward b...

Страница 31: ...the drone enter Heading Hold Mode Click again to exit from Heading Hold Mode The icon turns white Heading Hold Mode Click on this icon to view or delete the aerial video and photo Click on the arrow to exit Media By default the drone is in Low Speed Mode L Click on H to enter High Speed Mode High Low Speed Mode Click on this icon and it turns red shortly The drone will fly up automatically and sta...

Страница 32: ...cessful calibration and the drone is ready to be controlled 1 Please refer to the Frequency Pairing between Mobile Phone and Drone WiFi The video and the photos are stored in the local phone gallery you can display it in the phone directly or you also can display it in the APP via quick icon to enter Media interface Notice App must be authorized to access the phone gallery if not then may be unava...

Страница 33: ...e right to fly the drone to the right Left Ball Right Ball To fly up or down Move the Left Ball up to fly the drone up and move the Left Ball down to fly the drone back down To fly right or left To fly forward or backward Move the Right Ball up to fly the drone forward and move the Right Ball down to fly the drone backwards To rotate left or right Move the Left Ball to the left to rotate the drone...

Страница 34: ...ne alternately If the drone tilts forward or backward Click the of the Forward Backward Trimmer to adjust the drone till balance if the drone tilts forward Click the to adjust the drone till balance if the drone tilts backward If the drone rotates to left or right Click the of the Rotation Trimmer till balance if the drone rotates left Click the to adjust the drone till balance if the drone rotate...

Страница 35: ... purchased from the local seller U36W 09 Drone Lipo Battery U36W 05 Propeller Guards U36W 06 Camera Head Housing U36W 07 Clockwise Motor Red and blue wire U36W 08 Counter clockwise Motor Black and white wire U36W 04 B Propeller U36W 01 Drone Cover Housing U36W 02 Drone Bottom Housing U36W 03 A Propeller ...

Страница 36: ...otice Our company s products are improving all the time design and specifications are subject to change without notice All the information in this manual has been carefully checked to ensure accuracy if any printing errors our company reserve the final interpretation right U36W 13 Transmitter ...

Страница 37: ...smitter 2 1 Indicator light is off 1 The same as above 1 2 3 2 There is interfering signal nearby 2 Restart the drone and power on the transmitter 3 Misoperation 3 Operate the drone step by step in accordance with the user manual 4 The electronic component is damaged for frequent crash 4 To buy spare parts from local seller and replace damaged parts The drone is under powered or can not fly 3 1 Th...

Страница 38: ... Recharge the drone battery 2 The battery is expired or over discharge protection 2 Buy a new battery from local seller to replace the battery 3 Poor contact 3 Disconnect the battery and then connect it with the plug again Could not see the picture 6 1 Did not connect the wire of camera box or poor contact 1 Check the wire and connect well 2 There is interfering signal nearby 2 Cut off the wire an...

Страница 39: ...erference to radio communications However there is no guarantee that interference will not occur in a particular installation If this equipment does cause harmful interference to radio or television reception which can be determined by turning the equipment off and on the user is encouraged to try to correct the interference by one or more of the following measures Reorient or relocate the receivi...

Страница 40: ...ruction manual Modifications not authorized by the manufacturer may void user s authority to operate this device This device complies with part 15 of the FCC Rules Operation is subject to the following two conditions 1 this device may not cause harmful interference and 2 this device must accept any interference received including interference that may cause undesired operation FCC WARNING MADE IN ...

Отзывы: