background image

Alignment

Tips

•  To accurately align the airFiber radios for best performance, 

you MUST align only one end of the link at a time.

•  You may need to use additional hardware to compensate for 

issues such as the improper orientation of a mounting pole 
or significant elevation differences between airFiber radios.

Establishing a Link

Adjust the positions of the Master and the Slave to establish 
a link. The following section features the airFiber X antenna, 
AF‑11G36:

Note:

 The Master must be aimed first at the Slave because 

the Slave does not transmit any RF signal until it detects 
transmissions from the Master.

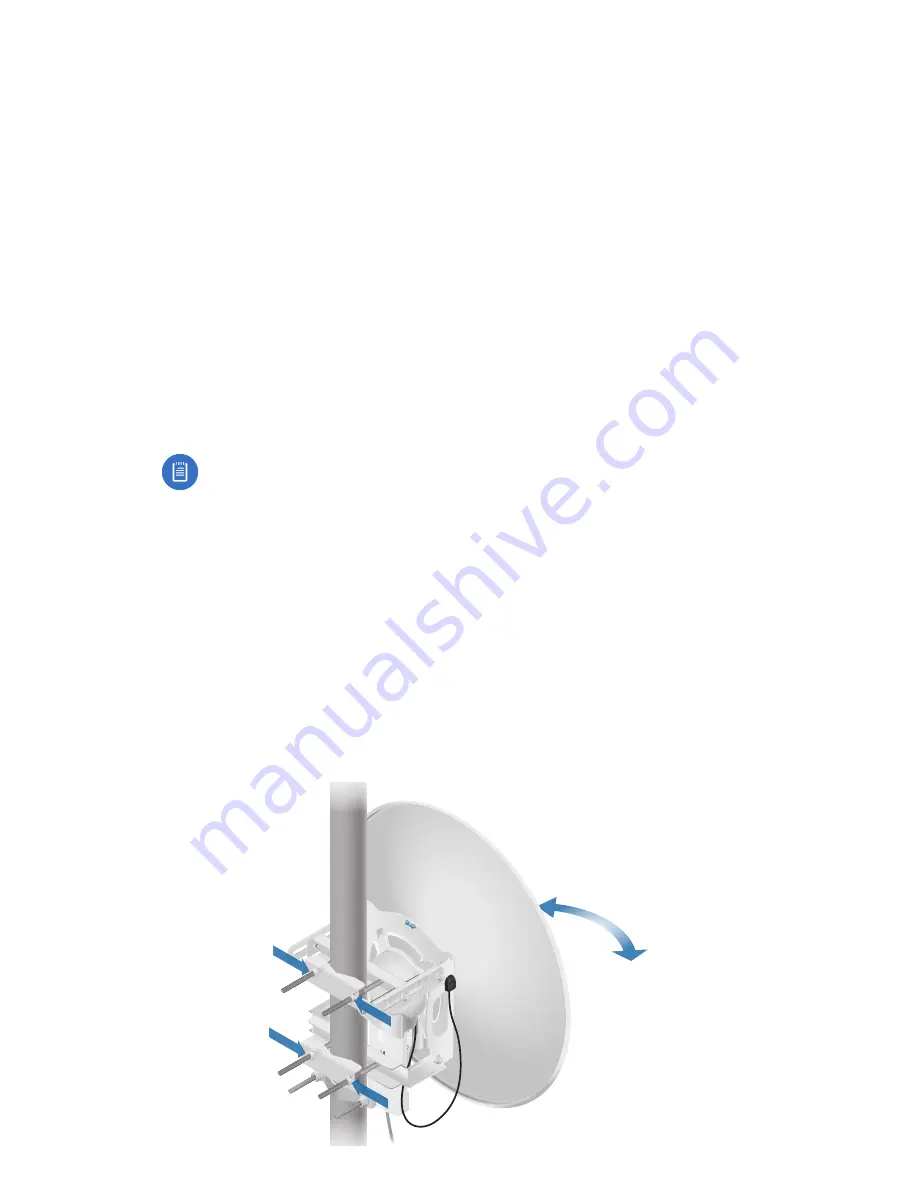
1. 

Master

  Visually aim the Master at the Slave. To adjust the 

Master’s position, adjust the azimuth and the elevation.
Adjust the azimuth:
a.  Loosen the four flange nuts on the two pole clamps.
b.  Rotate the antenna to point towards the other end of 

the link.

c.  Tighten the four flange nuts on the two pole clamps.

Содержание airFiber 11FX

Страница 1: ...11 GHz FDD Backhaul Radio Models AF 11FX H AF 11FX L ...

Страница 2: ...2A Power Cord Quick Start Guide 1 High band Duplexer AF 11FX H or low band Duplexer AF 11FX L TERMS OF USE Ubiquiti radio devices must be professionally installed Shielded Ethernet cable and earth grounding must be used as conditions of product warranty TOUGHCable is designed for outdoor installations It is the customer s responsibility to follow local country regulations including operation withi...

Страница 3: ... 1 m As a safety precaution ground the airFiber radio to grounded masts poles towers or grounding bars WARNING Failure to properly ground your airFiber radio will void your warranty Recommended 2 Outdoor Gigabit PoE surge protectors Note For guidelines about grounding and lightning protection follow your local electrical regulatory codes Optional DC power source if not using PoE Outdoor shielded C...

Страница 4: ...Hardware Overview Port Cover LED Panel Duplexer Shroud CH1 Port Under Cap CH0 Port Connects to AF 11G36 Antenna ...

Страница 5: ...nagement is disabled the MGMT port is the only port that can monitor configure and or update firmware Reset Button To reset to factory defaults press and hold the Reset button for more than 10 seconds while the device is already powered on Data Port Gigabit PoE port for handling all user traffic and powering the device VDC The VDC terminal block labeled and is used to power the AF 11FX using 50VDC...

Страница 6: ...s for low band Duplexer SISO mode or high band Duplexer MIMO mode RX1 TX1 Receive and Transmit SMA ports for high band Duplexer MIMO mode only Duplexer N Connector SMA Port SMA Port N Connector Female N type connector into which the antenna cable is plugged SMA Port High band and low band channel SMA ports ...

Страница 7: ...z flash This continues until the AF 11FX is fully booted Signal Level Once fully booted the Signal 1 4 LEDs act as a bar graph showing how close the AF 11FX is to ideal aiming This is auto scaled based on the link range the antenna gains and the configured TX power of the remote AF 11FX Each Signal LED has three possible states On Flashing and Off All Signal LEDs would be solidly on in an ideal li...

Страница 8: ...onfigured in SISO mode On Radio configured in MIMO mode MGMT Off No Ethernet Link On Ethernet Link Established Random Flashing Ethernet Activity DATA Off No Ethernet Link On Ethernet Link Established Random Flashing Ethernet Activity Off No Power On Powered On Short Flash 1 3 on off cycle Normal Flash 1 1 on off cycle Long Flash 3 1 on off cycle ...

Страница 9: ...to the AF 11FX and connect your computer to the MGMT port Configure the AF 11FX Install a ground wire and mount the AF 11FX on the airFiber AF 11G36 antenna or a compatible antenna At the installation site install the antenna with the mounted AF 11FX radio see the antenna s Quick Start Guide for installation instructions Establish and optimize the RF link Installing the Duplexer Install the includ...

Страница 10: ... SISO mode go to step 5 4 To use the AF 11FX in MIMO mode a Attach the second Duplexer not included to the AF 11FX radio s TX1 and RX1 ports Note The Duplexers must be installed in reverse order on opposite sides of the link b Remove the cap on the top right side of the AF 11FX 5 Re attach the Duplexer Shroud to the AF 11FX radio ...

Страница 11: ...ft the release latch on the bottom of the AF 11FX and slide the Port Cover off 2 Connect an Ethernet cable to the DATA port 3 Connect the Ethernet cable from the DATA port of the AF 11FX to the POE port of the adapter WARNING Use only the included adapter model GP C500 120G Failure to do so can damage the unit and void the product warranty ...

Страница 12: ...et DC Power To use DC input power instead of PoE follow these steps 1 Lift the release latch on the bottom of the AF 11FX and slide the Port Cover off 2 Connect a DC power cable to the Terminal Block 3 Connect the other end of the DC power cable to a DC power supply 4 Connect the DC power supply to its source ...

Страница 13: ...the Slave Frequency Setting The TX Frequency and RX Frequency settings must be the reverse of each other on both the Master and the Slave 1 Connect an Ethernet cable from your computer to the MGMT port on the AF 11FX 2 Configure the Ethernet adapter on your computer with a static IP address on the 192 168 1 x subnet 3 Launch your web browser Type http 192 168 1 20 in the address field and press en...

Страница 14: ...ss Settings a For one AF 11FX select Master as the Wireless Mode For the other AF 11FX keep the default Slave b Enter a name in the Link Name field This should be the same on both the Master and the Slave c If needed change the Channel Bandwidth Output Power and or Maximum Modulation Rate settings 7 Configure the TX Frequency and RX Frequency Note One airFiber radio s TX Frequency is the other rad...

Страница 15: ...ed by default so each airFiber radio must have a unique IP Address If the airFiber radios use the same IP Address you may lose access to the airFiber radios via the DATA ports Click the Network tab a For the Management IP Address option DHCP Keep the default DHCP to use DHCP reservation on your router to assign a unique IP Address Static Change the IP Address Netmask and other settings to make the...

Страница 16: ...Ground Wire 1 Remove the nut from the Ground Bonding Point located on the back of the AF 11FX Ground Bonding Point 2 Attach a ground wire min 10 AWG or 5 mm2 to the lug and replace the nut to secure the wire 640 00256 01 640 00256 01 ...

Страница 17: ...y Note The ground wire should be as short as possible and no longer than one meter in length Mount to the airFiber Antenna Follow the instructions in this section to mount the AF 11FX to an airFiber AF 11G36 antenna 1 Attach the airFiber X radio to the antenna by aligning the four tabs on the back of the radio with the slots of the radio mount Then slide the radio down to lock it into place ...

Страница 18: ...ort If you are using MIMO mode attach the RF connector labeled H to the radio s CH1 port 3 Attach the protective shroud a Align the hash mark on the top of the shroud with the notch on the dish antenna b Rotate the shroud clockwise until it locks into place ...

Страница 19: ...to the DATA port 3 If you are using DC power connect the other end of the Ethernet cable to your LAN Connection is complete 4 If you are using Power over Ethernet a Connect the Ethernet cable from the DATA port of the AF 11FX to the POE port of the adapter WARNING Use only the included adapter model GP C500 120G Failure to do so can damage the unit and void the product warranty b Connect an Ethern...

Страница 20: ...hernet Surge Protector model ETH SP at the end of each link Install the first surge protector within one meter of the airFiber DATA port and install the second surge protector at the ingress point of the location housing the wired network equipment Ground to Pole Tower or Grounding Block Max 1 m from AF 11FX Max 1 m airFiber PoE Adapter EdgeRouter Power Source ETH SP ETH SP AF 11FX Mounted on AF 1...

Страница 21: ...Master and the Slave to establish a link The following section features the airFiber X antenna AF 11G36 Note The Master must be aimed first at the Slave because the Slave does not transmit any RF signal until it detects transmissions from the Master 1 Master Visually aim the Master at the Slave To adjust the Master s position adjust the azimuth and the elevation Adjust the azimuth a Loosen the fou...

Страница 22: ...six hex head bolts Elevation Adjustment Bolt Note Do NOT make simultaneous adjustments on the Master and Slave 2 Slave Visually aim the Slave at the Master To adjust the Slave s position adjust the azimuth and elevation as described in step 1 3 Check to see if a link is established Ensure that the LINK LED is solidly lit green and the Signal LEDs of the Slave are displaying signal levels MIMO ...

Страница 23: ...he Slave 6 Repeat steps 4 and 5 until you achieve an optimal link with all four Signal LEDs solidly lit This ensures the best possible data rate between the airFiber radios 7 Lock the alignment on both airFiber antennas by tightening all the nuts and bolts 8 Observe the Signal LEDs of each airFiber radio to ensure that the values remain constant while tightening the nuts and bolts If any LED value...

Страница 24: ...he professional installer s responsibility to make sure the device is operated within local country regulatory requirements The Output Power Antenna Gain Cable Loss TX Frequency and RX Frequency fields are provided to the professional installer to assist in meeting regulatory requirements ...

Страница 25: ...ive Power over Ethernet or DC Power Block Supported Voltage Range 42 58VDC Certifications FCC 47 CFR Part 101 Wind Loading 480 N 200 km hr 108 lbf 125 mph Wind Survivability 200 km hr 125 mph Mounting Enlarged airFiber X Mount Operating Temperature 40 to 55 C 40 to 131 F Networking Interface Data Port 1 10 100 1000 Ethernet Port Management Port 1 10 100 Ethernet Port System Processor INVICTUS IC M...

Страница 26: ...ted TX Power 30 dBm1 Frequency Accuracy 1 ppm Channel Bandwidth 3 5 5 7 10 14 20 28 30 40 50 56 MHz Selectable2 Programmable Uplink and Downlink Duty Cycles 1 Depends on Regulatory Region 2 Channel widths may vary according to country region regulations ...

Страница 27: ...g The antennas used for this transmitter must be installed to provide a separation distance of at least 186 cm from all persons and must not be located or operating in conjunction with any other antenna or transmitter Les antennes utilisées pour ce transmetteur doivent être installé en considérant une distance de séparation de toute personnes d au moins 186 cm et ne doivent pas être localisé ou ut...

Страница 28: ...ce or the shop where you purchased the product Deutsch Die Europäische Richtlinie 2012 19 EU verlangt dass technische Ausrüstung die direkt am Gerät und oder an der Verpackung mit diesem Symbol versehen ist nicht zusammen mit unsortiertem Gemeindeabfall entsorgt werden darf Das Symbol weist darauf hin dass das Produkt von regulärem Haushaltmüll getrennt entsorgt werden sollte Es liegt in Ihrer Ver...

Страница 29: ...que tout autre matériel électrique ou électronique par les moyens de collecte indiqués par le gouvernement et les pouvoirs publics des collectivités territoriales L élimination et le recyclage en bonne et due forme ont pour but de lutter contre l impact néfaste potentiel de ce type de produits sur l environnement et la santé publique Pour plus d informations sur le mode d élimination de votre anci...

Страница 30: ...ch Par la présente UBIQUITI NETWORKS déclare que l appareil UBIQUITI NETWORKS est conforme aux exigences essentielles et aux autres dispositions pertinentes de la directive 1999 5 CE Deutsch German Hiermit erklärt UBIQUITI NETWORKS dass sich dieses UBIQUITI NETWORKS Gerät in Übereinstimmung mit den grundlegenden Anforderungen und den anderen relevanten Vorschriften der Richtlinie 1999 5 EG befinde...

Страница 31: ...WORKS declara que este dispositivo UBIQUITI NETWORKS está conforme com os requisitos essenciais e outras disposições da Directiva 1999 5 CE Română Romanian Prin prezenta UBIQUITI NETWORKS declară că acest dispozitiv UBIQUITI NETWORKS este în conformitate cu cerințele esențiale și alte prevederi relevante ale Directivei 1999 5 CE Slovensky Slovak Týmto UBIQUITI NETWORKS prehlasuje že toto UBIQUITI ...

Страница 32: ...hts reserved Ubiquiti Ubiquiti Networks the Ubiquiti U logo the Ubiquiti beam logo airFiber airOS EdgeRouter INVICTUS and TOUGHCable are trademarks or registered trademarks of Ubiquiti Networks Inc in the United States and in other countries All other trademarks are the property of their respective owners AI081116 w w w u b n t c o m ...

Отзывы: