3
The Model ELO-GB QR Quick
Response Extra Large Orifice Dry
Pendent Sprinklers are intended for
standard sprinkler placement and
standard flow and pressure
requirements as specified in NFPA
It is not intended for use as a
“large drop” sprinkler nor as an
“ESFR” sprinkler and is not
specifically Listed for NFPA 231
and NFPA 231C.
The following parameters must be
incorporated into the design of
automatic sprinkler systems utilizing
Model ELO-GB QR Quick Response
Dry Pendent Sprinklers.
1. Minimum sprinkler spacing is
6 feet (1.8 m).
2. Maximum sprinkler spacing is
15 feet (4.6 m).
3. Maximum coverage area for
densities below .25 gpm/sq. ft.
(10.24 Lpm/m
2
) is 130 sq. ft.
(12.1 m
2
) The maximum cover-
age area for densities .25 gpm/
sq. ft (10.2 Lpm/m
2
) and above
is 100 sq. ft. (9.3 m
2
).
4. Automatic sprinkler systems
must be hydraulically calculated
using the area density curves of
NFPA 13 Standards.
5. Minimum sprinkler discharge
pressure is 7 psi (0.48 bar) 30
gpm (113.7 Lpm).
All Central Model ELO-GB QR Dry
Pendent sprinklers must be installed
according to current NFPA 13 Stan-
dards. Deviations from these require-
ments and standards or any alteration
to the sprinkler itself will void any
warranty made by Central Sprinkler
Company. In addition, installation
must also meet local government
provisions, codes, and standards as
applicable.
The system piping must be properly
sized to insure the minimum required
flow rate at the sprinkler. Check for
the proper model, style, orifice size,
and temperature rating prior to
installation. Install sprinklers after the
piping is in place to avoid mechanical
damage; replace any damaged units.
Wet pipe systems must be
protected from freezing. Upon
completion of the installation, the
system must be tested per
recognized standards.
In the event of a thread leak,
remove the unit, apply new pipe joint
compound or tape, and reinstall.
Installation Sequence
Step 1.
The unit must be installed
into a threaded, cast iron, ductile
iron, or malleable iron tee only. It
may be installed into the run or
outlet of this tee. Do not install
into an elbow or mechanical tee.
Step 2. Use only a non-hardening
pipe joint compound or Teflon* tape.
Apply only to male threads.
*Teflon is a trademark of the DuPont Corp.
Design
Data
Installation
Step 3. Hand tighten the sprinkler
into the fitting. Use a Central Dry
Pendent Sprinkler Wrench at the
frame wrench boss, or a pipe wrench
on the main tube to tighten the dry
pendent into the fitting. A leak-tight
joint requires only 7 to 14 ft. lbs. (9.5
to 19.0 Nm) of torque. Torque levels
over 40 ft. lbs. (54.4 Nm) may twist
the head in the main tube, damaging
the seal.
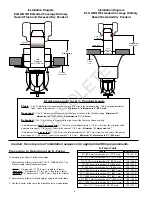
Step 4. To install the escutcheon
plate, align it with and push it over the
sprinkler body and onto the inner
portion of the escutcheon until the
outer edge of the escutcheon meets
the mounting surface. The recessed
escutcheon tool may be used to
install the escutcheon plate easily
from the floor.
Sprinklers must be handled care-
fully. They should not be transported
or stored where ambient temperature
may exceed 100
°
F/38
°
C. For best
results, store them in a dry, cool
location in the original shipping
package.
Do not install sprinklers that have
been dropped or visibly damaged,
such as a crack in a glass bulb or a
loss of liquid from the bulb. Sprinklers
should never be painted, coated,
plated, or altered in any other way
from manufactured condition or they
may not function properly. Any
sprinklers altered in such manner
must be replaced.
The owner is responsible for the
proper operating condition of all fire
protection devices and accessories.
The NFPA Standard 25 entitled,
“Inspection, Testing and Maintenance
of Water-Based Fire Protection
Systems”, contains guidelines and
minimum maintenance requirements.
Furthermore, the local
Authority
Having Jurisdiction may have addi-
tional regulations and requirements
for maintenance, testing, and inspec-
tion that must be obeyed.
Care &
Maintenance
OBSOLETE


