background image

53 

http://www.tyan.com


(Front Panel and USB) 


Содержание YR290 B7018-D2

Страница 1: ...http www tyan com YR290 B7018 D2 Service Engineer s Manual...

Страница 2: ...2 http www tyan com...

Страница 3: ...bility or warranties relating to fitness for a particular purpose or merchantability MiTAC retains the right to make changes to produce descriptions and or specifications at any time without notice In...

Страница 4: ...t into an outlet on a circuit different from that of the receiver Consult the dealer on an experienced radio television technician for help Notice for Canada This apparatus complies with the Class A l...

Страница 5: ...an introduction to the TYAN YR290 B7018 D2 barebones standard parts list describes the external components gives a table of key components and provides block diagram of the system Chapter2 Covers pro...

Страница 6: ...urpose of this pin If you outlet does not support this kind of plug contact your electrician to replace your obsolete outlet Do not place anything on the power cord Place the power cord where it will...

Страница 7: ...CPU and Heatsink 31 2 1 3 Installing the Memory 35 2 2 Rack Mounting 38 2 2 1 Installing the Server in a Rack 38 2 2 2 Installing the inner Rails to the Chassis 39 2 2 3 Installing the Outer Rails to...

Страница 8: ...D Backplane Board Features 65 3 7 2 M7018 BP2 Connector Pin Definitions 66 3 8 Replacing the Power Supply 68 Appendix I Cable Connection Tables 69 TYAN Proprietary Design 73 Appendix II FRU Parts Tabl...

Страница 9: ...290 B7018 D2 system provides scalable 32 64 bit computing high bandwidth memory design and lightning fast PCI E bus capabilities The YR290 B7018 D2 not only manages currentIT environments but also fle...

Страница 10: ...Supported HDD Interface SATA II 3 0Gb s SAS 3 0Gb s FAN 3 6cm fans System Cooling Configuration per blade Air Duct 1 Customized for the YR290 Chassis Peripherals per blade Type of ODD Q ty Ultra slim...

Страница 11: ...68E Speed 3 0 Gb s SAS RAID RAID 0 1 10 standard Connector 4 SATA Controller Intel ICH10R Speed 3 0 Gb s Storage per blade SATA RAID RAID 0 1 10 5 Intel Matrix RAID Connector type D Sub 15 pin Resolut...

Страница 12: ...densing at 35 C RoHS RoHS 6 6 Complaint Yes Manual 1 Quick Ref Guide 1 MB User s manual 1 BB User s manual Installation CD 1 TYAN installation CD Heatsink Cooler 4 LGA1366 CPU heatsinks Rail kit 1 sli...

Страница 13: ...Q ty LGA1366 2 Thermal Design Power TDP wattage Max up to 95W System Bus Up to 4 8 5 86 6 4GT s with Intel QuickPath Interconnect QPI support Processor per blade CPU list Please refer to our Web site...

Страница 14: ...Watchdog timer support Onboard Chipset Onboard Aspeed AST2050 AST2050 IPMI Feature IPMI 2 0 compliant baseboard management controller BMC USB 2 0 virtual hub BIOS update Server Management per blade AS...

Страница 15: ...CD 1 TYAN installation CD Heatsink Cooler 4 LGA1366 CPU heatsinks Rail kit 1 sliding rail kit for YR290 Package Contains Cable Power Cord 2 CCBL 0310 US type power cord 2 CCBL 0300 EU type power cord...

Страница 16: ...lustrated below 1 4 1 Box Contents Per Node SATA Interface Component Description 2U chassis 2 nodes 8 hot swap HDD bays per node TYAN S7018 system board pre installed 1 450W single Power Supply for SA...

Страница 17: ...stalled Power Distribution Board pre installed M7018 BP2 SATA SAS HDD Backplane Board pre installed M7018 R16 1F1YR1L PCI E Riser Card pre installed NOTE The 2nd PCI E slot is a proprietary slot for t...

Страница 18: ...settings etc TYAN Motherboard Drive CD Heatsink x4 HDD Screw Pack x4 Riser Card Power Cable for SAS Interface CCBL 136N AC Power Cord 125V US AC Power Cord 250V Europe Barebone Manual Mainboard Manua...

Страница 19: ...19 http www tyan com Ultra slim DVD ROM DVD Bracket DVD ROM Screw Pack Rail Kit Rail x2 Screw Pack...

Страница 20: ...duct 1 5 1 System Front View Per Node HDD LED Description Activity LED Off Fault LED Off No HDD activity Activity LED blinking green Fault LED Off HDD activity Activity LED Off Fault LED Red HDD Fail...

Страница 21: ...s Amber Failed System Warning caused by HDD BMC FAN failure thermal problem etc 5 Power Green Power ON Blue ID LED Front Panel Button Description 6 Power On Off Power up and power down the system 7 ID...

Страница 22: ...pair LAN LED The three onboard Ethernet ports have green and amber LEDs to indicate LAN status The table below illustrates the different LED states Ethernet LAN Link Activity LED Description Left slow...

Страница 23: ...n com 1 5 3 Internal View Per Node Number Description 1 HDD Cage 2 M7018 BP2 SATA SAS HDD Backplane Board 3 System Fans 4 Power Distribution Board 5 PCI E Riser Card Assembly 6 Air Duct 7 CPU Sockets...

Страница 24: ...24 http www tyan com NOTE...

Страница 25: ...nd dirt can get into components and cause malfunctions Use containers to keep small components separated Putting all small components in separate containers prevents them from becoming lost Adequate l...

Страница 26: ...f any other grounded appliance Avoid touching motherboard components IC chips connectors memory modules and leads The motherboard is pre installed in the system When removing the motherboard always pl...

Страница 27: ...disk drive to the chassis after the chassis is secured on the rack To know how to install the hard disk drives refer to 2 2 4 Rack mounting the Server page 41 2 1 1 Installing the DVD ROM Drive Optio...

Страница 28: ...28 http www tyan com 3 Insert the DVD ROM drive into the chassis...

Страница 29: ...29 http www tyan com 4 Connect the SATA cable and DVD power cable to the DVD ROM drive NOTE The illustration is based on a SAS Interface system Thus the connector marked is left idle...

Страница 30: ...MB J15 S4P for Riser J4 SATA Cable S1 SATA0 JP5 for MB DVD ROM to S7018 MB Riser for SATA SKU Cable DVD ROM Connect to S7018 Riser ODD PWR Cable P1 B4P for MB J15 S4P for Riser J4 SATA Cable S1 SATA3...

Страница 31: ...nstalling the CPU and Heatsink Follow the steps below to install the processor and heatsink 1 Locate the CPU socket 2 Push the CPU lever slightly away from the socket to unlock the socket Pull the lev...

Страница 32: ...32 http www tyan com 3 Push to fully open the socket cover Remove the protection cap...

Страница 33: ...33 http www tyan com 4 Place the CPU in the CPU socket 5 Close the socket cover and press the CPU socket lever down to secure the CPU...

Страница 34: ...34 http www tyan com 6 Place the heatsink on top of the CPU and secure it with 4 screws 7 Repeat the procedures described earlier to install the second CPU...

Страница 35: ...board 1 Locate the memory slots on the motherboard 2 Press the memory slot locking levers in the direction of the arrows as shown in the following illustration 3 Align the memory module with the slot...

Страница 36: ...hannel Two DIMMs per Channel Single Rank Memory DIMM C0 x x DIMM C1 x DIMM B0 x x DIMM B1 x DIMM A0 x x DIMM A1 x Dual Rank Memory DIMM C0 x x DIMM C1 x DIMM B0 x x DIMM B1 x DIMM A0 x x DIMM A1 x Max...

Страница 37: ...1 x DIMM B0 x x DIMM B1 x DIMM A0 x x DIMM A1 x Quad Rank Memory DIMM C0 x x DIMM C1 x DIMM B0 x x DIMM B1 x DIMM A0 x x DIMM A1 x Max Memory combination Single Rank Registered DIMMs 48GB 12x4GB DIMMs...

Страница 38: ...ity A Sliding rails 2 B Screw kit 1 2 2 1 Installing the Server in a Rack Follow these instructions to mount the TYAN YR290 B7018 D2 into an industry standard 19 rack NOTE Before mounting the TYAN YR2...

Страница 39: ...n com 2 2 2 Installing the inner Rails to the Chassis 1 Draw out the inner rails from the rail assembly Install inner rails to the left and right side of chassis 2 Push the rails forwards to lock the...

Страница 40: ...ackets in the rack 2 Secure the outer rail to the rack using 4 M5 screws and 4 washers 2 sets front 2 sets rear for each side Secure the rails to the rack as shown 3 Repeat Step 2 if you want to insta...

Страница 41: ...http www tyan com 2 2 4 Rack mounting the Server To install the chassis to the rack 1 Lift the chassis and then insert the inner slide rails into the outside rails 2 Push the chassis back into the ra...

Страница 42: ...42 http www tyan com 3 Screw the chassis to the rack 4 Insert the node into the chassis 5 Repeat Step 4 for the second node...

Страница 43: ...the hard disk drive to the chassis after the chassis is secured on the rack The YR290 B7018 D2 supports up to 8 2 5 hard drives per node Follow these instructions to install a hard drive 1 Press the...

Страница 44: ...44 http www tyan com 3 Unscrew the HDD tray bracket 4 Place a hard drive into the drive tray Use four screws to secure the HDD 5 Reinsert the HDD tray into the chassis...

Страница 45: ...45 http www tyan com 6 Press the locking lever to secure the tray Repeat the same procedures to install other HDD trays...

Страница 46: ...ve the nodes 2 Unscrew the chassis 3 Press the locking tabs on both sides of the chassis to pull the chassis out NOTE To avoid injury it is strongly recommended that two people lift the TYAN YR290 B70...

Страница 47: ...herboard M5376 front panel board M7018 BP2 SATA SAS HDD Backplane Board M7018 R16 2F1L SATA Interface or M7018 R16 1F1YR1L SAS Interface PCI E Riser card System fans and Power supply unit etc 3 2 Disa...

Страница 48: ...48 http www tyan com Front Components Node FAN PCBs Front Panel Board SATA SAS HDD Backplane...

Страница 49: ...install a new riser card NOTE The 2 nd PCI E slot on the M7018 R16 1F1YR1L PCIe Riser Card is a proprietary slot for the TYAN P3202 SAS card ONLY The use of any other PCI E card could result in damag...

Страница 50: ...50 http www tyan com 3 Unscrew to remove the PCI E bracket 4 Install a PCI E card onto the assembly Screw the PCI E card back to the assembly 5 Repeat Step 3 4 to install a low profile PCI E card...

Страница 51: ...ew to replace a new M7018 R16 1F1YR1L riser card NOTE The following illustration is based on a M7018 R16 1F1YR1L riser card The card actually installed in your system may be different from the illustr...

Страница 52: ...All Motherboard Cables Before replacing the motherboard or certain components remove cables connected to the motherboard Follow these instructions to remove all motherboard cables 1 Unplug all cables...

Страница 53: ...53 http www tyan com Front Panel and USB...

Страница 54: ...ll of the aforementioned cables follow the instructions below to remove the motherboard from the chassis 1 Remove the heatsink and processor if installed 2 Remove the ten screws securing the motherboa...

Страница 55: ...1 Disconnect three cables from the power distribution board PSMI 20 pin and 8 pin power PDB to S7018 MB Cable PDB Connect to S7018 PSMI Cable J11 M B PSMI Conn J39 PDB to S7018 MB PDB Connect to S7018...

Страница 56: ...tp www tyan com 2 Unscrew to take out the power distribution board 3 After replacing a new power distribution board repeat the procedures described earlier in reverse order to put the new set back in...

Страница 57: ...acing the Front Panel Board Follow these instructions to replace the Front Panel board 1 Unplug two front panel cables FPB to SATA SAS BP Cable FPB Connect to SATA SAS BP Board Control Cable J1 J12 2...

Страница 58: ...panel tray from the chassis 4 Disconnect the Front Panel Control and USB cables from the front panel board Front Panel Board FPB to S7018 MB Cable FPB Connect to S7018 MB Control Cable J1 Front Panel...

Страница 59: ...5 Unscrew to take out the front panel board 6 Replace a new front panel board and screw it to the front panel tray 7 Repeat the procedures described earlier in reverse order to place the front panel...

Страница 60: ...cation LED 6 PW_LED FPB power LED 21 ID_SW Location Switch 7 WLED IPMI LED 22 FP5V_STBY 5VSB power 8 WLED IPMI LED 23 FPB_HDD_ACTIVITY_G HDD Green LED 9 SMBDAT I 2 C BUS Data 24 FPB_HDD_FAULT_R HDD Re...

Страница 61: ...s in your system 1 Unplug the cables connected to the motherboard 2 Loose the screws that secure the fans to the chassis Lift the fans up NOTE To replace a single fan just loose the screws which go wi...

Страница 62: ...hole to secure the fan as illustrated Repeat the same procedures for all three fans 5 Reinstall the fans into the chassis following the procedures described earlier in reverse order 6 Connect the fan...

Страница 63: ...eplace the cooling fans in your system 1 Follow the instructions in Section 3 6 Replacing the System Fans to lift the fans up 2 Disconnect all cables from the M7018 BP2 SATA backplane board 2 Mini SAS...

Страница 64: ...able 2 36P to 36P Mini SAS2 SAS Port2 J2 SATA SAS Backplane BP Board to S7018 MB for SATA interface Cable SATA SAS BP Board Connect to S7018 MB Mini SAS Cable 3 36P to 4x7P Mini SAS1 SATA0 JP5 SATA1 J...

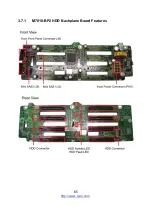
Страница 65: ...65 http www tyan com 3 7 1 M7018 BP2 HDD Backplane Board Features...

Страница 66: ...SAS_RX4 GND PIN A5 PIN A6 PIN A7 SAS_TX5 SAS_TX5 GND PIN B5 PIN B6 PIN B7 SAS_RX5 SAS_RX5 GND PIN A12 PIN A13 PIN A14 PIN A15 GND SAS_TX6 SAS_TX6 GND PIN B12 PIN B13 PIN B14 PIN B15 GND SAS_RX6 SAS_R...

Страница 67: ...D PIN A5 PIN A6 PIN A7 SAS_TX1 SAS_TX1 GND PIN B5 PIN B6 PIN B7 SAS_RX1 SAS_RX1 GND PIN A12 PIN A13 PIN A14 PIN A15 GND SAS_TX2 SAS_TX2 GND PIN B12 PIN B13 PIN B14 PIN B15 GND SAS_RX2 SAS_RX2 GND PIN...

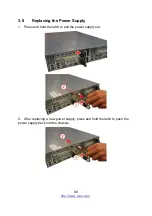
Страница 68: ...www tyan com 3 8 Replacing the Power Supply 1 Press and hold the latch to pull the power supply out 2 After replacing a new power supply press and hold the latch to push the power supply back into the...

Страница 69: ...TA SAS Backplane BP Board to HBA Card for SAS interface Cable SATA SAS BP Board Connect to HBA Card Mini SAS Cable 1 36P to 36P Mini SAS1 SAS Port1 J1 Mini SAS Cable 2 36P to 36P Mini SAS2 SAS Port2 J...

Страница 70: ...nect to SATA SAS BP Board Control Cable J1 J12 4 Power Supply Cables PDB to S7018 MB PDB Connect to S7018 MB 2x10P PWR Cable MB 2X10P Conn J14 PDB to SATA SAS BP Board PDB Connect to SATA SAS BP Board...

Страница 71: ...e P1 B4P for MB J15 S4P for Riser J4 SATA Cable S1 SATA0 JP5 for MB DVD ROM to S7018 MB Riser for SATA SKU Cable DVD ROM Connect to S7018 Riser ODD PWR Cable P1 B4P for MB J15 S4P for Riser J4 SATA Ca...

Страница 72: ...72 http www tyan com NOTE...

Страница 73: ...R16 1F1YR1L541178820019 1 M7018 R16 1F1YR1L 2U Riser Card PCBA P3202 541178820018 1 P3202 8 port SAS 3 0G HBA w tall bracket TYAN Proprietary design for use only with the M7018 R16 1F1YR1L riser card...

Страница 74: ...74 http www tyan com NOTE...

Страница 75: ...Online Support sections with downloadable Linux drivers and comprehensive compatibility reports for chassis memory and much more With all these convenient resources just a few keystrokes away users ca...
Страница 76: ...per maintenance of products NOTE A receipt or copy of your invoice marked with the date of purchase is required before any warranty service can be rendered You may obtain service by calling the manufa...

Отзывы: