background image

1

INSTRUCTION MANUAL ENCLOSED

MANUEL D’INSTRUCTION À L’INTÉRIEUR

MANUAL DE INSTRUCCIONES ADJUNTO

INSTRUCTION MANUAL ENCLOSED

MANUEL D’INSTRUCTION À L’INTÉRIEUR

MANUAL DE INSTRUCCIONES ADJUNTO

ATTENTION

IF YOU HAVE ANY PROBLEMS OR QUESTIONS, EMAIL

OR CALL CUSTOMER SERVICE BEFORE YOU RETURN

THIS PRODUCT TO THE STORE WHERE IT WAS PURCHASED.

For Customer Service: 

www.twinstarhome.com

in English Call: 866-661-1218

ATTENTION

SI VOUS AVEZ DES PROBLÈMES OU QUESTIONS, 

ENVOYEZ UN COURRIEL AU SERVICE À LA CLIENTÈLE OU 

APPELEZ LE SERVICE À LA CLIENTÈLE AVANT DE RETOURNER 

CE PRODUIT OÙ VOUS L’AVEZ ACHETÉ.

Pour le service à la clientèle: 

www.twinstarhome.com

pour le service en français: 866-661-1219

ATENCIÓN

SI TIENE ALGÚN PROBLEMA O PREGUNTAS, ENVÍE UN 

MENSAJE DE CORREO ELECTRÓNICO O LLAME AL SERVICIO 

DE ATENCIÓN AL CLIENTE ANTES DE DEVOLVER ESTE 

PRODUCTO A LA TIENDA EN LA QUE LO COMPRÓ.

Servicio de atención al cliente: 

www.twinstarhome.com

Línea para llamadas en español: 866-661-1219

STOP

ARRÊT

PARE

STOP

ARRÊT

PARE

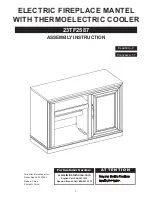
Содержание 23TF2587

Страница 1: ...1 1218 ATTENTION SI VOUS AVEZ DES PROBLÈMES OU QUESTIONS ENVOYEZ UN COURRIEL AU SERVICE À LA CLIENTÈLE OU APPELEZ LE SERVICE À LA CLIENTÈLE AVANT DE RETOURNER CE PRODUIT OÙ VOUS L AVEZ ACHETÉ Pour le service à la clientèle www twinstarhome com pour le service en français 866 661 1219 ATENCIÓN SI TIENE ALGÚN PROBLEMA O PREGUNTAS ENVÍE UN MENSAJE DE CORREO ELECTRÓNICO O LLAME AL SERVICIO DE ATENCIÓN...

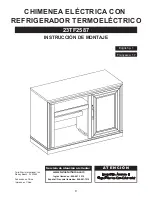
Страница 2: ...RUCTION Español p 9 Français p 17 Requires Electric Fireplace Insert with Heater AT T E N T I O N Twin Star International Inc Delray Beach FL 33445 Made in China Printed in China www twinstarhome com English Call 866 661 1218 Spanish French Call 866 661 1219 For Customer Service ...

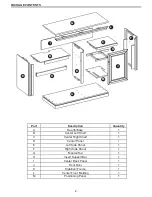
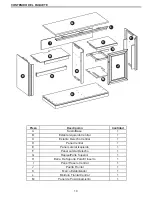
Страница 3: ...ntity A Hearth Base 1 B Center Left Shelf 1 C Center Right Shelf 1 D Center Panel 1 E Left Side Panel 1 F Right Side Panel 1 G Mantel Top 1 H Insert Support Bar 1 I Center Back Panel 1 J Front Door 1 K Stabilizer Frame 1 L Center Front Molding 1 M Positioning Panel 1 ...

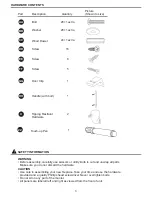
Страница 4: ... SAFETY INFORMATION WARNING Before assembly carefully use scissors or utility knife to cut and unwrap all parts Make sure you do not discard the hardware CAUTION Use care in assembling your new fireplace Take your time and use the hardware provided and a quality Phillips head screwdriver Never overtighten bolts Do not sit on any part of the mantel All panels are labeled left and right as viewed fro...

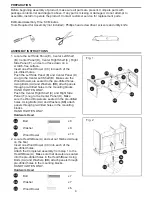
Страница 5: ...Wood Dowels are seated in the pre drilled holes Using Bolts AA and Washers BB attach panels through pre drilled holes in the mounting blocks HAND TIGHTEN ONLY Push the Center Right Shelf C and Right Side Panel F snug to the Center Panel D Make sure the Wood Dowels are seated in the pre drilled holes Using Bolts AA and Washers BB attach panels through pre drilled holes in the mounting blocks HAND T...

Страница 6: ...om left and right 5 Attach Center Back Panel I to the back of the completed assembly from step 4 Use a Phillips Head Screw Driver tighten Wood Screws DD through the pre drilled holes in the Center Back Panel I AA BB Fig 3 BB AA L CC Hardware Used Hardware Used BB AA DD Bolt Screw x 2 x 16 Washer x 2 3 Insert wood dowel CC into the holes in the Left Right Side Panel E F Push Center Front Molding L ...

Страница 7: ...D FIREPLACE MANTEL INSTALL THE INSERT IN YOUR FIREPLACE CLOSE TO ITS FINAL POSITION Insert the wine cooler feet into the holes of the Positioning Panel M Push the panel forward until the cooler makes contact with the front frame of the mantel HH EE Handle with bolt Screw x 1 x 2 M EE GG Fig 6 EE J HH Hardware Used Hardware Used EE Screw x 6 6 Connect the Front Door J to the Right Side Panel F with...

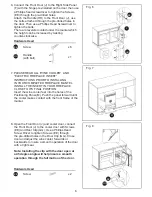
Страница 8: ...sert Install Insert From Back AA BB H Hardware Used BB AA Bolt x 2 Washer x 2 10 Lift insert carefully into the back of the unit and center in the insert opening Do not drag insert across hearth base as it may scratch the unit Connect the Insert Support Bar H to the inside left and right panels using the bolt AA and washer BB through pre drilled holes MOVE YOUR COMPLETED UNIT ONLY SHORT DISTANCES ...

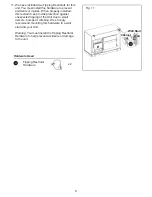
Страница 9: ...this restraint can provide protection against unexpected tipping of the Unit due to small tremors bumps or climbing We strongly recommend mounting this hardware to a wall stud and your Unit Warning You must install the Tipping Restraint Hardware to help prevent accidents or damage to the unit Hardware Used Tipping Restraint Hardware x 2 Cabinet Wall Stud Wall ...

Страница 10: ...h p 1 Français p 17 Necesitará Además El Hogar Eléctrico Con Calentador AT E N C I Ó N Twin Star International Inc Delray Beach FL 33445 Fabricado en China Impreso en China www twinstarhome com Inglés llamadas 866 661 1218 Español Français llamadas 866 661 1219 Servicio de atención al cliente ...

Страница 11: ...tante Derecho Central 1 D Panel Central 1 E Panel Lateral Izquierdo 1 F Panel Lateral Derecho 1 G Repisa Parte Superior 1 H Barra De Soporte Para El Inserto 1 I Panel Trasero Central 1 J Puerta Frontal 1 K Marco Estabilizador 1 L Moldura Frontal Central 1 M Panel de Posicionamiento 1 CONTENIDO DEL PAQUETE ...

Страница 12: ...real INFORMACIÓN DE SEGURIDAD ADVERTENCIA Antes del montaje corte con unas tijeras o un bisturí y desenvuelva las piezas cuidadosamente Asegúrese de no desechar los herrajes PRECAUCIÓN Tenga cuidado al armar su nueva chimenea Tómese su tiempo y use los elementos suministrados y un destornillador Phillips de calidad No apriete demasiado los pernos No se siente en ninguna parte de la repisa de la ch...

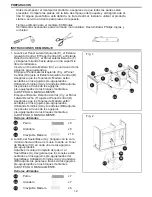
Страница 13: ...ANUALMENTE F E BB AA CC C B D CC CC Fig 2 2 Localice el Suelo Base A y póngalo con la cara mirando hacia arriba en el suelo Inserte un Tonel de Madera CC en cada uno de los agujeros pre agujereados Adjunte el montaje Completo del paso 1 al Suelo Base A Asegúrese que los toneles están sentados en los agujeros pre agujereados del Suelo Base Utilizando Tornillos AA y Arandelas BB adjunte los paneles ...

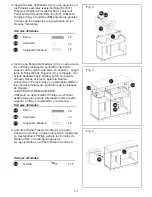
Страница 14: ...a izquierda y la derecha 5 Adjunte el Panel Trasero Central I a la parte trasera del montaje completo del paso 4 Utilizando un Destornillador Phillips apriete los Tornillos de Madera DD a través de los agujeros pre agujereados en el Panel Trasero Central I AA BB Fig 3 BB AA L CC Herrajes utilizados BB BB AA AA DD Tornillo x 2 x 9 x 16 x 2 x 9 3 Inserte Toneles de Madera CC en los agujeros en los P...

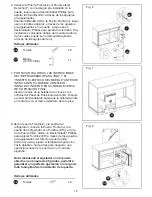
Страница 15: ...AR EN SU MUEBLE COMPLETO INSTALE EL INSERTO EN SU MUEBLE CERCA DE SO POSICIÓN FINAL Inserte los pies de la heladera de vinos en los orificios del Panel de Posicionamiento M Empuje el panel hacia adelante hasta que la heladera entre en contacto con el marco delantero de la repisa HH EE Mango Con Tornillo Tornillo x 1 x 2 M Fig 6 EE J HH Herrajes utilizados Herrajes utilizados EE Tornillo x 6 6 Conec...

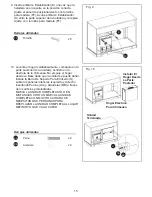
Страница 16: ...posterior de la unidad y céntrelo en la abertura de la chimenea No empuje el hogar desde su Base dado que la unidad se puede dañar Instale la Barra De Soporte Para El Inserto H sobre los paneles interiores Izquierda y derecho insertando Pernos AA y Arandelas BB a través de los orificios pretaladrados MUEVA LA UNIDAD COMPLETA SÓLO EN DISTANCIAS CORTAS MUEVA LA UNIDAD COMPLETA CON MUCHO CUIDADO SE NE...

Страница 17: ... o lesiones Cuando se los instala correctamente brindan protección contra la caída inesperada del gabinete debido a temblores leves o a que alguien choque la unidad o se trepe a ella Recomendamos montar estos herrajes a un taco de pared y a la Unidad Advertencia Debe instalar el Herraje contra Caídas para evitar accidentes o que se dañe la unidad Gabinete Taco De Pared Pared ...

Страница 18: ...English p 1 Español p 9 Nécessite AUSSI un foyer insert électrique avec chauffage AT T E N T I O N Twin Star International Inc Delray Beach FL 33445 Fabriqué en Chine Imprimé en Chine www twinstarhome com Anglais Appelez 866 661 1218 Español Français Appelez 866 661 1219 Pour le service à la clientèle ...

Страница 19: ... centrale gauche 1 C Etagère centrale droite 1 D Panneau central 1 E Panneau latéral gauche 1 F Panneau latéral droit 1 G Manteau dessus 1 H Support pour l unité encastrable 1 I Panneau central arrière 1 J Porte avant 1 K Cadre stabilisateur 1 L Moulure centrale avant 1 M Panneau de positionnement 1 ...

Страница 20: ...ERTISSEMENT Avant l assemblage à l aide de ciseaux ou d un couteau universel coupez et déballez soigneusement toutes les pièces Assurez vous de ne pas jeter de matériel MISE EN GARDE Faites preuve de prudence dans l assemblage de votre nouvelle cheminée Prenez votre temps et utilisez le matériel fourni et un tournevis cruciforme de qualité Ne serrez pas trop les boulons Ne vous asseyez pas sur des...

Страница 21: ...B AA CC C B D CC CC Fig 2 2 Posez le Foyer Base A côté lisse vers le haut sur le sol Insérez une Cheville En Bois CC dans chacun des trous pré percés Fixez l Assemblage terminé à l étape 1 au Foyer Base A Assurez vous que les chevilles sont bien insérées dans les trous pré percés dans le Foyer Base Fixez les panneaux à travers les trous pré percés des blocs de montage à l aide des Boulons AA et de...

Страница 22: ...les trous pré percés des blocs de montage à l aide des Boulons AA et des Rondelles BB BB AA CC CC x 9 x 9 x 6 x 2 Matériel utilisé Boulon Rondells Goujon en bois 4 Insérez un goujon en bois CC dans chacun des trous pré percés de la bordure supérieure du panneau assemblé à l étape 3 Trouvez ensuite le manteau dessus G Déposez le côté fini du manteau sur le dessus du panneau entièrement monté De l in...

Страница 23: ...LLER VOTRE APPAREIL INSTALLEZ L APPAREIL ENTIEREMENT TERMINE DANS UN EMPLACEMENT DE CHEMINEE Insérer les pieds du cabinet cellier dans les trous du panneau de positionnement M Appuyer le panneau vers l avant jusqu à ce que le cabinet cellier entre en contact avec le cadre avant du manteau HH EE Poignée arec boulon Vis x 1 x 2 M Fig 6 EE J HH Matériel utilisé Matériel utilisé EE Vis x 6 6 Attachez ...

Страница 24: ...dans le centre de l ouverture de celui ci Ne pas tirer le foyer encastrable sur la base âtre car cela pourrait égratigner la base du manteau Installer la Barre De Support Pour L unité Encastrable H sur les panneaux intérieurs gauche et droit en insérant des Boulons AA et de Rondelles BB dans les orifices préperforés NE DÉPLACEZ LE FOYER ENTIÈREMENT MONTÉ QUE SUR DE COURTES DISTANCES DÉ PLACEZ L UNI...

Страница 25: ... une protection contre tout basculement imprévu du meuble attribuable à de faibles tremblements à des secousses ou à des tentatives d escalade Il est fortement recommandé de fixer ces pièces sur un poteau mural et sur le meuble Avertissement Il est nécessaire d installer les pièces d arrimage anti basculement pour prévenir les accidents ou les dommages à l unité Matériel utilisé Quincaillerie d arr...

Отзывы: