


8 Reference Monitor
Reference Monitor 9
3. Controls & Functions
FRONT
●
[POWER] button
- Used to turn the power on and off.
●
[SOURCE] button/lamp
- Used to select the desired input source. Press
the SOURCE button to active the input select
menu and use the UP/DOWN Knob to change
the input source.
●
[SCAN] button/lamp
- Used to change the scan mode.
- Press the SCAN button to move through the
scan modes: OVER SCAN -> ZERO SCAN ->
UNDER SCAN -> 2:1 SCAN -> 1:1 SCAN -> FIT
WIDTH -> ZOOM(PBP 16:9 Mode)
●
[ASPECT] button/lamp
- Used to change the various display ratio
between 4:3 and 16:9.
●
[MARKER] button/lamp
- Used to activate/deactivate the Marker. The
desired marker can be displayed on the
screen properly when the type of marker
selected from the main menu.
●
[F1] (In Single Mode) button/lamp
- Used to activate the function.
- The feature selected in “SYSTEM->KEY
FUNCTION1” setting will be activated.
●
[F1] (In Multi Mode) button
- Used to select a display in Multi Mode(PBP
Mode). (Screen 1, Screen 2, Full Picture)
●
[F2] button/lamp
- Used to activate the function.
- The feature selected in “SYSTEM->KEY
FUNCTION2” setting will be activated.
●
[F3] button/lamp
- Used to activate the function.
- The feature selected in “SYSTEM->KEY
FUNCTION3” setting will be activated.
●
[MENU/EXIT] button
- Used to activate the OSD menu.
- When the OSD menu is activated, press this
button to exit from the menu.
●
[UP/DOWN/ENTER] Knob
- Used to move within the menu when the OSD
menu is activated and is also used to increase
or decrease the value of selected feature.
- Press the Knob to select the feature of main
menu and the sub menus when the OSD
menu is activated.
- When the OSD menu is inactivated, press the
Knob to control volume, brightness, contrast
and aperture.
●
[TALLY] lamp
- Tally lamp that can be toggled in green or red
using the REMOTE(RJ-45) port.
●
[USB]
- This terminal is used to upgrade the firmware
or color calibration made by TVLogic.
●
[AUDIO OUT]
- Used for Stereo Audio Output through Phone
Jack.
3. Controls & Functions
REAR
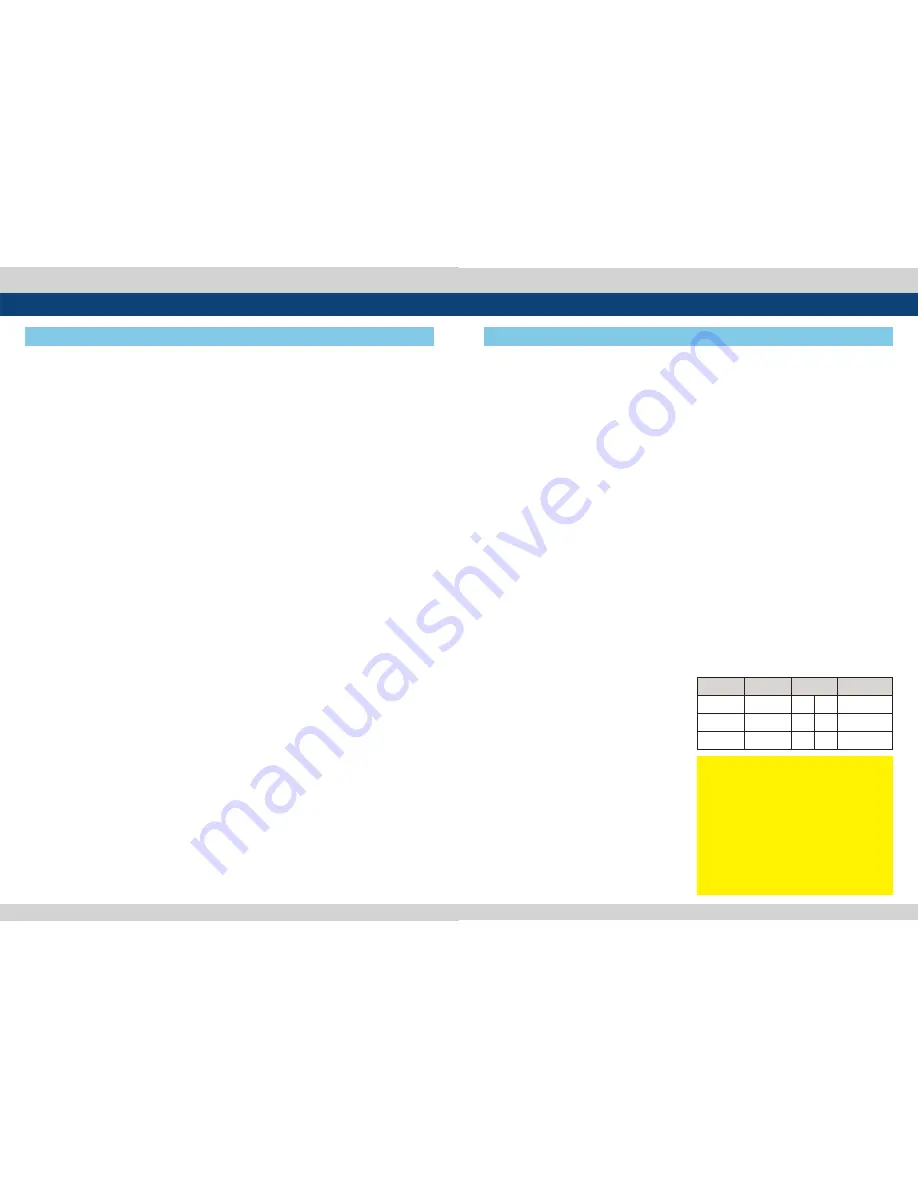
Connector Composite Component
S-Video
1
CVBS1
Y
G
Y
2
CVBS2
Pb
B
No Con.
3
CVBS3
Pr
R
C
●
[RS-232]
- Factory program port used for automatic
alignment.
●
[CVBS1/Y/G/S-Y] (BNC)
- Signal input terminal used to feed the
monitor COMPOSITE 1, S-VIDEO Y,
COMPONENT Y and RGB G signals.
●
[CVSBS2/Pb/B] (BNC)
- Signal input terminal used to feed the
monitor COMPOSITE 2, RGB B and
COMPONENT Pb signals.
●
[CVSBS3/Pr/R/S-C] (BNC)
- Signal input terminal used to feed the
monitor COMPOSITE 3, S-VIDEO C,
COMPONENT Pr and RGB R signals.
●
[HDMI(HDCP)] (HDMI)
- Signal input terminal for HDMI signal.
●
[DVI-I]
- Signal input terminal for DVI ANALOG or DVI
DIGITAL signal.
●
[SDI-A IN] (BNC)
- HD/SD SDI signal input terminal for SDI A.
●
[SDI-A OUT] (BNC)
- HD/SD SDI signal output terminal for SDI A.
●
[SDI-B IN] (BNC)
- HD/SD SDI signal input terminal for SDI B.
●
[SDI-B OUT] (BNC)
- HD/SD SDI signal output terminal for SDI B.
●
[EXT.SYNC IN/OUT]
- External sync signal input/output terminal
for external sync.
●
[LAN]
- Ethernet port for easy firmware updates and
remote control.
●
[AUDIO IN] (Phone Jack)
- External Audio in for Stereo Speaker out.
- Select the left/right Audio disembedded
signal output.
- Used for HDMI input signal or external stereo
signal output through the internal speaker or
the phone jack.
●
[REMOTE] (RJ-45)
- Provides connection to control equipment
for external monitor control.
●
[RS422 IN/OUT] (RJ-45)
- Used to control the monitor with protocol
provided by TVLogic or to support TSL
protocol.
●
[AC IN]
- Used to supply AC power; 100V~240V input
range.
●
DC 12V IN
- 12V DC
●
[VIDEO INPUT]
- Input VIDEO connection method.
<Warning!!>
When using the product make sure to ground,
whenever possible, before connecting the
input signal cable in order to prevent any
possible damage to the product or connected
devices. The damage may include signal noise,
malfunction of main board or display panel.
And the connected devices such as camera or
video source player may also be influenced
through signal cable. Please check if the AC
power source and the power extender or
power distributor is grounded.


