background image

Copyrights Tvilight B.V.   September 2017. Datasheet is subject to change without notice.

INSTALLATION MANUAL    

(CS-PRAI) 230 VAC (PR150868) or 115 VAC (PR151116)

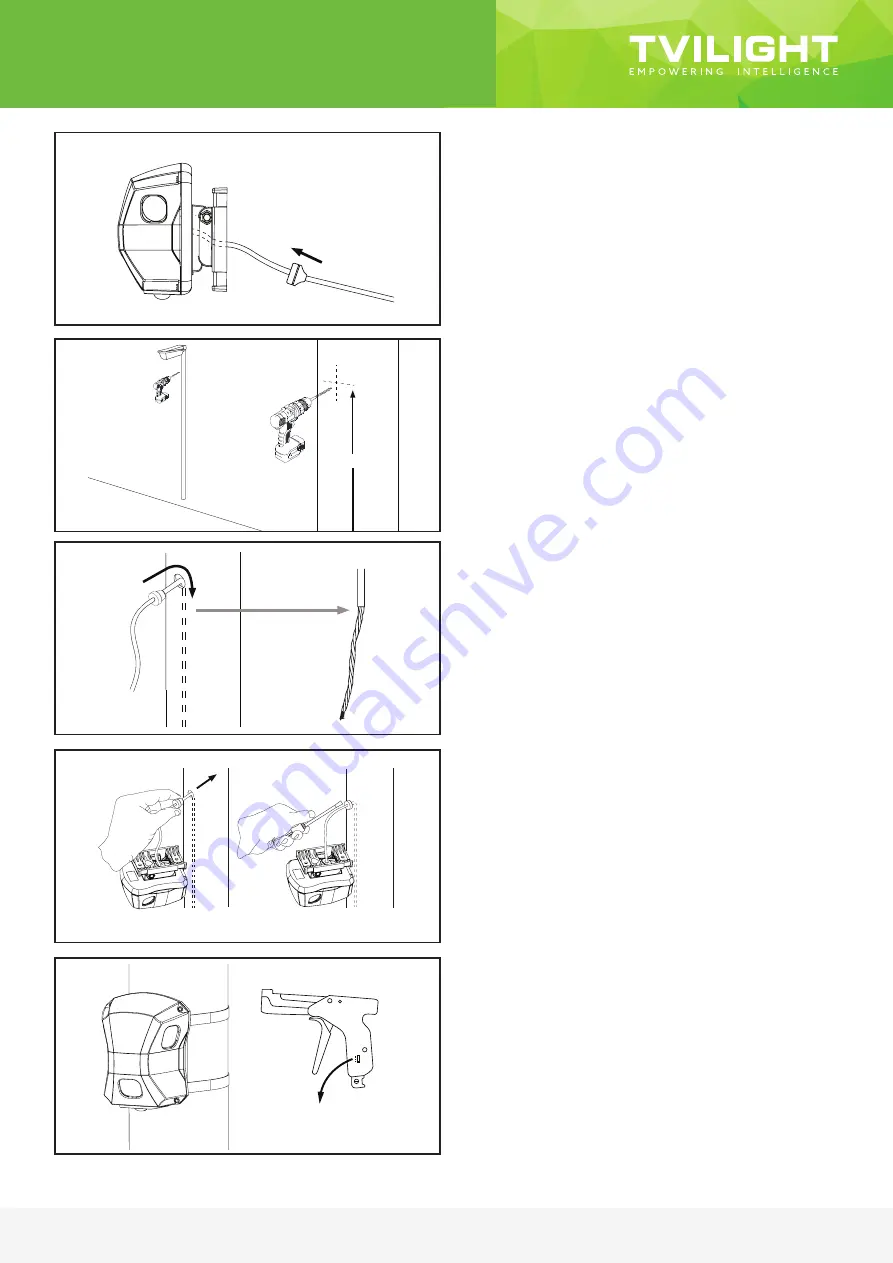
1. DE: Schieben Sie die Gummitülle auf das Kabel. 

1. EN: Push grommet through wire.

1. FR : Passer le câble dans le passe-câble.

1. IT: Spingere la guarnizione attraverso il cavo.

1. ES: Empuje la arandela a través del cable.

1. NL: Druk doorvoer door draad.

2. DE: Bohren Sie ein Loch mit einem Durchmesser von 16 mm in den Mast.

2. EN: Drill 16mm hole into pole.

2. FR : Percer un trou de 16 mm dans le poteau.

2. IT: Praticare un foro di 16 mm nell‘asta.

2. ES: Taladre un orificio de 16 mm en el poste.

2. NL: Boor een 16mm groot gat in de pool.

3. DE: Führen Sie das Kabel durch die Bohrung; verdrillen Sie dabei die Adern.

3. EN: Run wire through hole, twist the end leads of the wires.

3. FR: Passer le câble dans le trou, torsader les extrémités du conducteur des fils.

3. IT: Far passare il cavo nel foro, attorcigliare le estremità dei cavi.

3. ES: Pase el cable por el orificio, retuerza el extremo de los cables.

3. NL: Voer de draad door het gat, draai de uiteinden van de draden in elkaar.

4. DE: Drücken Sie die Gummitülle in die Bohrung. Nehmen Sie dabei einen Schraubendreher 

zu Hilfe.

4. EN: Push grommet into hole. Use a screw driver to press grommet into the hole.

4. FR : Pousser le passe-câble dans le trou. Utiliser un tournevis pour enfoncer le passe-câble 

dans le trou.

4. IT: Spingere la guarnizione nel foro. Usare un cacciavite per spingere la guarnizione nel foro.

4. ES: Empuje la arandela en el agujero. Utilice un destornillador para presionar la arandela en el 

agujero.

4. NL: Druk de doorvoer in het gat. Druk de doorvoer met een schroevendraaier in het gat.

5. DE: Befestigen Sie das Produkt mit Hilfe des Spannwerkzeugs am Mast; stellen Sie das 

Spannwerkzeug auf maximale Spannung ein.

5. EN: Strap product to pole, with help of tensioning tool; ensure that tensioning tool is set to 

maximum tension.

5. FR : Attacher le produit au poteau, à l‘aide d‘un outil de serrage ; veiller à ce que l‘outil de 

serrage soit réglé sur la tension maximum.

5. IT: Fissare il prodotto all‘asta con l‘aiuto dello strumento di tensionamento; assicurare che lo 

strumento di tensionamento sia impostato alla tensione massima.

5. ES: Fije el producto al poste con la ayuda de una herramienta tensora; asegúrese de que la 

herramienta tensora esté fijada a la máxima tensión.

5. NL: Bevestig het product op de pool met behulp van bevestigingsgereedschap; controleer of 

het bevestigingsgereedschap op de maximumspanning is ingesteld.

5m

Page 5 of 8

Содержание CITYSENSE PLUS Series

Страница 1: ...previously defined by the user Dynamic lighting reduces energy consumption by up to 80 without compromising public safety and citizen comfort The in built monitoring tools notify users via CityManager about the lighting related faults such as a lamp or ballast failures This greatly reduces the need for expensive visual inspections and enables a reduction of operation and maintenance costs Designed...

Страница 2: ...ion with CityManager through Gateway Compatible with conventional PLL HID HPS and LED luminaires 2 4 GHz IEEE 802 15 4 self forming self healing wireless network Depending on variant 9 5 dBm max transmit power 96 dBm receiver sensitivity up to 150 meter open field range or 22 dBm transmit power 100 dBm max receiver sensitivity up to 1 KM open field range Up to 250 kbps microcontroller RF data rate...

Страница 3: ...mienta tensora Bevestigingsgereedschap 3 x Aufkleber 3 x Sticker 3 x autocollant 3 x adesivo 3 x etiqueta adhesiva 3 x sticker M16 Gummitüllle M16 Rubber Grommet M16 passe câble M16 guarnizione M16 arandela M16 doorvoer Schraubendreher Screw Driver Tournevis Cacciavite Destornillador Schroevendraaier 4X Klemme 4X Terminal 4X Borne 4X Morsetto 4X borne 4X klem www tvilight com No TVI XXXXXXXXXX L N...

Страница 4: ...l not be able to dim the connected armature Default settings of the CITYSENSEis 100 without TVILIGHT network connection Dimming time Systeme Failure Level Power On Level will be automatically set by CITYMANAGER approx 8m approx 3 5m approx 9 5m approx 2 5m approx 17m approx 4m Speed Range Safety instructions The device may only be used for the application area specified this area should be accessi...

Страница 5: ...e dabei einen Schraubendreher zu Hilfe 4 EN Push grommet into hole Use a screw driver to press grommet into the hole 4 FR Pousser le passe câble dans le trou Utiliser un tournevis pour enfoncer le passe câble dans le trou 4 IT Spingere la guarnizione nel foro Usare un cacciavite per spingere la guarnizione nel foro 4 ES Empuje la arandela en el agujero Utilice un destornillador para presionar la a...

Страница 6: ...ur le poteau 7 IT Applicare l adesivo con l ID del prodotto all asta 7 ES Aplique la etiqueta adhesiva de identificación de producto al poste 7 NL Breng een product ID sticker op de pool aan 8 DE Führen Sie die Verbindung gemäß Schaltplan durch 8 EN Connect as shown in wiring diagram 8 FR Connecter le câble comme indiqué sur le schéma de câblage 8 IT Collegare come mostrato nel diagramma di cablag...

Страница 7: ...packaging if still available Ship the RMA items via traceable means to the below address Write the RMA number on at least two 2 outside surfaces of each return package Write RMA number on the Air Waybill or Shipper Allow four 4 weeks turn around time after receipt of RMA by Company 5 4 Address All RMA packages should be shipped to TVILIGHT B V RMA _ _ _ _ _ Westerhaven 13 6th floor 9718 AW Groning...

Страница 8: ...der the warranty terms Also while the warranty terms cover defects in material design and or manufacturing it excludes failures related to battery power supply other wear and tear parts and consumables Client should maintain an adequate stock in case some of the products require replacement 3 Application note 3 1 The product should be used only in conjunction with properly certified such as CE lum...

Отзывы: