background image

1 4

English


- Do not leave the equipment unattended when the mains plug is 

inserted into the wall socket�


- Do not pull the mains cable to remove the mains plug from the wall 

socket�


- Remove the mains plug from the wall socket when the equipment 

is not in use, before assembly or disassembly and before cleaning 
and maintenance�

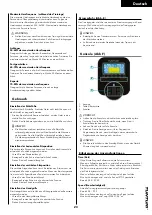
Assembly instructions

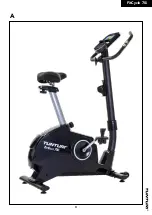
Description illustration A

The illustration shows what the trainer will looks like after the 
assembly is completed� 
You can use this as a reference during your assembly, but do follow 
the assembly steps always in the correct sequence as showed in the 
illustrations� 

Description illustration B

The illustration shows what components and parts you should find 
when un-boxing your product�

  ‼  NOTE

•  Small parts can be hidden/ packed in hollow spaces in the 

Styrofoam product protection

•  If a part is missing, contact your dealer�

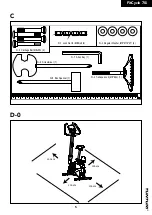
Description illustration C

The illustration shows the hardware kit that comes with your product� 
The hardware kit contains bolts, washers, screws , nuts etc� and the 
required tools to properly fit your trainer� 

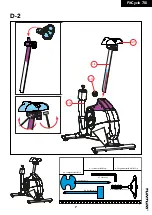
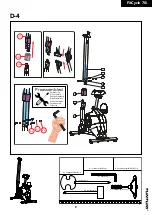
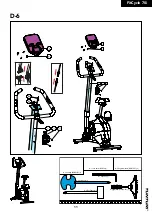
Description illustration D

The illustrations shows you in the correct following order how to 
assembly your trainer best� 

  ‼  NOTE

•  Part numbers shown in the assembly steps are commencing 

with the spare part drawing that can be found in the online full 
version user manual�

 ⚠ WARNING

•  Assemble the equipment in the given order�
•  Carry and move the equipment with at least two persons�

 ⚠ CAUTION

•  Place the equipment on a firm, level surface�
•  Place the equipment on a protective base to prevent damage to 

the floor surface�

•  Allow at least 100 cm of clearance around the equipment�
•  Refer to the illustrations for the correct assembly of the 

equipment�

Additional assembly information� 

D3 How to fit the pedals correctly� 

  ‼    

NOTE

•  Right and left side are determined from an exercising positions 

perspective� 

Right hand pedal

Find the “R” or “L”  mark on the pedal axle


- Fit the right hand pedal “R” into the right hand crank�


- Firstly turn the pedal axle in clockwise direction by hand�


- Use the wrench to fully tighten the pedal�

Left hand pedal


- Fit the left hand pedal “L” into the left hand crank�


- Firstly turn the pedal axle in counter-clockwise direction by hand�


- Use the wrench to fully tighten the pedal�

  ‼  NOTE

•  Save the tools provided with this product, after you completed 

the product assembly,  
for future service purposes� 

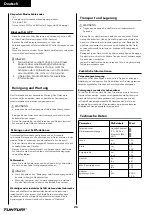
Workouts

The workout must be suitably light, but of long duration� Aerobic 
exercise is based on improving the body’s maximum oxygen uptake, 
which in turn improves endurance and fitness� You should perspire, 
but you should not get out of breath during the workout� 
To reach and maintain a basic fitness level, exercise at least three 
times a week, 30 minutes at a time� Increase the number of exercise 
sessions to improve your fitness level�  
It is worthwhile to combine regular exercise with a healthy diet� A 
person committed to dieting should exercise daily, at first 30 minutes 
or less at a time, gradually increasing the daily workout time to one 
hour� Start your workout at low speed and low resistance to prevent 
the cardiovascular system from being subjected to excessive strain�  
As the fitness level improves, speed and resistance can be increased 
gradually� The efficiency of your exercise can be measured by 
monitoring your heart rate and your pulse rate�

Exercise Instructions

Using your fitness trainer will provide you with several benefits, it will 
improve your physical fitness, tone muscle and in conjunction with a 
calorie controlled diet help you lose weight�

The warming up phase

This stage helps get the blood flowing around the body and the 
muscles working properly� It will also reduce the risk of cramp and 
muscle injury� It is advisable to do a few stretching exercises as shown 
below� Each stretch should be held for approximately 30 seconds, do 
not force or jerk your muscles into a stretch - if it hurts, STOP

The exercise phase

This is the stage where you put the effort in� After regular use, the 
muscles in your legs will become more flexible� Work to your but it is 
very important to maintain a steady tempo throughout� The rate of 
work should be sufficient to raise your heart beat into the target zone 
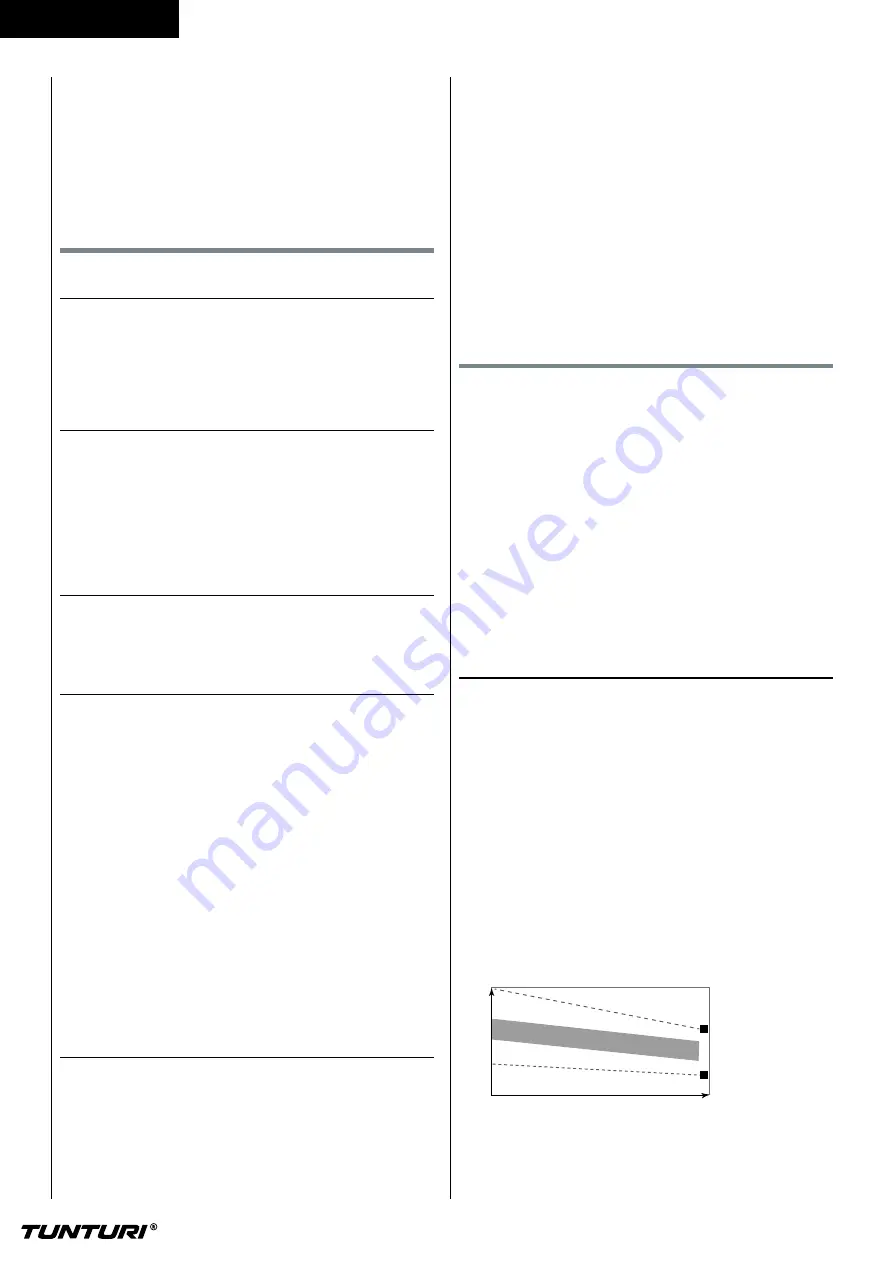
shown on the graph below�

200

180

160

140

120

100

  80

  20   25   30   35   40   45   50   55   60   65   70   75

 85 %

 70 %

 AGE

 MAXIMUM

 COOL DOWN

HEART RATE

TARGET ZONE

This stage should last for a minimum of 12 minutes though most 
people start at about 15-20 minutes

Содержание 20TFCE7000

Страница 1: ...manuale prima di assemblare questo prodotto Lea este manual antes de montar este producto L s bruksanvisningen innan du monterar denna produkt Lue t m k sikirja ennen kokoamista tuotetta WWW FitCycle...

Страница 2: ......

Страница 3: ...3 FitCycle 70i A...

Страница 4: ...i 4 FitCycle 70i B...

Страница 5: ...crewdriver 1 N 8 Box Spanner 1 N 4 T shape knob M8 69L 1 N 3 Regular Washer 8 19 2T 4 N 1 Lock Nut for M8 Bolt 4 N 2 Carriage Bolt M8x55L 4 N 7 Allen Key 1 100 cm 100 cm 100 cm 100 cm 5 FitCycle 70i C...

Страница 6: ...N 3 N 1 I 3 N 2 J 3 N 6 Screwdriver 1 N 8 Box Spanner 1 N 4 T shape knob M8 69L 1 N 3 Regular Washer 8 19 2T 4 N 1 Lock Nut for M8 Bolt 4 N 2 Carriage Bolt M8x55L 4 N 7 Allen Key 1 6 FitCycle 70i D 1...

Страница 7: ...G 10 L 6 G 11 G 19 N 6 Screwdriver 1 N 8 Box Spanner 1 N 4 T shape knob M8 69L 1 N 3 Regular Washer 8 19 2T 4 N 1 Lock Nut for M8 Bolt 4 N 2 Carriage Bolt M8x55L 4 N 7 Allen Key 1 7 FitCycle 70i D 2...

Страница 8: ...eft hand pedal L R Right hand crank Make sure to use Right hand pedal R N 6 Screwdriver 1 N 8 Box Spanner 1 N 4 T shape knob M8 69L 1 N 3 Regular Washer 8 19 2T 4 N 1 Lock Nut for M8 Bolt 4 N 2 Carria...

Страница 9: ...assemblato Pre ensamblado F rmonterad Esikoottu H 3 G 20 G 24 B 2 B 1 B 3 N 6 Screwdriver 1 N 8 Box Spanner 1 N 4 T shape knob M8 69L 1 N 3 Regular Washer 8 19 2T 4 N 1 Lock Nut for M8 Bolt 4 N 2 Car...

Страница 10: ...N 5 N 4 N 4 N 6 Screwdriver 1 N 8 Box Spanner 1 N 4 T shape knob M8 69L 1 N 3 Regular Washer 8 19 2T 4 N 1 Lock Nut for M8 Bolt 4 N 2 Carriage Bolt M8x55L 4 N 7 Allen Key 1 1 0 FitCycle 70i D 5...

Страница 11: ...N 6 Screwdriver 1 N 8 Box Spanner 1 N 4 T shape knob M8 69L 1 N 3 Regular Washer 8 19 2T 4 N 1 Lock Nut for M8 Bolt 4 N 2 Carriage Bolt M8x55L 4 N 7 Allen Key 1 1 1 FitCycle 70i D 6...

Страница 12: ...1 2 FitCycle 70i E F...

Страница 13: ...kout consult a physician to check your health If you experience nausea dizziness or other abnormal symptoms immediately stop your workout and consult a physician To avoid muscular pain and strain star...

Страница 14: ...into the left hand crank Firstly turn the pedal axle in counter clockwise direction by hand Use the wrench to fully tighten the pedal NOTE Save the tools provided with this product after you completed...

Страница 15: ...nt will become less accurate WARNING If you have a pacemaker consult a physician before using a heartrate chest belt CAUTION If there are several heart rate measurement devices next to each other make...

Страница 16: ...he room temperature Explanation Display functions Time Without setting the target value time will count up When setting the target value time will count down from your target time to 0 and alarm will...

Страница 17: ...NER mode and press mode key to enter next setting entry for BEGINNER mode program Use UP DOWN key to select BEGINNER program 1 4 fig 12 and press MODE ENTER to confirm Use UP DOWN key to set time pres...

Страница 18: ...alfunctions caused by individual parts can occur in the equipment In most cases it will be sufficient to replace the defective part If the equipment does not function properly immediately contact the...

Страница 19: ...applies only to the original purchaser and is valid only in countries where Tunturi New Fitness BV has an authorised importer The warranty does not extend to fitness equipment or components that have...

Страница 20: ...glich ein Das Ger t ist nur f r den Hausgebrauch geeignet Das Ger t ist nicht f r den gewerblichen Gebrauch geeignet Die maximale Verwendung ist auf 3 Stunden pro Tag beschr nkt Wenn dieses Ger t von...

Страница 21: ...angegebenen Teilenummern beginnen mit der Ersatzteilzeichnung die Sie in der Online Vollversion des Benutzerhandbuchs finden WARNUNG Bauen Sie das Ger t in der angegebenen Reihenfolge zusammen Tragen...

Страница 22: ...t im Grunde dasselbe wie wenn zur Verbesserung Ihrer Fitness trainieren nur das Ziel ist ein anderes Herzfrequenz Pulsfrequenzmessung Handpulssensoren Die Pulsfrequenz wird durch Sensoren in den Handg...

Страница 23: ...Sitzposition Die vertikale Sitzposition kann durch Einstellen des Sitzrohrs auf die erforderliche Position eingestellt werden Wenn das Bein fast gerade ist muss das Fu gew lbe das Pedal am untersten P...

Страница 24: ...ie RESET Taste und halten Sie sie zwei Sekunden lang gedr ckt um alle Funktions Darstellungen zur ckzusetzen Start Stop Trainingsstart bzw stopp Body Fat K rperfett K rperfett in und BMI messen Recove...

Страница 25: ...dr cken Sie zur Best tigung auf MODE ENTER Verwenden Sie die Taste Dial UP DOWN um die Zeit einzustellen dr cken Sie zur Best tigung auf MODE ENTER Dr cken Sie auf die Taste START STOP um mit dem Tra...

Страница 26: ...wird die Konsole im Energie Modus schalten Wenn der Computer nicht normal angezeigt wird installieren Sie den Transformator erneut und versuchen Sie es erneut Wackeliges oder instabiles Gef hl w hren...

Страница 27: ...nt mer und nur in den L ndern in denen es einen von der Tunturi New Fitness BV autorisierten Importeur gibt Die Garantie gilt nicht f r solche Fitnessger te oder Teile an denen ohne Zustimmung der Tun...

Страница 28: ...r des blessures graves voire mortelles Si vous vous sentez d faillir interrompez imm diatement l exercice L quipement est uniquement adapt un usage domestique L quipement ne convient pas un usage comm...

Страница 29: ...s lors des tapes de montage commencent par le dessin des pi ces que vous trouverez dans la version compl te du manuel disponible en ligne AVERTISSEMENT Assemblez l quipement dans l ordre indiqu Deux p...

Страница 30: ...re la vitesse pour maintenir votre rythme cardiaque dans la zone cible Perte de poids Ici le facteur important est l effort que vous d ployez Plus vous entra nez longtemps et de mani re soutenue plus...

Страница 31: ...vers l int rieur avant de sortir les pieds de support requis pour stabiliser la machine R glage de la position horizontale de la selle La position horizontale de la selle est r glable en l amenant la...

Страница 32: ...le niveau de r sistance pendant l entra nement Augmenter la valeur du param tre Bas R duit le niveau de r sistance pendant l entra nement Diminuer la valeur du param tre Mode Enter mode entr e Choisir...

Страница 33: ...Appuyer sur la touche UP DOWN haut bas pour r gler le niveau de r sistance La charge est indiqu e la fen tre LEVEL niveau Fig 11 Mode Sporty Fig P9 P12 Appuyer sur les fl ches VERS LE HAUT VERS LE BAS...

Страница 34: ...pi ce d faillante Si l quipement ne fonctionne pas correctement contactez imm diatement le revendeur Fournissez le num ro de mod le et le num ro de s rie de l quipement au revendeur Mentionnez la natu...

Страница 35: ...t es Tunturi New Fitness BV et les revendeurs Tunturi ne r pondent pas des d fauts occasionn s par des conditions ind pendantes de leur volont La garantie est applicable uniquement au premier acheteur...

Страница 36: ...jk met trainen Het toestel is uitsluitend geschikt voor huishoudelijk gebruik Het toestel is niet geschikt voor commercieel gebruik Het maximum gebruik is beperkt tot 3 uur per dag Het gebruik van dit...

Страница 37: ...n de volledige gebruikershandleiding te vinden is WAARSCHUWING Monteer het apparaat in de aangegeven volgorde Draag en verplaats het toestel met minstens twee personen VOORZICHTIG Zet het toestel op e...

Страница 38: ...band Als u een hartslag limiet hebt ingesteld voor uw training klinkt er een alarm wanneer deze wordt overschreden Hartslagmeting hartslagborstband LET OP Een hartslagborstband is niet standaard bij d...

Страница 39: ...in de gewenste positie Draai de stelknop voor de handgreep vast Voeding Fig E De trainer werkt op stroom van een extern voedingsnet Op de illustratie wordt de plaats van de aansluiting op de trainer w...

Страница 40: ...aining Body Fat Test van lichaamsvetpercentage en BMI Recovery Nadat de console het pulse signaal registreert drukt u op de toets RECOVERY om de modus te activeren waarin u uw hartslagherstel kunt vol...

Страница 41: ...R om uw keuze te bevestigen Druk op de toets START STOP om uw workout te beginnen Met RESET keert u terug naar het hoofdmenu Modus Watt Selecteer met het UP DOWN het workoutprogramma kies de modus WAT...

Страница 42: ...zichtig neer Zorg voor een beschermende laag onder het toestel om schade aan het vloeroppervlak te voorkomen Verplaats het toestel voorzichtig over een ongelijke ondergrond Breng het toestel niet met...

Страница 43: ...waarvoor het toestel niet is bedoeld corrosie of schade ontstaan tijdens laden of transport De garantie geldt niet voor geluiden die ontstaan door het gebruik als ze het gebruik van het apparaat niet...

Страница 44: ...ENZIONE Il sistema di monitoraggio della frequenza cardiaca pu essere impreciso L eccessivo esercizio pu causare serie lesioni o perfino il decesso Se si avverte spossatezza interrompere immediatament...

Страница 45: ...rainer nel modo migliore NOTA I numeri delle parti visualizzati nei passaggi dell assemblaggio iniziano con lo schema delle parti di ricambio presente nel manuale utente della versione completa online...

Страница 46: ...er migliorare la vostra forma la differenza l obiettivo Frequenza cardiaca Misurazione delle pulsazioni sensori del cardiofrequenzimetro Le pulsazioni vengono misurate da sensori posti sulle impugnatu...

Страница 47: ...le Regolazione della posizione verticale del sedile possibile regolare la posizione verticale del sedile impostando il reggisella nella posizione richiesta Con la gamba quasi stesa l arco del piede de...

Страница 48: ...ne premere una volta il tasto RESET per azzerare i valori della funzione corrente Premere il tasto RESET e tenerlo premuto per 2 secondi per azzerare tutti i valori di tutte le funzioni Start Stop Avv...

Страница 49: ...GIU della manopola per regolare il livello di resistenza Il livello di carico viene mostrato nella finestra LIVELLO fig 11 Modalit Cardio Usare il tasto SU GIU della manopola per selezionare il progr...

Страница 50: ...it durante l uso Se la macchina si sente instabile o instabile durante il funzionamento consigliabile regolare i piedini di supporto per portare il telaio all altezza corretta Leggi le istruzioni in q...

Страница 51: ...originario dell attrezzo ed in vigore solo in quei paesi in cui Tunturi Ltd dispone di un proprio rappresentante autorizzato La garanzia non copre i difetti di quegli attrezzi o componenti che sono st...

Страница 52: ...io puede provocar lesiones graves o incluso la muerte Si se siente mareado deje de hacer ejercicio inmediatamente La m quina es adecuada nicamente para uso dom stico La m quina no es adecuada para un...

Страница 53: ...e la m quina Descripci n de la ilustraci n D Las ilustraciones muestran c mo montar mejor la m quina en el orden correcto ATENCI N Los n meros de pieza que se muestran en los pasos de montaje comienza...

Страница 54: ...ntenso y prolongado sea el ejercicio f sico m s calor as quemar En realidad es lo mismo que si se entrenara para mejorar la condici n f sica lo que cambia es el objetivo Del ritmo card aco Medici n de...

Страница 55: ...de la posici n del sill n vertical La posici n del sill n vertical puede ajustarse situando el tubo del sill n en la posici n eseada Con la pierna casi recta el arco del pie debe tocar el pedal en su...

Страница 56: ...durante 2 segundos para reiniciar todas las cifras de la funci n Start Stop Iniciar o detener pausa la sesi n de ejercicio Body Fat Grasa corporal Compruebe su porcentaje de grasa corporal y su IMC nd...

Страница 57: ...tilice el selector ARRIBA ABAJO para seleccionar el programa de ejercicios elija el modo HRC y pulse la tecla MODO para introducir el siguiente ajuste en el programa del modo CARDIO Utilice el selecto...

Страница 58: ...e el transformador e intente nuevamente Sensaci n inestable o inestable durante el uso Si la m quina se siente inestable o inestable durante la operaci n se recomienda ajustar los pies de apoyo para q...

Страница 59: ...v lida para el comprador original del equipo de ejercicio y tiene vigencia solamente en los pa ses en los que Tunturi New Fitness BV cuenta con un importador autorizado La garant a no cubre los equip...

Страница 60: ...per dag Om utrustningen anv nds av barn eller personer med fysiska sensoriska mentala eller motoriska handikapp eller som saknar erfarenhet och kunskap kan detta medf ra risker Personer som r ansvari...

Страница 61: ...alen Leta efter markeringen R eller L p pedalaxeln F st den h gra pedalen R p det h gra vevpartiet Vrid f rst pedalaxeln medurs f r hand Anv nd skiftnyckeln f r att dra fast pedalen ordentligt V nstra...

Страница 62: ...r ver att elektroderna p s ndarb ltet r en aning fuktiga och i st ndig kontakt med skinnet Om elektroderna r f r torra eller f r fuktiga kan pulsm tningen bli mindre exakt VARNING Kontakta en l kare i...

Страница 63: ...ge n r utrustningen inte har anv nts p 4 minuter F rklaring av displayfunktioner Time Tid Om m lv rdet inte st lls in kommer tiden att r knas nerifr n och upp Om m lv rdet st lls in kommer tiden att r...

Страница 64: ...al UP DOWN f r att v lja tr ningsprogram v lj l get MANUAL och tryck p knappen MODE ENTER f r att g till n sta inmatning av inst llning f r programmet i det manuella l get Anv nd knappen Dial UP DOWN...

Страница 65: ...m tningen m ste anv ndaren h lla b da h nderna p handtagen LCD display fig F 25 i 8 sekunder tills datorn slutar m ta LCD n visar BMI och FAT fig F23 F 24 OBS Korrekt User Profile Settings kr vs f r...

Страница 66: ...r att g lla fr n ink psdatumet Garantivillkoren kan variera mellan olika l nder Kontakta en lokal terf rs ljare om garantivillkoren Garantins omfattning Oavsett omst ndigheter ansvarar inte Tunturi Ne...

Страница 67: ...ka Friskrivning 2020 Tunturi New Fitness BV Alla r ttigheter f rbeh llna Produkten och handboken kan komma att ndras Specifikationer kan ndras utan f rvarning P v r webbplats finns den senaste bruksan...

Страница 68: ...ti aistillisesti henkisesti tai liikunnallisesti rajoittuneiden tai kokemukseltaan ja tiedoiltaan puutteellisten henkil iden toimesta voi aiheuttaa vaaratilanteita Heid n turvallisuudestaan vastuussa...

Страница 69: ...suorittanut asennuksen loppuun pane t m n tuotteen mukana toimitetut ty kalut talteen tulevia huoltot it varten Harjoitukset Harjoituksen on oltava sopivan kevyt mutta pitk kestoinen Aerobic harjoitus...

Страница 70: ...rkempi VAROITUS Jos sinulla on syd ntahdistin ota yhteys l k riin ennen sykevy n k ytt HUOMAUTUS Jos useita sykemittauslaitteita on vierekk in varmista ett niiden keskin inen et isyys on v hint n 2 me...

Страница 71: ...tavoitteen saavuttamisen j lkeen aika lasketaan eteenp in Jos n ytt ei harjoittelun aikana vastaanota signaaleja 4 sekuntiin harjoitusajan laskeminen lopetetaan STOP Alue on 0 00 99 59 Speed Esitt se...

Страница 72: ...keen voit asettaa my s harjoitusmatkan DISTANCE kuva F 08 energiankulutuksen CALORIES kuva 09 ja sykkeen PULSE kuva 10 HUOM Kun asetat useamman kuin yhden tavoitteen harjoittelu p ttyy ensimm iseksi s...

Страница 73: ...i kuin 50 Sovellus Bluetooth T m konsoli voi muodostaa yhteyden lylaitteen sovellukseen Bluetoothin v lityksell iOS Android Luo Bluetooth yhteys vain asennetun APP yhteystilan avulla lykk ss laitteess...

Страница 74: ...kattaa ty st ja materiaalista johtuvat virheet kuntolaitteessa joka on alkuper isess kokoonpanossaan Takuu koskee vain virheit jotka ilmenev t normaalissa ja laitteen mukana tulleen ohjekirjan mukaise...

Страница 75: ...2 G 18 N 5 N 4 G 11 L 5 L 1 L 2 L 8 L 3 L 4 L 6 G 8 G 19 G 20 G 21 G 22 G 23 G 10 B 3 B 2 B 4 G 13 G 14 G 15 G 16 G 17 D 1 D 2 D 3 D 9 D 4 D 8 D 6 D 5 D 7 N 2 G 1 G 2 G 3 G 4R G 12 I 3 N 1 N 3 I 2 I...

Страница 76: ...ng 10x 14x6mmL 1 D Idler Compl Assy 1 D 1 Hex Bolt M6xP1 0x12L 1 D 2 Idler wheel 24x 37x20 5mmL 1 D 3 Wave washer 10 5x 15x0 3t 2 D 4 Nylon nut M8 30 1 D 5 Hex Bolt M8xP1 25x20L 1 D 6 Flat washer 8 5x...

Страница 77: ...2 H 3 Handlebar post 1 I Rear stabilizer Compl Assy Incl I 1 I 3 1 I 1 End cap for rear stabilizer 4 I 2 Leveler foot for rear stabilizer 50 4 I 3 Rear stabilizer 1 J Front stabilizer Compl Assy Incl...

Страница 78: ...x20L M4x20L 2 M 6 Handlebar 1 N Hardware Kit 1 N 1 Nylon nut M8 4 N 2 Carriage bolt M8xP1 25x55L 4 N 3 Flat washer 8x 19 4 N 4 T knob M8xP1 25x69L 1 N 5 Metal clamp for handlebar 1 N 6 Wrench 1 N 7 He...

Страница 79: ......
Страница 80: ...www tunturi com Tunturi New Fitness BV Purmerweg 1 NL 1311 XE Almere P O Box 60001 NL 1320 AA Almere The Netherlands www tunturi com 20210114 W...

Отзывы: