1)
Do not pull down on side retaining velcro straps when closing the tent. These straps are designed
only to hold the tent base together, and are not designed to be used to pull the bases together.
When you are closing the tent, hold down the top folded base to compact the tent, then use the
velcro straps to secure the bases in this position. These straps will tear out of the tent if excessive
force is applied to the strap.
2)
Open the tent fully and brush / vacuum inside.
3)
Clean the fabric as needed using a mild detergent, warm water, and a soft to medium brush.
Rinse fabric of all detergent prior to drying.
4)
Dry tent in the sun with all windows open. The tent must be completely dry before storage, or
mildew and mold may occur. This is especially necessary after camping in rain or wet
conditions.
5)
Using a small brush you can remove dirt from the zipper. You can use bees wax or a silicon
spray to keep the zipper lubricated
6)
Wash the mattress pad and hang dry only.
7)
Always be aware that the addition of a roof top tent will increase the height of the vehicle.
Knowing the height will allow you to safely enter garages and carports.
8)
Before you leave always check the nuts and bolts attaching your rooftop tent to the rack.
Make sure they are tight and secure. Check the locks and latches making sure the tent does
not open while driving. Check the cover is sipped and strapped.
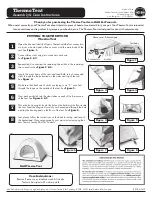
Storage and Handling
1. Slide the ladder out, starting at the base of the ladder until the locking pins in each section engage.
Use ladder as a lever to open the tent.
2. Allow the ladder to rest firmly on the ground. The tent base should be level with the ground
while the ladder sits firmly on the ground making an angle between 70 and 85 degrees w
i
th the
ground.
3. Assure all the steps on the telescoping ladder are locked. If you need to adjust the height of the
telescoping ladder, start with the top section and release the locking levers. Slide the ladder up so
the top most section recedes fully into the section below it. Repeat this step for each section you
wish to shorten the ladder by. Be sure to maintain an angle between 70 and 85 degrees between
the ground and the ladder at all times and ensure that the remaining sections are fully locked if
you adjust the ladder height as described above.
LADDER SETUP:
Содержание Ranger Overland Rooftop Tent
Страница 1: ...TUFF STUFF TRAILHEAD ROOF TOP TENT...
Страница 13: ...WELCOME TO THE TRIBE...