background image


;’RFTGTT5RT12

Alpha-30R 

Moblie Barcode Printers 

User Manual 

Series Lists: 

Alpha-30R 


Direct Thermal 


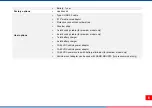
Содержание Alpha-30R

Страница 1: ...Alpha 30R Moblie Barcode Printers User Manual Series Lists Alpha 30R Direct Thermal ...

Страница 2: ...from the Monotype Corporation Windows is a registered trademark of Microsoft Corporation All other trademarks are the property of their respective owners Information in this document is subject to change without notice and does not represent a commitment on the part of TSC Auto ID Technology Co No part of this manual may be reproduced or transmitted in any form or by any means for any purpose othe...

Страница 3: ...indication 12 2 3 2 Battery charging LED indication 12 3 Setup 13 3 1 Setting up the Printer 13 3 2 Charging Battery Smart Battery 14 3 2 1 Charging the Battery 15 3 2 2 Charging the Battery by 1 bay Battery Charger Optional 16 3 2 3 Charging the Battery by 1 bay Docking Cradle Optional 17 3 2 4 Charging the Battery by 4 bay Docking Cradle Optional 18 3 3 Loading the Media 20 3 4 Loading the Media...

Страница 4: ...TSC Console 26 4 1 Start TSC Console 26 4 2 Set WiFi and Add to TSC Console Interface 28 4 3 Initialize the Printer WiFi Setting 31 4 4 TPH Care 32 4 5 Printer Function 33 4 6 Smart Battery 34 5 TroubleShooting 35 6 Maintenance 37 7 Agency Compliance and Approvals 39 8 Revise History 50 ...

Страница 5: ... With the Apple certified MFi Bluetooth 5 0 connection and 802 11 a b g n ac Wi Fi fast roaming features the Alpha 30R Series not only provide reliable and seamless communication with users devices they also securely print labels wherever they are needed This document provides an easy reference for operating this printer TSC printers include the Windows labeling software for creating your label te...

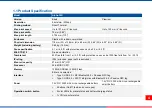
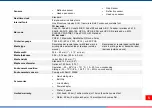
Страница 6: ... ft MIL STD 810 Drop and vibration Tumble test 800 free falls from 1 m 3 3 ft with protective case can be 1000 free falls from 1 m 3 3 ft IP rating IP54 w o case paper path is excluded Max roll capacity 57 mm 2 24 OD Processor 32 bit RISC CPU Memory 128 MB SDRAM 128 MB Flash Interface Either one selected Type C USB 2 0 MFi Bluetooth 5 0 Passive NFC tag Type C USB 2 0 802 11 a b g n ac with Bluetoo...

Страница 7: ...per receipt paper with black mark in printing side selected label linerless outside wound Receipt paper receipt paper with black mark in printing side or backside label linerless outside wound Media width 25 4 80 mm 1 3 15 w liner Media thickness 0 06 0 16 mm 2 36 6 3 mil Media height Label Min 25 4 mm 1 Media core diameter Standard 12 7 mm 0 5 Optional 19 05 mm 0 75 Environment condition Operatio...

Страница 8: ...er strap 1 slot docking cradle for premium model only 4 slot docking cradle for premium model only 1 slot battery charger 4 slot battery charger 12 24VDC vehicle power adaptor 12 60VDC vehicle power adaptor 12 48VDC power source with battery eliminator for premium model only Vehicle mount adapter can be used with RAM MOUNTS for premium model only ...

Страница 9: ...ing the bar code printer Please retain the packaging materials in case you need to reship the printer Unpacking the printer the following items are included in the carton One printer unit One Li ion battery One quick installation guide One auto switching AC adapter One belt clip If any parts are missing please contact the Customer Service Department of your purchased reseller or distributor ...

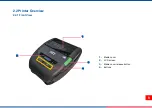
Страница 10: ...8 1 Media cover 2 LCD screen 3 Media cover release button 4 Buttons 2 2 Printer Overview 2 2 1 Front View 1 2 3 4 ...

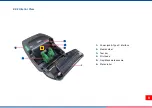
Страница 11: ...9 2 2 2 Interior View 1 Power jack Type C interface 2 Media holder 3 Tear bar 4 Print head 5 Gap Black mark sensors 6 Platen roller 2 3 5 1 4 6 ...

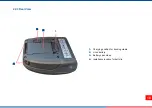
Страница 12: ...10 2 2 3 Rear View 1 Charging position for docking cradle 2 Li ion battery 3 Battery open clasp 4 Installation location for belt clip 4 2 3 1 ...

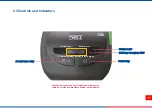
Страница 13: ... Firmware Version Media Type Feed Pause key Battery charging LED Start Key Battery level Bluetooth last 4 digits Status LED When Wifi is connected the IP Address will replace the firmware version and Bluetooth number on the display ...

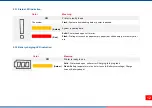
Страница 14: ...Red Solid Printer head open cutter error Flash Printing error such as paper empty paper jam ribbon empty or memory error etc 2 3 2 Battery charging LED indication Color Meaning Off Printer is ready to use Amber Solid Printer head open cutter error Charging is in progress Flash Battery temperature is too hot or too cold Battery overvoltage Charge timeout Battery absent ...

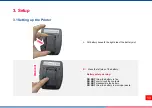
Страница 15: ...y beneath the right side of the battery slot 2 Press the left side of the battery Battery safety warning DO NOT throw the battery in fire DO NOT short circuit the contacts DO NOT disassemble the battery DO NOT throw the battery in municipal waste PRESS ...

Страница 16: ...y charger charging The LED indicator on the charger will flash red when the battery is charged for the first time Please remove the battery and reinstall it to unlock this shutdown mode Charging Temperature The battery normal working condition is from 0 C to 40 C 32 F to 104 F The device or battery charger always perform battery charging in a safe and optimummanner At higher temperatures e g appro...

Страница 17: ...er turns solid amber After fully charged the printer LED indicator turns off It will stop charging automatically after the battery is fully charged Note Please switch OFF printer power prior to plug in the power cord to printer power jack When the battery is charging please do not remove the battery from the printer otherwise please re plug the power cord into a power outlet ...

Страница 18: ...nto a properly grounded outlet and plug the charger connector to a battery charger DC socket 4 When charging the battery status LED indicator on the printer turns solid amber After fully charged the printer LED indicator turns off It will stop charging automatically after the battery is fully charged 5 After charging please take out the battery by using fingers to hold the back side of the battery...

Страница 19: ... lay it down to fit the hole as shown 4 Plug the power adapter of the charger into a properly grounded outlet and plug the charger connector to a battery charger DC socket N A 5 When charging the battery status LED indicator on the printer turns solid amber 6 When fully charged the printer LED indicator turns off Press the button to release the printer ...

Страница 20: ...18 3 2 4 Charging the Battery by 4 bay Docking Cradle Optional 1 Place the 4 bay cradle on a flat surface 2 Put on the transfer board 3 Screw up the screw ...

Страница 21: ...ounded outlet and plug the charger connector to a battery charger DC socket 6 Switch on the power When charging the battery status LED indicator on the printer turns solid amber When fully charged the printer LED indicator turns off It will stop charging automatically after the battery is fully charged Press the button to release the printer ...

Страница 22: ...20 3 3 Loading the Media 1 Open the printer media cover by pressing the media cover release button 2 Pull the media holders apart to fit the label roll width PUSH ...

Страница 23: ...ng side face up and pull out enough paper over the print head 4 Press each side of media cover to close the media cover and make sure the media cover closed correctly Note Please calibrate the gap black mark sensor when changing media 5 Use TSC Console software to make calibration Refer to chpter 4 ...

Страница 24: ...22 3 4 Loading the Media Linerless Model 1 Open the printer media cover by pressing the media cover release button 2 Pull the media holders apart to fit the label roll width PUSH ...

Страница 25: ...ng side face up and pull out enough paper over the print head 4 Press each side of media cover to close the media cover and make sure the media cover closed correctly Note Please calibrate the gap black mark sensor when changing media 5 Use TSC Console software to make calibration Refer to chpter 4 ...

Страница 26: ...24 3 5 Installing the Belt Clip 1 Lock the belt clip on lower of the printer 2 Press the hook of belt clip into the bars on the lower printer as pictured The printer can be hung on the belt ...

Страница 27: ...rated environmental case with shoulder strap Optional 1 Zip up the case cover 2 Place the printer in the case 3 Close the case cover 4 Zip up the outside cover to check The outside cover should be opened and fixed while printing ...

Страница 28: ...aphics deploy fonts graphics label templates or upgrade the firmware to the group of printers and send additional commands to printers at the same time Printer firmware version before A2 12 will only use 9100 Port as command port Printer firmware after A2 12 will use 6101 Port as command port 4 1 Start TSC Console 1 Double click TSC Console icon to start the software 2 Manually add the devices by ...

Страница 29: ... 3 Select the current interface of the printer 4 The printer will be added to TSC Console s interface 5 Select the printer and set the settings For more information please refer to TSC Console User Manual ...

Страница 30: ...TSC Console Interface 1 Use USB or COM Port to set up the interface refer to chp 5 1 2 Double click to enter the printer configuration page 3 Click Get to receive printer s information 4 Click Wi Fi to the wi fi setting page 1 2 ...

Страница 31: ...Port field For WPA Enterprise I Fill in the SSID II Select the Encryption option to WPA Enterprise III Select DHCP to ON For OFF option please fill in the IP Address Subnet Mask and Gateway IV Select the EAP Type option For EAP TLS option please upload the CA and Key for mutual authentication integrity protected cipher suite negotiation and key exchange between two endpoints V After setting click ...

Страница 32: ...ddress should be shown within about 5 15 seconds after printer turn on If not please refer to steps below to initialize the printer Wi Fi module settings then to setup it again 7 Remove the Type C cable between the computer and the printer 8 Go to main page click Add Printer to add the printer via Network 9 Select the printer and enter the setting page by double clicking the printer 10 Click the P...

Страница 33: ...Initialize the Printer WiFi Setting 1 Return to the main page of TSC Console 2 Click Functions to expand the page 3 Click Wi Fi Default to initialize the printer Wi Fi module setting to factory default setting ...

Страница 34: ... result is zero 0 that means the print head is good 3 Bad dots are presented as a spike in the profile The arrow in below iprofile indicates the presence of potentially damaged dots and printer will stop printing This option is used to enable ON disable OFF the TPH care function This option is used to check the numbers of unhealthy TPH dot element This option is used to set the treshhold for unhea...

Страница 35: ... on PC Factory Default Initialize the printer to default settings Reset Printer Reboot printer Print Test Page Print test page according to the specified label size and sensor type Configuration Page Print printer configurations Dump Text Activate the printer to dump mode Ignore AUTO BAS Ignore AUTO BAS file when printer boot up Exit Line Mode Exit the line mode to page mode Enter Line Mode Leave ...

Страница 36: ...34 4 6 Smart Battery Smart Battery shows the battery information of the printer Mobile Printers only ...

Страница 37: ...t correctly Use wrong type paper Follow the instructions in loading the media Use thermal type paper The printer status from LCD shows Carriage Open The printer carriage is open Please close the print carriage The printer status from LCD shows No Paper Running out of media roll The media is installed incorrectly Media sensor is not calibrated Supply a new media roll Follow the instructions in load...

Страница 38: ...n if there is dot missing in the pattern Change proper media roll Make sure the print carriage is closed properly Missing printing on the left or right side of label Wrong label size setup Set the correct label size Irregular printing The printer is in Hex Dump mode Turn off and on the printer to skip the dump mode Skip labels when printing Label size is not specified properly Sensor sensitivity i...

Страница 39: ...ectrostatic damage Do not wear rings or other metallic objects while cleaning any interior area of the printer Use only the cleaning agents recommended in this document Use of other agents may damage the printer and void its warranty Do not spray or drip liquid cleaning solutions directly into the printer Apply the solution on a clean lint free cloth and then apply the dampened cloth to the printe...

Страница 40: ...printer II Rotate the platen roller and wipe it thoroughly with the lint free 99 Isopropyl Alcohol Clean the platen roller when changing a new label roll Peel Bar Use the lint free cloth with 99 Isopropyl Alcohol to wipe it As needed Sensor Use brush with soft non metallic bristles or a vacuum cleaner to remove paper dust Clean upper and lower media sensors to ensure reliable Top of Form and Paper...

Страница 41: ... is no guarantee that interference will not occur in a particular installation If this equipment does cause harmful interference to radio or television reception which can be determined by turning the equipment off and on the user is encouraged to try to correct the interference by one or more of the following measures Reorient or relocate the receiving antenna Increase the separation between the ...

Страница 42: ...ital apparatus complies with Canadian ICES 003 Cet appareil numérique de la classe B est conforme à la norme NMB 003 du Canada AS NZS CISPR 32 Class B GB 4943 1 GB T9254 GB 17625 1 IS 13252 Part 1 IEC 60950 1 TP TC 004 TP TC 020 LP0002 TELEC T401 Japanese radio requlations 2008 ...

Страница 43: ...41 K 60950 1 KS C 9832 2019 KS C 9835 2019 KS X 3124 2020 KS X 3126 2020 CNS 13438 CNS 14336 1 NBTC ...

Страница 44: ...42 VCCI TECHNICAL REQUIREMENTS VCCI CISPR 32 2016 CISPR 32 2015 COR1 2016 45 E Dated 28 01 2005 1048 E Dated 18 10 2018 NTC IMDA TS SRD BS EN 55032 BS EN IEC 61000 3 2 BS EN 61000 3 3 BS EN 55035 ...

Страница 45: ...ping or dropping could cause damage 7 Make sure to follow the correct power rating and power type indicated on marking label provided by manufacture 8 Please refer to user manual for maximum operation ambient temperature WARNING Hazardous moving parts keep fingers and other body parts away CAUTION Risk of explosion if battery is replaced by an incorrect type Dispose of used batteries according to ...

Страница 46: ...ad to cool CAUTION Any changes or modifications not expressly approved by the grantee of this device could void the user s authority to operate the equipment CE Statement This equipment complies with EU radiation exposure limits set forth for an uncontrolled environment This equipment should be installed and operated with minimum distance 20 cm between the radiator your body All operational modes ...

Страница 47: ...C Auto ID Technology Co Ltd declares that the radio equipment type Wi Fi IEEE 802 11 a b g n is in compliance with Directive 2014 53 EU The full text of the EU declaration of conformity is available at the following internet address http www tscprinters com RF exposure warning Wi Fi This equipment must be installed and operated in accordance with provided instructions and must not be co located or...

Страница 48: ...quency exposure limits The Wireless Device should be used in such a manner such that the potential for human contact during normal operation is minimized This device has been evaluated for and shown compliant with the IC Specific Absorption Rate SAR limits when installed in specific host products operated in portable exposure conditions For Wi Fi This device has also been evaluated and shown compl...

Страница 49: ...t normal Ce périphérique a été évalué et démontré conforme aux limites SAR Specific Absorption Rate Taux d absorption spécifique par l IC lorsqu il est connecté à des dispositifs hôtes spécifiques opérant dans des conditions d utilisation mobile Pour le Wi Fi Ce périphérique a également été évalué et démontré conforme aux limites d exposition radio fréquence par l IC pour des utilisations par des ...

Страница 50: ...式認證合格之低功率射頻電機 非經許可 公司 商號或使用者均不得擅自變更頻率 加大功率或變更原設計之特性及功能 即 低功率電波輻射性電機管理辦法第十二條 低功率射頻電機之使用不得影響飛航安全及干擾合法通信 經發現有干擾現象時 應立即停用 並改善至無干擾時方得繼續使用 前項合法通信 指依電信法規定作業之無線電通信 低功率射頻電機須忍受合法通信或工業 科學及醫療用電波輻射性電機設備之干 擾 即低功率電波輻射性電機管理辦法第十四條 ...

Страница 51: ...49 ...

Страница 52: ...50 8 Revise History Date Content Editor ...

Страница 53: ......

Отзывы: