background image

32

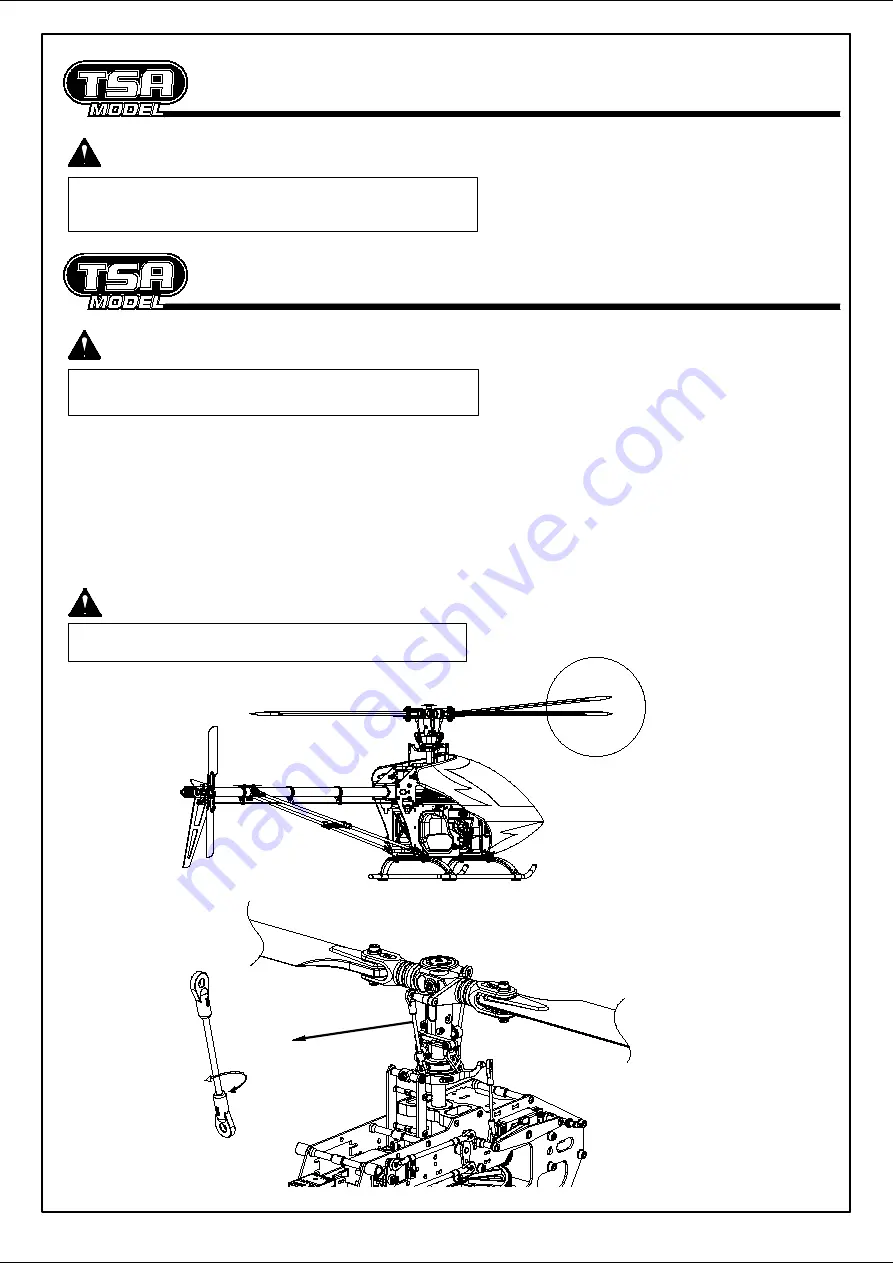
Pitch rod

Flybarless gyro setup-3 Axis gyros

1.  Increase pitch slowly until the helicopter comes to a stable hover. Note any seperation

     in the rotor blades. 

2.  Observe the blade tracking:  

     If main blades are in the same track, then no adjustment required.However, 

     If one blade appears higher than the another blade, then adjustments must be made.  

3.  Adjust pitch rod tracking: 

         A. Main blade is higher → reduce length of linkage rod 

         B. Main blade is lower  → add the length of linkage rod 

Precaution during initial setup is for the safety of yourself and others, so 

please make sure the heli is flying at least 10m away from any person. 

Caution

Caution

Improper tracking will result in vibration, Adjust track until both blades 

are tracking in the same plane. 

Caution

Pleasa refer to the Flybarless gyro instruction manual for setting up the 

cyclic and tail servo along with the rotor head. This will be specific for 

each system.

Main blade adjustment

B

A

Содержание Infusion 600n Platinum

Страница 1: ......

Страница 2: ......

Страница 3: ...oothly 6 Check that the position of the transmitter s throttle stick and engine carburetor are at their low position 7 Check that the receiver receives signals properly 8 Check and ensure that all nec...

Страница 4: ...may increase during flight that would lead to severe consequences The rotor head may disassemble from the blade holder which spins at a speed of 1200 2000 rpm and may fly off from the blade holder If...

Страница 5: ...indicated 4 In the instruction manual refer to the left hand column to check the type and quantity of parts 3 Glue width 1 5mm Lock Preassembly precautions Diagram for applying thread lock Swashplate...

Страница 6: ...FOR ASSEMBLY Universal ball link plier Metric ruler Over 30cm 8 7 5 5 Cross wrench 5 5 12 Spanner 6mm 8mm 12mm 21mm Allen head Screw drivers 1 5mm 2mm 2 5mm 3mm 3 5mm 4mm 5mm 0 5 10 15 5 10 15 Pitch...

Страница 7: ...7 Remote glow plug adapter 12V Battery Starter shaft 6 1 5V 5 12V 4 Starter 50 size helicopter muffler 3 2 1 50 size helicopter engine Transmitter 7 channels Rudder servo Servos Charger 4 8 V 1800 mA...

Страница 8: ...talling the bearing M2 4 Bind screw T 001 03 T 009 05 T 022 02 T 005 01 T 002 02 T 031 00 Main Frame Assembly 2 2 Please apply loctite when locking all metal screws Lock 37 5mm Canopy rear support M3...

Страница 9: ...ear then tightening the M3 5 SS grub screws Ensure correct gear orientation M3 5 SS Locating pin Locating pin 2x12 2 Plastic tail boom clamp Hex insert 9mm 12x 18x4 Brg 6x 13x5 Brg Plastic tail boom c...

Страница 10: ...ple Fuel inducer T 003 00 Inducer cover M3 5 Stainless steel bind screw M3 5 Stainless steel bind screw 1 Fuel tube 2 5x 5 5 To fuel nipple Fuel tank Hex nut To muffler pressure nipple 90 fuel fitting...

Страница 11: ...SS 1 6 M3 8 Cap screw Custom washer 6 6x 15x5 Brg 10x 19x5 Brg 1 2 T 002 02 Note direction of the Retainer nut Assembly Tip Please apply loctite when locking all metal screws Lock Main Frame Assembly...

Страница 12: ...1 only for right main frame assembly TSA RPM Sensor assembly means 2 only for left main frame assembly Futaba RPM Sensor assembly means for both right and left main frame assembly Diagram Diagram Diag...

Страница 13: ...sher supplied with engine M3 6 Bind screw Clutch 6x 13x2 Spacer M3 6 Cap screw T 010 00 T 014 00 Glow plug can be installed using optional TSA 8mm socket head spanner Leave glow plug out for engine in...

Страница 14: ...crew M3 12 PH screw M3 10 Cap screw Custom washer M3 12 PH screw M3 12 PH screw Custom washer Engine mount 8 6 M3 10 Cap screw M3 12 PH screw Custom washer 6 11 T 014 00 T 012 00 Landing Gear Assembly...

Страница 15: ...6x2 5 Flange Brg M3 6 Bind screw 3x 6x2 5 Flange Brg M3 10 Bind screw Spacer 3x 4 2x2 45 M3 8 Bind screw Spacer 3x 4 2x1 25 3x 6x2 5 Brg Metal ARE pivot block M3 8 Bind screw M2 7 Cap screw 5 7mm Ball...

Страница 16: ...ith the switch On off switch Wire clamp Assembly Tip M3 6 Bind screw 1 M2 6 18 PH screw 22 Spacer 5x 7x16 55 M4 4 SS 2 2 13 T 011 02 T 024 00 Servo Assembly Please apply loctite when locking all metal...

Страница 17: ...2 M3 12 Bind screw Ball link long 4 2 M2 Nut 2 5 7mm Ball M2 8 Cap screw 2 2 Lever M2 8 Cap screw 5 7mm Ball M2 Nut M3 6 Bind screw Screw attached Lever Servo support guide 3x 6x7 4x 7x2 5 Flange Brg...

Страница 18: ...Hex insert M3 6 Bind Screw M3 6 Bind Screw M3 15 Cap screw T 014 00 T 010 00 M3 6 Bind Screw 4 Fan and Engine Assembly 15 Please apply loctite when locking all metal screws Lock M3 15 Cap screw 4 Diag...

Страница 19: ...play adjustment Loosen lower bearing block bolts Insert main gear assembly and main shaft While pressing up on the bearing block tighten the 4 lower bearing block bolts Ensure no up down free play by...

Страница 20: ...ntation The ball will clip in and centralise easily Coupling Pivot ball 12 Assembly Tip M2 4 Bind Screw 4 12mm Ball 6 12mm Ball 12mm Ball 12mm Ball 12mm Ball M2 4 Bind Screw 12mm Ball 12mm Ball Please...

Страница 21: ...rd Caution Note direction of bearings M3 6 Bind screw Caution 2 Two must be assembled T 016 01 T 016 01 M3 12 Bind screw 1 11mm Ball 2 T 016 01 M4 10 Bind screw 2 Note the installing direction of the...

Страница 22: ...e sure the rocker arm is parallel with the swashplate Ball link T 016 01 T 020 01 T 011 02 Rotor Head Complete Assembly 22 Please apply loctite when locking all metal screws Lock M4 5 Bind screw 2 1 1...

Страница 23: ...ocating pin on each gear then tighten the M3 5SS grub screws Ensure correct orientation 6x 12x4 Brg 2 6x 12x4 Brg M3 6 Bind screw M3 6 Bind screw Locating pin 2x12 1 T 016 01 23 Tail Gearbox Assembly...

Страница 24: ...Note direction of bearings Periodically check and perform necessary lubrication T 016 01 Caution 5mm 17mm Only use long shank M3 mounting screw 5x 10x4 Thrust bearing 2 6x 12x4 Brg 2 Caution 22 3x 7x...

Страница 25: ...hen slide bearing overtop and allow to dry Apply oil to tail boom bearing carrier and inside tail boom for easy T T installation AB AB L O C K L O C K T 016 01 T 017 02 Assembly Tip Add grease Add gre...

Страница 26: ...12 3 Bind screw M4 16 Bind screw Tail boom support 6 M2 6 Nut T 026 04 T 027 01 T 028 02 Tail Boom Support Assembly 29 Please apply loctite when locking all metal screws Lock After inserting the tail...

Страница 27: ...6mm about 81 6mm M2 8 55mm Ball link 23mm Ball link 23mm T 016 01 Measure the pitch angle after assembly of the blades and then make the adjustment Caution Rotor Head Linkage Assembly 30 Please apply...

Страница 28: ...nding on the servo Adjust the length according to the instructions and verift once fitted on the model Turn on the transmitter before installing the servo rod ensure the radio has a linear throttle pi...

Страница 29: ...her 3x 4 5x0 2 2 5 7mm Ball Spacer 3x 4 5x3 1 Screw attached T 024 00 T 027 01 Futaba x 1 JR x 1 Futaba JR Both JR and Futaba servo horns are provided Please use the appropriate set for your applicati...

Страница 30: ...crew M4 Nylon nut Spacer 4x 19 8x1 5 Main blade not included Thickness 12mm Spacer 4x 19 8x1 5 8mm 30mm T 016 01 2 2 M4 Nylon nut M4 30 8 Cap screw Main Blade Assembly 33 Caution Only use long shank M...

Страница 31: ...ding to its corresponding instruction manual Caution For JR Receiver and Gyro Assembly 34 Receiver battery Receiver 3 Axis Gyro Double sided adhesive tape Hook and loop tape hooked Hook and loop tape...

Страница 32: ...ge 4 8 V Aileron Elevator Pitch Rudder Receiver Battery On off switch SYS AUX PIT RUD D12 CH7 CH6 ELE D11 AIL CH5 CH1 CH2 CH3 CH4 AUX2 AUX1 GEAR RUDD ELEV AILE THRO AUX3 BIND BATT SENS Brown Red Orang...

Страница 33: ......

Страница 34: ...g A Main blade is higher reduce length of linkage rod B Main blade is lower add the length of linkage rod Precaution during initial setup is for the safety of yourself and others so please make sure t...

Страница 35: ...e elevator control down then the unit will go backward Fly backward Up Down Aileron Pushing the elevator control up then the unit will go forward Forward rotate Fly forward Push the aileron control le...

Страница 36: ...control up then the unit will go forward Up Down Elevator backward rotate Fly backward Push the elevator control down then the unit will go backward Push the aileron control right then the unit will...

Страница 37: ...secure it to prevent the unit from tipping over Avoid causing damage to the components which may adversely effect flight performance and safety Transporting the unit The helicopter s main and tail ro...

Страница 38: ...TPA00703XX Order Number TPA00802XX Order Number TPA01001XX Order Number TPA01201XX Rigidity brace M3 12 PH screw Canopy rear support Canopy front support M3 8 PH screw Parts with this symbol have been...

Страница 39: ......

Страница 40: ......

Страница 41: ......

Страница 42: ......

Страница 43: ...Cap screw M2 Nut Metal tail boom clamp M3 5 Bind screw Order Number TPA04801XX Order Number TPA05200XX Rod M2 2 50mm Rod M2 8 55mm Rod M2 2 80mm Rod M2 2 230mm Ball link long Carbon fiber tube 211mm...

Страница 44: ......

Страница 45: ......

Страница 46: ......

Отзывы: