background image

ICS-2000 INTERNET CONTROL STATION

12

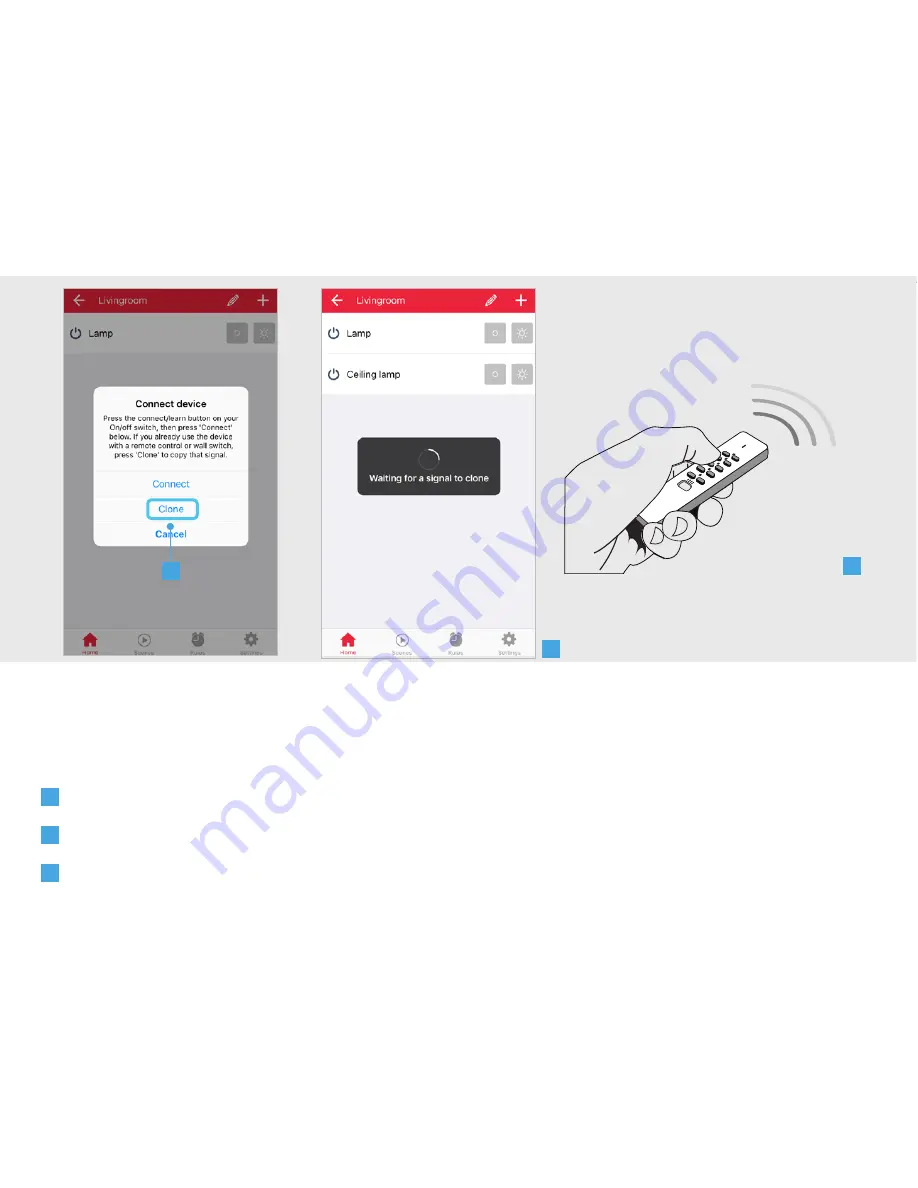
2.2 Connect an existing device (Clone)

This step is recommended when you already control your Trust Smart Home receiver with a remote 

control or wall switch.  (Only for Startline products)

A

 Press CLONE

B

 A dialogue is shown to clone the signal of the transmitter

C

 Give an ON signal on the transmitter that controls the device chosen in step 2.1e.

A

B

C

Содержание ICS-2000

Страница 1: ...www trust com ...

Страница 2: ...ICS 2000 OCTOPUS CONTROL STATION ONLINE MANUAL Item 71110 Version 1 0 Visit www trust com for the latest instructions ...

Страница 3: ... 2 1 Connect a new device 9 2 2 Connect an existing device Clone 12 2 3 Edit Delete device 13 3 1 Add scenes 14 3 2 Add Delete actions 15 3 3 Add Delete delays 16 4 1 Configure timers 17 4 2 Edit Delete timer 20 5 1 Configure rules 21 5 2 Edit Delete rule 24 6 0 Connect manually 25 ...

Страница 4: ...ICS 2000 INTERNET CONTROL STATION 4 ...

Страница 5: ...e range up to 70 m optimal conditions The range is dependent on local conditions such as the presence of metals For example the thin metal coating in Low emissivity Low E glass can have a negative impact on the range of radio signals There may be restrictions on the use of this device outside the EU If applicable check whether this device complies with local directives This class 1 wireless device...

Страница 6: ...le parts for the user WATER RESISTANT This product is not water resistant CLEANING Clean this product with a dry cloth Do not use harsh chemicals cleaning solvents or strong detergents HANDLING Do not drop the device bump the device against something or shake it Rough handling can damage internal circuit boards and fine mechanics ENVIRONMENT The product should not be exposed to extreme heat or col...

Страница 7: ...000 INTERNET CONTROL STATION 7 1 1 A 1 1 Add a room A Press the button at the top of the screen to add a new room B Fill in a name for the room you want to add C Press the ADD button to save the new room B C ...

Страница 8: ... press the pencil button at the top of the screen B Press on the room name to begin editing C When you are done editing the name press the CONFIRM button D To delete a room press the DELETE button in front of the room when in editing mode Press the CONFIRM button to go back to the room overview D ...

Страница 9: ...RNET CONTROL STATION 9 2 1 Connect a new device A Press on a room name to open it B Press the button at the top of the screen to add a new device C Enter a name for the device you want to add D Press ADD A B C D 2 1 ...

Страница 10: ...control your Trust Smart Home receiver with a remote control or wall switch continue to step 2 2 Only for Startline products F Put your receiver in connect learn mode Read the manual of the receiver on how to put it in connect learn mode G When the receiver is in connect learn mode press CONNECT E 1 sec F F G ...

Страница 11: ...ET CONTROL STATION 11 The receiver will go on and off twice to acknowledge the connection H The device is now added to your room You can now control the device with the App I Use the buttons to control the device H I ...

Страница 12: ...mmended when you already control your Trust Smart Home receiver with a remote control or wall switch Only for Startline products A Press CLONE B A dialogue is shown to clone the signal of the transmitter C Give an ON signal on the transmitter that controls the device chosen in step 2 1e A B C ...

Страница 13: ...s the pencil button the enter edit mode C Press on the device name to begin editing D When you are done editing the name press the confirm button E To delete a device press the DELETE button in front of the device when in editing mode Press the CONFIRM button to go back to the device overview 2 3 Edit delete device B C A D E ...

Страница 14: ...scene you can trigger different devices at the same time or with an delay A Press the scene button in the menu bar B Press the button at the top of the screen to add a new scene C Fill in a desired name for the scene D Press OK 3 1 Add scenes D A B C ...

Страница 15: ...scene B Add the desired actions for the devices by pressing the buttons C Press CONFIRM to add the actions to the scene D By pressing the pencil button you enter edit mode E Delete an action by pressing the DELETE button F Press CONFIRM again to save the scene 3 2 Add delete actions A B C D E F ...

Страница 16: ... step 3 2 A Press the ADD DELAY button B Choose how long the delay must be by selecting a time period C Press the CONFIRM button to add the delay to the scene D The delay is now added to your scene E By pressing the pencil button you enter edit mode F Press the DELETE button to delete a delay 3 3 Add delete delays A B C D E F ...

Страница 17: ...er one or multiple devices on a fixed time Sunrise or Sunset A Press the Timers Rules button in the menu bar B Press the button at the top of the screen to add a new timer C Press on Timer wizard D Fill in a name for your timer and press OK 4 1 Configure timers A B C D ...

Страница 18: ...of start time for the timer In this example a fixed time is used F Select the desired start time for the timer and press NEXT G Choose which days and in which months the timer should be triggered By default all days and months are selected Press NEXT E F G ...

Страница 19: ...d actions for when the timer is triggered Press NEXT I A message appears asking if you want to add a timer to turn the devices OFF Press Yes J Select the time you want the devices to be turned OFF Press NEXT K The timers have been added to the overview H I J ...

Страница 20: ...M Press on the timer name to begin editing N When you are done editing the name press the confirm button O To delete a timer press the DELETE button in front of the timer when in editing mode Press the CONFIRM button to go back to the timers rules overview 4 2 Edit delete timer M N O 4 2 ...

Страница 21: ...an execute an action by choosing a trigger and action A Press the TIMERS RULES button in the menu bar B Press the button at the top of the screen to add a new rule C Press on RULE D Fill in a name for your rule and press OK 5 1 Configure rules A B C D 5 1 ...

Страница 22: ...ET CONTROL STATION 22 E Add a trigger by pressing the button next to triggers F Select a trigger to use to execute an action In this example a contact sensor is used as trigger G Choose one of the linked devices E F G ...

Страница 23: ...tions I An overview is shown of the available devices that have been linked Choose an action for the desired devices Press the CONFIRM button J The choosen triggers and actions are shown Press the CONFIRM button again to save the rule K The rule has been added to the rule overview H I J ...

Страница 24: ...Press on the rule name to begin editing N When you are done editing the name press the confirm button O To delete a rule press the DELETE button in front of the rule when in editing mode Press the CONFIRM button to go back to the timers rules overview K L M N O 5 2 Edit delete rule 5 2 ...

Страница 25: ...to enter the MAC address manually during the registration process Press the MANUAL button B Look at the bottom of the ICS 2000 for the MAC address C Press the Enter manually field and enter the MAC address for your ICS 2000 Then press NEXT 6 Connect manually A MAC 00 00 A2 00 12 11 B C 6 ...

Страница 26: ...ICS 2000 INTERNET CONTROL STATION 26 ...

Страница 27: ...plies to your country and it begins on the day of purchase For additional information visit www trust com warranty Copyright The contents of the User manual are subject to copyright protection Without prior written permission reproducing or copying is prohibited Information in these documents is subject to change without prior notice Check www trust com 71110 for updates For support and FAQ go to ...

Страница 28: ...C Directive 2004 108 EC Low Voltage Directive 2006 95 EC ROHS Directive 2011 65 EC R TTE Directive 1999 5 EC The product is compatible with the following norms standards The product is compatible with the following norms standards Manufacturer Authorized representative H Donker Procurement Director Dordrecht 1 February 2016 EN 300 328 EN 300 220 EN 55022 EN 55024 ETSI EN 301 489 17 NEN EN IEC 6095...

Отзывы: