


Easy Scan 19200
20
To edit the scanned text that you have just saved you must open a text
editor, for example ‘Notepad’. You can also use your own text editor or
word processor.
6.2 TextBridge Classic for Windows 95
6.2.1 Setting up the scanner
The scanner was already set up to use the software during installation
of the application.
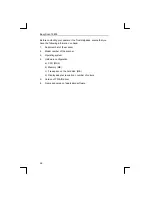
6.2.2 Scanning with TextBridge Classic
1.
Start TextBridge Classic.
2.
Place the document that is to be scanned on the scanner.
3.
Press the ‘Go’ button (figure 15) in TextBridge. The TWAIN
window (figure 12) now appears on the screen.
Figure 15: ‘Go’ button
4.
Click ‘Preview’ to produce a test scan.
5.
Use the mouse to select the area you wish to scan.
6.
Click ‘Line-art’.
7.
Set the resolution to 300 dpi.
8.
Click ‘Scan’. Once scanning is complete, TextBridge Classic asks
whether there is anything else to scan. You can now scan more
pages.
9.
Click ‘End’ to finish scanning. Text recognition now starts
automatically. A window then appears asking you to save the text
that has been scanned.
10. Type a name for your text under ‘File Name’.
11. Under ‘Save as Type’ select the file format. You should choose a
file format that is supported by your text editor or word processor.
If in doubt, select ‘ASCII Std. (*.txt)’.
12. Click ‘Save’ to save the file. You have now finished the
recognition process.


