Tru-Test 0.15 J Скачать руководство пользователя страница 5


A non-electrified fence incorporating barbed wire or razor 
wire may be used to support one or more offset electrified 
wires of an electric animal fence. The supporting devices for 

the electrified wires shall be constructed so as to ensure that 
these wires are positioned at a minimum distance of 
150 mm (6") from the vertical plane of the non-electrified 

wires. The barbed wire and razor wire shall be earthed at 
regular intervals. 
Follow our recommendations regarding earthing. 
A distance of at least 10 m (33') shall be maintained between 

the energizer earth electrode and any other earthing system 
connected parts such as the power supply system protective 
earth or the telecommunication system earth. 
Connecting leads that are run inside buildings shall be 
effectively insulated from the earthed structural parts of the 

building. This may be achieved by using insulated high 
voltage cable. 
Connecting leads that are run underground shall be run in 
conduit of insulating material or else insulated high voltage 
cable shall be used. Care must be taken to avoid damage to 

the connecting leads due to the effects of animal hooves or 
vehicle wheels sinking into the ground. 
Connecting leads shall not be installed in the same conduit 
as the mains supply wiring, communication cables or data 
cables. 
Connecting leads and electric animal fence wires shall not 
cross above overhead power or communication lines. 
Crossings with overhead power lines shall be avoided 
wherever possible. If such a crossing cannot be avoided it 

shall be made underneath the power line and as nearly as 
possible at right angles to it. 
If connecting leads and electric animal fence wires are 
installed near an overhead power line, the clearances shall 
not be less than those shown in the table below. 

Minimum clearances from power lines for electric animal 
fences


Power line voltage 

Clearance 

1000 V 

3 m (10') 

>

1000 V to  

33,000 V 

4 m (13') 

>

33,000 V 

8 m (27') 

 
If connecting leads and electric animal fence wires are 
installed near an overhead power line, their height above the 

ground shall not exceed 3 m (10'). This height applies to 
either side of the orthogonal projection of the outermost 

conductors of the power line on the ground surface, for a 
distance of: 

• 

2 m (6'6") for power lines operating at a nominal voltage 
not exceeding 1000 V. 

• 

15 m (50') for power lines operating at a nominal 
voltage exceeding 1000 V. 

Electric animal fences intended for deterring birds, household 

pet containment or training animals such as cows need only 
be supplied from low output energizers to obtain satisfactory 
and safe performance. 
In electric animal fences intended for deterring birds from 
roosting on buildings, no electric fence wire shall be 

connected to the energizer earth electrode. A warning sign 
shall be fitted to every point where persons may gain ready 
access to the conductors. 
Where an electric animal fence crosses a public pathway, a 
non-electrified gate shall be incorporated in the electric 

animal fence at that point or a crossing by means of stiles 
shall be provided. At any such crossing, the adjacent 
electrified wires shall carry warning signs.  
Any part of an electric animal fence that is installed along a 
public road or pathway shall be identified at frequent 

intervals by warning signs securely fastened to the fence 
posts or firmly clamped to the fence wires. 

• 

The size of the warning sign shall be at least 
100x200 mm (4x8"). 

• 

The background colour of both sides of the warning 
sign shall be yellow. The inscription on the sign shall be 

black and shall be either: 


or the substance of "CAUTION: Electric animal fence". 

• 

The inscription shall be indelible, inscribed on both sides 
of the warning sign and have a height of at least 25 mm 
(1"). 

Ensure that all mains-operated, ancillary equipment 

connected to the electric animal fence circuit provides a 
degree of isolation between the fence circuit and the supply 
mains equivalent to that provided by the energizer. 
Protection from the weather shall be provided for the 
ancillary equipment unless this equipment is certified by the 

manufacturer as being suitable for use outdoors, and is of a 
type with a minimum degree of protection IPX4. 


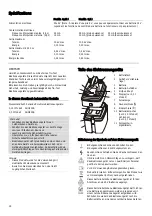
Product specifications 


0.15 J model 

0.3 J model 

Power source 

9 V battery (Note: A 12 V battery can also be used in place of the normal 9 V battery, 
however the battery management features will not be fully functional.) 

Current consumption 
 

Fast pulse (1.5 s) 


Slow pulse (2.5 s) 

 
22 mA 
14 mA 

 
48 mA (full power) 
30 mA (full power) 

 
25 mA (half power) 
15 mA (half power) 

Maximum output 
 Voltage 
 Energy 

 
up to 10 kV 
up to 0.15 J 

 
up to 10.5 kV 
up to 0.30 J 


Maximum output at 500 

Ω


 Voltage 
 Energy 

 
up to 2.2 kV 

up to 0.10 J 

 
up to 3.2 kV 

up to 0.24 J 


Stored energy 

up to 0.24 J 

up to 0.45 J 


Содержание 0.15 J

Страница 1: ...de la batterie estimée 16 Règles de sécurité 16 Spécifications 18 DEUTSCH 18 Teile des Elektrozaungeräts 18 Installation 19 Bedienung des 0 15 J Modells 19 Bedienung des 0 3 J Modells 19 Lagerung des Elektrozaungeräts 20 Handhabung der Batterie 20 Geschätzte Batterielebensdauer 20 Sicherheitshinweise 21 SVENSKA 22 Aggregatets delar 22 Installation 23 Drift av aggregatmodell 0 15 J 23 Drift av aggr...

Страница 2: ...lified personnel in order to reduce the risk of electric shock Read full instructions before use Product Information Please recycle this product in accordance with the regulations for your country This battery energizer is intended for connection to a 9 V battery This battery energizer must not be connected to a battery while the battery is being charged by a mains line operated charger Do not con...

Страница 3: ...lse speed press repeatedly until the two pointers on the right hand side of the display indicate the required setting Possible settings Fast Slow Night Mode Fast Night Mode Slow Daylight 1 5 s 2 5 s 2 5 s 1 5 s Darkness 1 5 s 2 5 s 1 5 s 2 5 s Note In night mode the energizer senses darkness using the light sensor and automatically changes the pulse speed Ensure the light sensor remains clean at a...

Страница 4: ...ically to the output terminals Earth electrode Metal structure that is driven into the ground near an energizer and connected electrically to the Fence earth terminal of the energizer and that is independent of other earthing arrangements Connecting lead An electric conductor used to connect the energizer to the electric fence or the earth electrode Electric animal fence An electric fence used to ...

Страница 5: ... at a nominal voltage not exceeding 1000 V 15 m 50 for power lines operating at a nominal voltage exceeding 1000 V Electric animal fences intended for deterring birds household pet containment or training animals such as cows need only be supplied from low output energizers to obtain satisfactory and safe performance In electric animal fences intended for deterring birds from roosting on buildings...

Страница 6: ...reducir el riesgo de choques eléctricos el energizador sólo debería ser abierto o reparado por personal cualificado Lea todas las instrucciones antes del uso Información de producto Por favor recicle este producto de acuerdo con las normas vigentes en su país Este energizador a batería está diseñado para ser conectado a una batería de 9 V Este energizador a batería no debe estar conectado a una ba...

Страница 7: ...apague la pantalla Cambiar la potencia Pulse brevemente para cambiar entre media y plena potencia La flecha cambia su posición para indicar media potencia o plena potencia Cambiar la velocidad de impulsos Para cambiar la velocidad de impulsos pulse varias veces hasta que las dos flechas en el lado derecho de la pantalla indiquen el ajuste deseado Ajustes posibles Rápido Lento Modo nocturno rápido ...

Страница 8: ...enta plena potencia 30 mA 75 días 125 días 200 días Velocidad de impulsos rápida media potencia 25 mA 90 días 150 días 250 días Velocidad de impulsos lenta media potencia 15 mA 150 días 250 días 400 días Instrucciones de seguridad Definiciones de términos especiales Energizador Un aparato que está diseñado para enviar periódicamente impulsos de voltaje a una cerca que está conectada al mismo Cerca...

Страница 9: ...puede evitar tiene que efectuarse debajo de la línea de suministro de corriente y en ángulos de 90 a ser posible Si los cables de conexión y los alambres de cercas eléctricas para animales están instalados cerca de una línea aérea de suministro de corriente las distancias no deben ser inferiores a aquellas de la tabla a continuación Distancias mínimas desde líneas de suministro de corriente para c...

Страница 10: ... O energizador só deverá ser aberto ou reparado por pessoal qualificado para reduzir o risco de choque elétrico Leia todas as instruções antes do uso Informação sobre o produto É favor reciclar este produto de acordo com os regulamentos nacionais O energizador de bateria foi projetado para ser conectado a uma bateria de 9 V Este energizador de bateria não deverá ser conectado a uma bateria enquant...

Страница 11: ...ar Mudança da potência Pressione brevemente para mudar entre meia potência e alta potência A seta muda a sua posição para indicar meia potência ou alta potência Mudança da velocidade dos pulsos Para mudar a velocidade dos pulsos pressione várias vezes até as duas setas no lado direito do visor indicarem o ajuste requerido Ajustes possíveis Rápido Lento Modo noturno rápido Modo noturno lento Luz de...

Страница 12: ...ulso lento a toda a potência 30 mA 75 dias 125 dias 200 dias Pulso rápido meia potência 25 mA 90 dias 150 dias 250 dias Pulso lento meia potência 15 mA 150 dias 250 dias 400 dias Instruções de segurança Definição dos termos técnicos Energizador de cerca elétrica Um aparelho usado para aplicar periodicamente pulsos de tensão a uma cerca conectada Cerca Uma barreira para animais ou para fins de segu...

Страница 13: ...não deverão cruzar se acima de linhas aéreas de corrente ou de comunicação Cruzamentos com linhas aéreas sempre deverão ser evitados Se um cruzamento não puder ser evitado ele deverá ser feito abaixo da linha de corrente e em um ângulo o mais reto possível Se as linhas de conexão e os arames da cerca elétrica forem instalados perto de uma linha aérea de corrente as distâncias não deverão ser menor...

Страница 14: ...sortie vers la clôture Connectez la borne de sortie à la clôture L électrificateur ne doit être ouvert ou réparé que par du personnel qualifié pour réduire le risque de choc électrique Lire attentivement toutes les instructions avant usage Information de produit assurez le recyclage du produit selon la réglementation nationale en vigueur Cet électrificateur sur batterie est conçu pour une utilisat...

Страница 15: ...eau de puissance Pressez pour passer de pleine à demi puissance et vice versa Le pointeur change de position pour indiquer la demi puissance ou la pleine puissance Modifier la fréquence d impulsions Pour modifier la fréquence d impulsions ré appuyez sur jusqu à ce que les deux pointeurs à droite de l écran indiquent le réglage souhaité Réglages possibles Rapide Ralenti Mode nuit Rapide Mode nuit R...

Страница 16: ... d impulsions ralentie 14 mA 160 jours 270 jours 450 jours Modèle 0 3 J Fréquence d impulsions rapide pleine puissance 48 mA 45 jours 75 jours 130 jours Fréquence d impulsions ralentie pleine puissance 30 mA 75 jours 125 jours 200 jours Fréquence d impulsions rapide demi puissance 25 mA 90 jours 150 jours 250 jours Fréquence d impulsions ralentie demi puissance 15 mA 150 jours 250 jours 400 jours ...

Страница 17: ... animaux ne doivent pas être installés au dessus de lignes électriques ou de télécommunication aériennes Éviter les croisements avec les lignes électriques aériennes partout où cela est possible Si on ne peut pas éviter ce croisement il doit se faire sous les lignes électriques à angle droit Si les fils de connexion et les fils de la clôture électrique pour animaux sont installés à proximité d une...

Страница 18: ...n Sicherheitsbestimmungen erfüllt Elektrozaungerät nicht gleichzeitig an einen Zaun und an andere Geräte wie beispielsweise ein Kuh oder Geflügeltreibsystem anschließen Anderenfalls wird ein etwaiger Blitzschlag auf die Zaunleitung auf alle anderen Geräte übertragen Hinweis Dieses Produkt wurde für die Verwendung mit elektrischen Weidezäunen entwickelt Bewahren Sie dieses Handbuch an einer leicht ...

Страница 19: ...an 3 Schließen Sie die gelbe Zaunleitung vom Zaunausgang des Elektrozaungeräts an den Zaun an Sorgen Sie für einen guten Kontakt Falls erforderlich entfernen Sie einen Teil des Kabelmantels um Stahllitzen freizulegen und so einen guten Kontakt sicherzustellen Bedienung des 0 15 J Modells Ein und ausschalten 1 Um das Elektrozaungerät einzuschalten drücken Sie einmal Beide Lämpchen leuchten kurz auf...

Страница 20: ...uchtet auf um anzuzeigen dass der Sicherheitscode aktiviert ist Sicherheitscode deaktivieren 1 Halten Sie so lange gedrückt bis sich das Display einschaltet und zwei Fragezeichen erscheinen 2 Drücken Sie bis Ihr Sicherheitscode im Display aufscheint 3 Drücken Sie kurz um das Elektrozaungerät zu entsperren und einzuschalten 4 Drücken Sie gleichzeitig und bis auf dem Display erscheint 5 Drücken Sie ...

Страница 21: ...Drähten zweier elektrischer Weidezäune die von getrennten unabhängig getakteten Elektrozaungeräten gespeist werden muss mindestens 2 m betragen Falls die Lücke geschlossen werden soll sind zu diesem Zweck elektrisch nicht leitende Materialien oder eine isolierte Metallabsperrung zu verwenden Stacheldrahtzaun und scharfkantiger Draht dürfen nicht an ein Elektrozaungerät angeschlossen werden Der ode...

Страница 22: ...Schutz von mindestens IPX4 SVENSKA Grattis till ditt inköp av ett batteridrivet elstängselaggregat från Tru Test Denna produkt använder den senaste teknologin för att ge överlägsen prestanda och många års service Var god läs instruktionerna noga för maximal säkerhet prestanda och pålitlighet från ditt Tru Test elstängselaggregat Modeller som täcks av denna bruksanvisning Denna bruksanvisning täcke...

Страница 23: ...l 0 15 J Koppla på och av 1 För att aktivera aggregatet tryck en gång De två indikatorljusen lyser kortvarigt upp sedan kommer pulsindikatorn att börja blinka 2 För att stänga av aggregatet tryck igen Pulsindikatorn kommer sluta att blinka Ändra pulshastighet För att ändra pulshastigheten tryck Snabb puls avger pulser var 1 5 sekunder för att maximera aggregatets effektivitet Långsam puls avger pu...

Страница 24: ...as genom batteriindikatorns ljus modell 0 15 J eller batterisymbolen på displayen modell 0 3 J Batteriindikatorljus Modell 0 15 J Batterisymbol Modell 0 3 J Handling Av Off Batteriets kondition är tillfredställande för normal drift Blinkar Av Batteriet börjar ta slut Ersätt batteriet så snart som möjligt På Blank display Batteriet är tomt och aggregatet fungerar ej Ersätt batteriet Beräknad batter...

Страница 25: ...ån djurens hovar eller klövar eller från traktorhjul som sjunker ner i marken Anslutningsledningar får inte installeras i samma skyddsrör som strömförsörjnings kommunikations eller datakablar Anslutningsledningar och elstängseltrådar får inte löpa ovanför luft eller kommunikationsledningar Korsningar med luftledningar bör helst undvikas Om en sådan korsning inte kan undvikas ska den ske under luft...

Страница 26: ...iones relativas a este producto de manera expresa o implicada cada vez que se presenten que tienen su origen en estatutos leyes comercio uso u otro Garantie Für dieses Produkt wird eine Garantie gegen Material und Verarbeitungsfehler für einen bestimmten Zeitraum ab dem Kaufdatum gewährt Sollte ein Gewährleistungsmangel auftreten geben Sie das Produkt zusammen mit einem Kaufbeleg an die Verkaufsst...

Страница 27: ......

Страница 28: ......

Отзывы: