background image

Assembly of  Aluminum T-14 Pole with Mounting Kit and T-14 House Mount
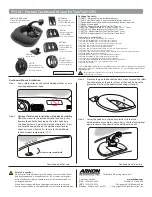
Step 11)

  Measure the top perches and find center 

and mark. 


Insert the lower top perch rod first into 

the   ball   top.     Find   your   center   mark   and   then 
tighten set screw using the provided Allen wrench.  
Repeat for the upper top perch.

Step 12)

  Begin by rotating your pole 

¼

 turn.  You 

should see the bolt head or nut that was inserted 
thru the pulley facing upwards.   It’s now time to 
install the house bracket (P).   The house bracket 
has been assembled for you.  Loosen the nuts so 
that you can open the bracket enough to slip over 
the bottom of the pole.  Measure from the bottom 
of the pole upward to 36” and mark.   Slide your 
bracket to the mark and using 7/16” wrench, to 
tighten the bolts, place your wrench on the bolt 
head instead of the nut.   The reason why is that 
these are self-gripping nuts.  Also check for level 
using a square. 

Step 13

)   We are next going to install the winch.  

The winch needs to be on the same side as the 
pulley so rotate your pole 

¼

 turn as seen in Step 

12 photo.  Measure from your bottom of the pole 
up 11-12” and mark with a pencil.  Next get your 
winch with assembled brackets (G).   Loosen the 
nuts on both the upper and lower winch brackets 
back   plate   so   that   the   opening   will   be   large 
enough that you can slip it on to your pole.    Do 

©2023  Troyer’s Birds’ Paradise LLC.  20785 Morris Rd. Conneautville, PA  16406  814-587-2756      Page 4

Step 10

Step 10

Step 11

Step 12

Bolt stem is on 

pulley side of 

pole

Step 13

Содержание T-14

Страница 1: ...der block s P House Bracke t Q Lock with chai n R Tarpaulin Hook with hardwar e S 8 Wood Screw s F G H I K L M N S R Q P O AL Pole Parts Lis t Pol e A 1 Bottom of pole has a drilled hole 6 feet up from the bottom see circle B 1 Center of pole has the slot for the pulley at top shown and an aluminum splice at opposite end T 1 Top of Pole One end square cut opposite has splic e C 1 48 heavy duty alu...

Страница 2: ...of gravel into the hole Step 6 Fill your newly dug hole with concrete right up to the top of your hole Step 7 Holding your ground stake vertically over the cement insert your aluminum ground stake into the concrete by pushing downward and pulling upward in a fi rm and steady motion It does not matter which end of the ground stake you insert into the ground Stop inserting the stake when your ground...

Страница 3: ...with bolt washers and lock nut all preassembled for you Remove the lock nut and pull the bolt from pulley make note of where the washers are Insert the pulley into the slot and while holding it in place insert the bolt with washer into the hole on the side of the pole thru the pulley and out the oppo site hole in the pole Place your washer on and thread the lock nut on Tighten using two 9 16 wrenc...

Страница 4: ... the pole upward to 36 and mark Slide your bracket to the mark and using 7 16 wrench to tighten the bolts place your wrench on the bolt head instead of the nut The reason why is that these are self gripping nuts Also check for level using a square Step 13 We are next going to install the winch The winch needs to be on the same side as the pulley so rotate your pole turn as seen in Step 12 photo Me...

Страница 5: ...y your cable out on the ground Remove any kinks or twists One end of the cable has a stop sleeve compressed on to it The other end is bare Place a few wraps of electrical tape on the bare end of the cable With your pole still showing the winch facing upwards take the tapped end of the cable and insert it thru the pul ley slot along the top of the pulley and out the back side of pole It s okay to p...

Страница 6: ... have a little tension on the cable because it has been looped on to safety pin Please be sure the hitch pin is fully seated into the safety bolt hole This will keep the pin in place while you install the pole over the ground stake Step 18 You will now be installing the pole over the ground stake This is best accomplished with two adults Before you stand the pole up give some thought as to the ori...

Страница 7: ...one of the slider blocks underneath the upper car riage bolts and using your hammer tap the slider block so that its fl ush with the back of the house Now use your hammer and tap the bottom of the block upwards so that you move the block to where the edge of the block is pushing on the carriage bolt head Partly covering these bolt heads will help later in the installation as it will keep the bolts...

Страница 8: ...e one we just did Place it on the house bracket push the house into the pole and wrap your bungee cord around the house hooking it in place at the roof Step 24 Notice in Step 23 photo you can see the carriage bolts extending out of the houses The stems of the carriage bolt is what you will align with the holes found on the back side of the three section houses Begin by fi nding the 3 compart ment ...

Страница 9: ... the bolts that are attached to the tarpaulin hook Place the hook so the hook is facing the back of the house towards a notch which is for the cable Align the holes in the house to the hook insert the bolts from inside the house through the hook and install the nut and repeat for the other hole Tighten the nuts using a 7 16 wrench Step 26 Before you can mount the house you will need to grasp the c...

Страница 10: ...that your cable is in the notch at the back the house If everything looks good close and lock the doors remove the bungee cords and run your house up the pole Place your safety Pin N back into the hole on the pole and insert the hitch pin How to lock the winch The last item in the mounting kit hardware box is a lock with a piece of chain Q Remove the packing from the lock and in order to open the ...

Отзывы: