background image

EN

13

cordless belt sander PBSS 10-20V

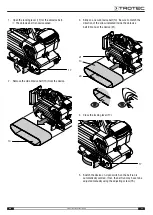
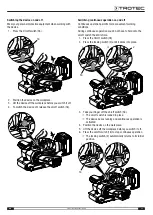
1. Open the locking lever (

17

) for the abrasive belt.

ð

The abrasive belt is now loosened.

17

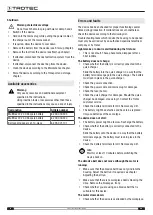
2. Remove the old abrasive belt (

10

) from the device.

10

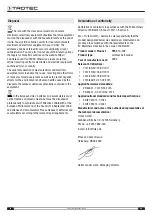
3. Slide on a new abrasive belt (

10

). Be sure to match the

direction of the arrow indicated inside the abrasive
belt (

20

) and at the device (

21

).

21

10

20

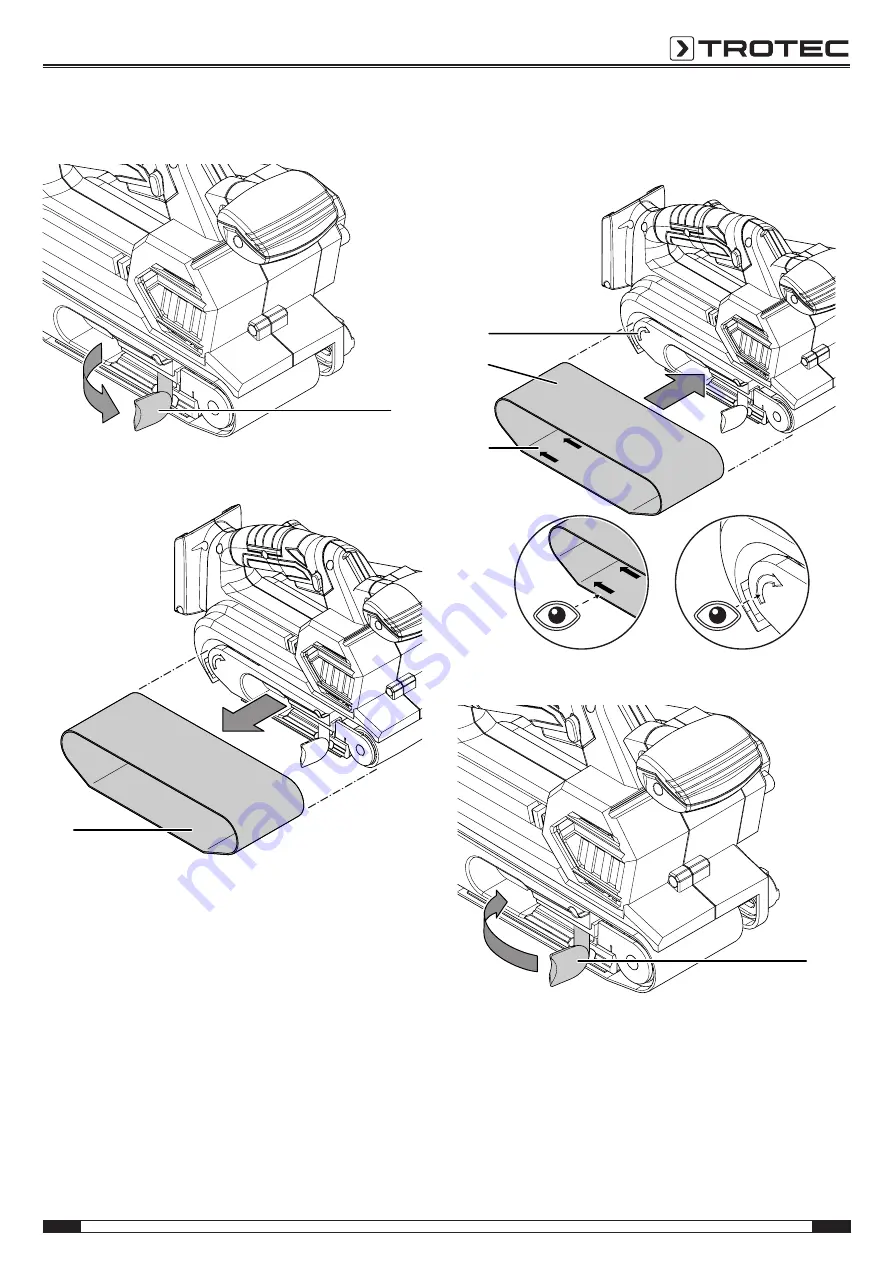
4. Close the locking lever (

17

).

17

5. Switch the device on. Upon switch-on the belt run is

automatically centred. If not, the belt run may have to be
adjusted manually using the adjusting screw (

15

).

Содержание PBSS 10-20V

Страница 1: ...TRT BA PBSS10 20V TC220111TTRT02 001 EN PBSS 10 20V EN ORIGINAL INSTRUCTIONS CORDLESS BELT SANDER...

Страница 2: ...rage risk level which if not avoided can result in serious injury or death Caution This signal word indicates a hazard with a low risk level which if not avoided can result in minor or moderate injury...

Страница 3: ...ating a power tool outdoors use an extension cord suitable for outdoor use Use of a cord suitable for outdoor use reduces the risk of electric shock If operating a power tool in a damp location is una...

Страница 4: ...ack may create a risk of fire when used with another battery pack Use power tools only with specifically designed battery packs Use of any other battery packs may create a risk of injury and fire When...

Страница 5: ...the power tool out of your control Secure the workpiece The grip of tensioning devices or a vice is more secure than holding the workpiece only by hand Do not use accessories which are not specifical...

Страница 6: ...device Keep all safety signs stickers and labels in legible condition The following safety signs and labels are attached to the battery Warning of explosion risk These symbols indicate the following D...

Страница 7: ...g or the vacuum cleaner s dust collection bag at regular intervals Warning of hot surface The insertion tool might still be hot after the application Burn hazard when touching the insertion tool Do no...

Страница 8: ...min by means of the setting wheel The on off switch of the device is fitted with a locking switch enabling for continuous operation and convenient and fatigue free working The tool free clamping syst...

Страница 9: ...t case 1 x Manual Technical data Parameter Value Model PBSS 10 20V Belt speed 120 350 m min Idle speed 1 030 3 020 min 1 Dimensions of the abrasive belt width x length 76 x 457 mm Grinding surface 76...

Страница 10: ...store or transport the device improperly the device may be damaged Note the information regarding transport and storage of the device Transport For transporting the device use the transport case incl...

Страница 11: ...ope of delivery for completeness and look for damages Warning Risk of suffocation Do not leave the packaging lying around Children may use it as a dangerous toy Dispose of the packaging material accor...

Страница 12: ...ge the battery 1 Press on the battery icon 19 on the battery 6 You can read the battery status from the battery level indication 13 19 13 Changing the abrasive belt Warning of electrical voltage Befor...

Страница 13: ...10 from the device 10 3 Slide on a new abrasive belt 10 Be sure to match the direction of the arrow indicated inside the abrasive belt 20 and at the device 21 21 10 20 4 Close the locking lever 17 17...

Страница 14: ...rning of explosive substances Wood dust can self ignite in case of flying sparks Do not use the dust extraction system or the dust bag when grinding metals Wood dust can intermix with varnish residues...

Страница 15: ...ner e g industrial vacuum cleaner to the dust extraction connection 5 If required you can connect the adapter for dust extraction 11 to the dust extraction connection 5 first If anything is unclear or...

Страница 16: ...se a coarse grain size 40 or 60 grit for removing paint and for rough grinding particularly raw wood For surface grinding undressed or sawn timber use abrasive belts of medium grit grain size 80 100 o...

Страница 17: ...more convenient working conditions During continuous operation you do not have to hold onto the on off switch the entire time 1 Press the On off switch 18 2 Press the locking switch 2 until it clicks...

Страница 18: ...ke or odour is emitted during the first use This is not a fault These phenomena disappear after a brief runtime The battery does not charge Check whether the battery is correctly connected to the quic...

Страница 19: ...e carried out by authorised specialist companies or by Trotec Notes on maintenance Inside the device there are no parts that need to be maintained or lubricated by the user Safety signs on the battery...

Страница 20: ...tic waste but must be disposed of professionally in accordance with Directive 2006 66 EC of the European Parliament and of the Council of 6 September 2006 on batteries and accumulators Please dispose...

Страница 21: ...Trotec GmbH Grebbener Str 7 D 52525 Heinsberg 49 2452 962 400 49 2452 962 200 info trotec com www trotec com...

Отзывы: