background image

10

11

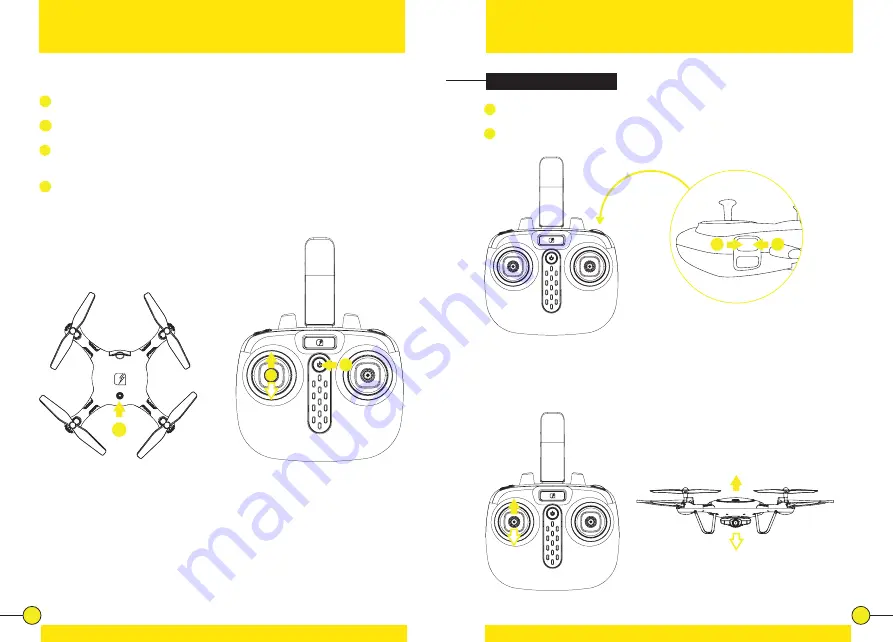
Pairing

Place the drone on a flat and level surface.


1

 Press the Power Switch of the drone for 2 seconds. The LED lights of the

   drone start flashing rapidly.


2

  Press the Power Switch to turn on the Controller. The Indicator Light on the   

Controller starts flashing rapidly.

3

   Push the Throttle/Rotate stick to the full up position, then to the full down      

 position. The Controller Indicator Light and the LED lights of the drone turn   

 solid after a few seconds.


4

  When the Indicator Light on the Controller and the LEDs on the drone are all 

solid (not blinking) the drone is ready to fly.

Piloting


1

  Pressing the Auto Take-Off & Land button will cause the rotors of the drone 

to spin. The drone takes off and will hover at approximately 1.5 meter.


2

  Pressing the Auto Take-Off & Land button again will make the drone land.

Auto Take-Off & Land

Throttle Control

To fly higher, push the Throttle/Rotate stick cautiously forward. To fly lower, 

push the Throttle/Rotate stick cautiously backward.


2


3

2

1


1

Содержание SPECTRE

Страница 1: ...1 SPECTRE USER GUIDE ...

Страница 2: ... products are design focused electronics engineered to combine ultimate performance and aesthetics Learn how to fly TRNDlabs Drone Academy is a video platform where you can get your drone up and running in minutes www trndlabs academy www trndlabs com ...

Страница 3: ... Sensitivity Control Additional Safety Precautions App Installation Direction Trim Replacing Rotor Blades Rotation Trim FAQ Calibration Controller Functions Recording a Video Playing Back Videos Viewing Photos Back to Home Flight Controls Controller Battery Installation Battery Safety Instructions Connecting Mobile Phone Installation FCC Compliance Information USA only Advanced Flight Performing 3...

Страница 4: ...Functions Controller Functions Functions USB Charging Cable Screwdriver Drone Body Rotor Blade Power Switch Camera Power Switch Video Button Indicator Light Mobile Phone Holder Direction Forward Backward Side ways Throttle Rotate Photo Button 3D Flip Button Auto Take Off Land Button Rotor Protector ...

Страница 5: ...geable battery with the supplied USB Charging Cable Trying to charge the rechargeable battery with a different battery charger might cause serious damage WARNING 1 Open the Controller battery cover 2 Install 4x 1 5V AA batteries 3 Slide the Controller battery cover back Rotor Protector Installation Gently slide the Rotor Protectors onto the landing feet of the drone 4x Place your mobile phone in t...

Страница 6: ...ght and the LED lights of the drone turn solid after a few seconds 4 When the Indicator Light on the Controller and the LEDs on the drone are all solid not blinking the drone is ready to fly Piloting 1 Pressing the Auto Take Off Land button will cause the rotors of the drone to spin The drone takes off and will hover at approximately 1 5 meter 2 Pressing the Auto Take Off Land button again will ma...

Страница 7: ...the Direction stick cautiously forward or backward To fly the drone to the left or the right push the Direction stick cautiously to the left or the right Rotation Control To make the drone circle to the left or the right push the Throttle Rotate stick cautiously to the left or right ...

Страница 8: ...le phones with Android search for SPECTRE in Google Play Connecting App Functions 1 Refer to chapter Pairing page 10 2 Enter the settings of your mobile phone and turn on the WiFi 3 Select FPV_WIFI_XXXX in the list of networks 4 Go back and select the SPECTRE App 5 Tap on the FLY button to enter the Live Video interface 1 Back to Home 2 Take a Photo 3 Record a Video 4 View Photos Videos 5 VR Mode ...

Страница 9: ...cture with the Photo Button on the controller The LED lights on the drone will flash momentarily to indicate a picture is being taken Tap the video icon to record a video The icon will turn yellow when it s recording Tap the icon again to stop recording the icon will turn grey again You can also record a video by pressing the Video Button on the controller The LED lights on the drone will start fl...

Страница 10: ...deo files e g MOVI0000 mov on the SD card in the folder VIDEO The videos are MOV files You will find the photo files e g PICT0000 jpg in the folder PHOTO The photos are JPG files When reinstalling the SD card make sure the metal contacts on the SD card are facing in the right direction Tap the VR Mode button to activate VR Mode The button will turn yellow and the live feed from the drone will be v...

Страница 11: ...an be switched from Normal Mode A to Headless Mode B Headless Mode does not require the pilot to differentiate the front head position of the drone but simply use the Direction Stick for the drone to respond correctly to the given input relative to the position of the controller To enter Headless Mode press and hold the Direction Stick for 2 seconds 1 The controller will emit a series of beeps to ...

Страница 12: ... front flips back flips and side flips Press the 3D Flip Button 1 then push the Direction stick 2 forward backward right or left at the same time The drone carries out the flip in the respective direction Do not attempt these stunts until you are able to fly confidently Choose an area that will provide a soft landing carpet or grass and maintain an altitude of at least 10 feet 3 meter to allow roo...

Страница 13: ...he same time push the right joystick forward backward 2 to compensate for the direction deviation Keep the left joystick pressed down and keep trimming with the right joystick until the drone flies stable When hovering if the drone flies to the left or right without moving the Direction stick proceed as follows If the drone moves on its own to the left right side press down the left joystick 3 and...

Страница 14: ... the number can be ignored Calibration The drone needs to be calibrated if it flies unstable Place the drone on a flat and level surface Now push both the left and right joystick at the same time to the lower right corners and hold for 2 to 3 seconds The LED lights on the drone will start blinking rapidly indicating the drone is calibrating After 2 to 3 seconds the LED lights will return back to n...

Страница 15: ...Replacing Rotor Blades page 27 Problem Unable to find photos and videos in App Gallery Solution Photos and videos taken with the App are stored on the mobile device and on the SD card of the drone Photos and videos taken with the controller are stored on the SD card of the drone only Safety Precautions Carefully follow the instructions below Make sure you fly the drone safely and you mind the warn...

Страница 16: ...tions FCC Compliance Information USA only For the best performance only use fresh 1 5V Alkaline AAA batteries in the controller Never operate the drone with low controller batteries The drone automatically switches off if the rotors are unable to rotate Switch the power to restart the drone When not in use store the drone in the original packaging with the batteries removed from the controller Alw...

Страница 17: ...32 33 ...

Страница 18: ... of this document are subject to change Download the latest version from www trndlabs com If you have any questions about this document please contact TRNDlabs by sending a message to hello trndlabs com 2017 TRNDlabs All rights reserved ...

Страница 19: ...36 2664 5 EN ...

Отзывы: