background image

10

GB

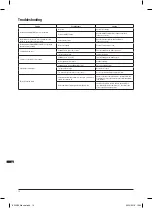
Troubleshooting

Problem

Possible cause

Solution

No function when ON/OFF Switch (2) is operated

No power

Check power supply

Defective ON/OFF Switch

Have the ON/OFF Switch replaced by an authorised  
Triton service centre

Motor suffers from cut-outs, loss of performance and 
produces sparks and/or burning smells

Carbon brushes worn

Have the brushes replaced by an authorised  
Triton service centre

No sanding action when ON/OFF Switch (2) is operated, 
despite the motor running

Gears not engaged

Consult a Triton service centre

Slow material removal

Sanding Sleeve (9) too fine or worn

Fit new Sanding Sleeve with coarser grit

Tool speed set too low

Increase tool speed

Scratches on workpiece after sanding

Sanding Sleeve too coarse

Fit new Sanding Sleeve with finer grit

Not enough material removed

Continue sanding

Burn marks on workpiece

Sanding Sleeve incompatible with material

Fit correct Sanding Sleeve

Tool speed set too high

Decrease tool speed

Too much pressure exerted on to the sander

Use less pressure whilst moving the machine

Excessive dust emission

Vacuum dust extraction system not connected, or extraction 
system not switched on

Check connection of the vacuum hose, the Dust Extraction 
Port Adaptor (7) (if used) and ensure dust extraction system 
is switched on

Dust extraction not working; dust extraction blocked 

Check dust extraction system; unblock dust extraction  
(see ‘Cleaning the dust extraction port’.)  Consult a Triton 
service centre if problems persist

825289_Manual.indd   10

22/10/2018   12:54

Содержание TSPSP650

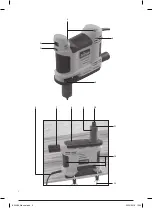
Страница 1: ...TSPSP 650 5A Portable Oscillating Spindle Sander Operating Safety Instructions Instru es de Opera o e Seguran a Instructions d utilisation et consignes de s curit Instrucciones de uso y de seguridad...

Страница 2: ...2 8 9 10 1 2 3 4 7 11 13 12 5 6 825289_Manual indd 2 22 10 2018 12 54...

Страница 3: ...3 5 14 13 16 17 15 18 7 825289_Manual indd 3 22 10 2018 12 54...

Страница 4: ...4 H C A B D E F G 825289_Manual indd 4 22 10 2018 12 54...

Страница 5: ...5 I J Fig I Fig II 16 17 5 5 825289_Manual indd 5 22 10 2018 12 54...

Страница 6: ...load speed 1800 3200min 1 Spindle oscillations 50 90opm Stroke length 1 4 Sleeve length 3 Sleeve diameters 1 2 3 4 1 1 1 2 Protection class Ingress protection IP20 Power cord length 6 Dimensions L x...

Страница 7: ...G UNATTENDED TURN POWER OFF Don t leave tool until it comes to a complete stop Table A Ampere Rating Volts Total length of cord in feet 120 25 50 100 150 240 50 100 200 300 More Than Not More Than Min...

Страница 8: ...plug is removed from the mains power supply before fitting or removing sanding sleeves Note Do not continue to use worn torn or heavily clogged sanding sleeves Ensure foreign objects such as nails an...

Страница 9: ...versa A sanding sleeve that was previously used for sanding metal should not be used on wood again Residual metal particles may lead to scratches and damage the workpiece Accessories A range of acces...

Страница 10: ...e tool speed Scratches on workpiece after sanding Sanding Sleeve too coarse Fit new Sanding Sleeve with finer grit Not enough material removed Continue sanding Burn marks on workpiece Sanding Sleeve i...

Страница 11: ...art pr Triton Precision Power Tools guarantees to the purchaser of this product that if any part proves to be defective due to faulty materials or workmanship within 3 YEARS from the date of original...

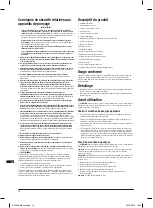
Страница 12: ...une protection suppl mentaire Protection de l environnement Les appareils lectriques usag s ne doivent pas tre jet s avec les ordures m nag res Veuillez les recycler dans les centres pr vus cet effet...

Страница 13: ...CHEZ PAS TROP Adoptez une posture stable en permanence 14 ENTRETENEZ VOS OUTILS CONVENABLEMENT Aiguisez et nettoyez vos outils pour obtenir les meilleurs r sultats en toute s curit Suivez les instruct...

Страница 14: ...me lorsque l outil est utilis comme indiqu il est impossible d liminer tous les facteurs de risque r siduels Si vous avez des doutes quant la mani re s re et correcte de proc dez il est recommand de...

Страница 15: ...r gler la vitesse faites tourner le r gulateur et positionnez le sur le r glage correspondant la vitesse d sir e La vitesse peut tre s lectionn e sur une plage comprise entre 1 et 6 la position 1 cor...

Страница 16: ...t Au cours du temps et des utilisations le cylindre va s user jusqu ne plus pouvoir assurer le maintien ad quat des manchons car son diam tre sera r duit Remarque Les cylindres pour manchons de pon ag...

Страница 17: ...erformance est r duite et il produit des tincelles et ou une odeur de brul Balais de charbon us s Faites remplacer les balais de charbon aupr s d un centre Triton agr Aucun pon age lorsque l interrupt...

Страница 18: ...e la herramienta de la toma el ctrica antes de realizar cualquier tarea de mantenimiento sustituir accesorios o cuando no la est utilizando Protecci n clase II doble aislamiento para mayor protecci n...

Страница 19: ...en sentido opuesto al sentido de rotaci n de la hoja 21 NUNCA DEJE LA HERRAMIENTA DESATENDIDA Apague siempre la herramienta antes de dejarla desatendida Aseg rese de que la herramienta se haya deteni...

Страница 20: ...precauci n Si no est seguro de c mo utilizar esta herramienta de forma correcta no la utilice ADVERTENCIA El polvo creado al lijar aserrar amolar perforar y al realizar otros trabajos de construcci n...

Страница 21: ...e Utilice la gu a para bordes 16 cuando sea necesario J Coloque la gu a para bordes y f jela en la lijadora utilizando las perillas de bloqueo para la gu a 17 Fig II 1 Coloque la base de la lijadora 8...

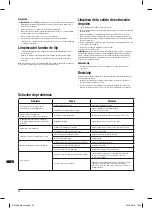
Страница 22: ...ua entre en contacto con la herramienta Aseg rese de que la herramienta est completamente seca antes de utilizarla Si dispone de un compresor de aire comprimido sople con aire seco y limpio para limpi...

Страница 23: ...amientas Triton disponen de un per odo de garant a de 3 a os Para obtener esta garant a deber registrar el producto online en un plazo de 30 d as contados a partir de la fecha de compra Si durante ese...

Страница 24: ...amenta Use prote o auricular Use prote o ocular Use prote o respirat ria Use prote o de cabe a Use prote o nas m os AVISO Para reduzir o risco de ferimentos o usu rio deve ler o manual de instru es Co...

Страница 25: ...iver inserindo um conjunto de baterias ou quando for pegar ou transportar a m quina AVISO A partida n o intencional de uma ferramenta pode causar ferimentos graves 18 Use extens es pr prias para uso e...

Страница 26: ...l trico n o conecte o condutor de aterramento em um terminal vivo Consulte um eletricista qualificado ou a assist ncia t cnica caso as instru es n o estejam claras ou caso fique em d vida se a ferrame...

Страница 27: ...sobre metal Isso poder impregnar a superf cie da madeira com detritos 1 Remova o parafuso de bloqueio 10 e a Arruela do tambor 11 D 2 Remova o tambor da lixa tubo 15 3 Deslize a lixa tubo 9 sobre o ta...

Страница 28: ...enta completamente antes de us la para lixar metal AVISO As part culas quentes de metal e centelhas podem incendiar res duos de serragem Limpe SEMPRE a ferramenta completamente quando mudar de lixamen...

Страница 29: ...ocorre lixamento quando o interruptor Liga Desliga 2 acionado mesmo com o motor funcionando As engrenagens n o engatam Consulte um Centro de Servi os Autorizado Remo o de material lenta A lixa tubo 9...

Страница 30: ...r les particules microscopiques ADVERTENCIA El polvo creado al lijar aserrar amolar perforar y al realizar otros trabajos de construcci n puede contener sustancias qu micas identificadas por el estado...

Отзывы: