background image

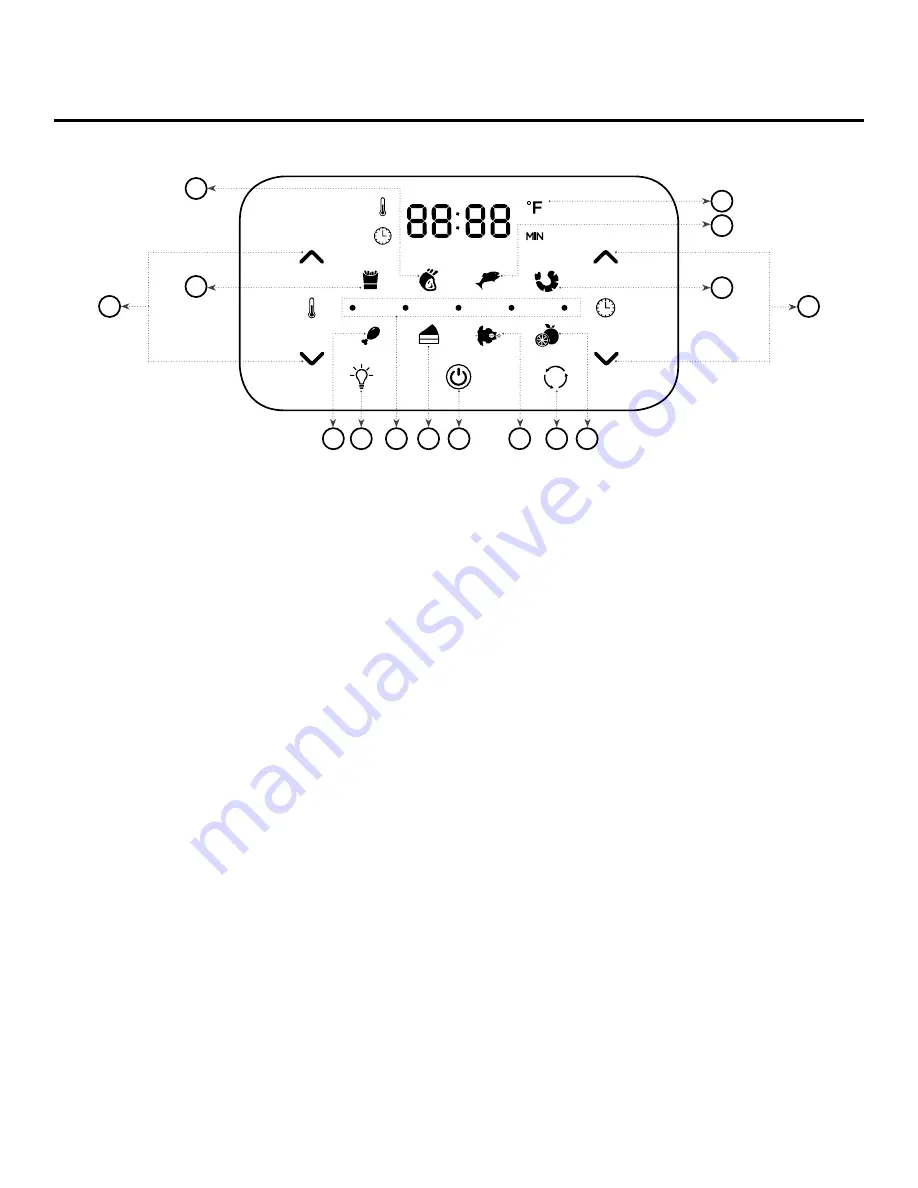
FIG. G

10

   P

ower AirFryer Pro™ | Model: CM002  

Using the Digital Control Panel

1.  Power/Start-Stop Button

 – Once the Unit  

is plugged in, the Power Button will light up.  
Selecting the Power Button once will cause  
the full panel to be illuminated. Selecting  
the Power Button a second time will activate  
the cooking process at the default temperature 
of 370° F (190

° C

) and time of 15 mins.  

Selecting the Power Button at any time during 
the cooking process will shut down the Unit, 
causing the display to go dark immediately and  
the running light to go dark within 20 secs.  
The fan will continue running for 20 secs.  
to cool down the Unit.

2.  Internal Light

 – Selecting this button  

will allow you to check cooking progress  
while Unit is in operation.  

NOTE:

 Opening the door during the cooking 

process will pause the Unit. Internal light  
will illuminate if doors open.

3.  Rotation Button

 – Select this button  

when cooking anything using the Rotisserie 
Mode. Function can be used with any preset. 
The icon will blink while in use.

4.  Temperature Control Buttons

 – These 

buttons enable you to raise or lower cooking 
temperature by 5° F (2.7

° C

) intervals ranging 

from 150° F (65

° C

) to 400° F (200

° C

). 

Dehydration ranges from 90° F (30

° C

) to 170° F 

(75

° C

).

5.  Time Control Buttons

 – These buttons 

enable you to select exact cooking time  
to the minute, from 1 min. to 60 mins. in all 
modes except when dehydrating, which uses  
30-min. intervals and an operating time  
of 2–24 hrs. 

6.  LED Digital Display

 – The Digital Numeric 

Display will switch between Temperature and 
Time Remaining during the cooking process.

7–14. Cooking Presets

 – Selecting any of these 

will set Time and Temperature to a default 
setting for that particular food. You may override 
these presets with Time and Temperature 
Buttons. View presets on the next page.

15.  Running Lights

 – These lights will blink  

in sequence while cooking is in progress  
and continue blinking up to 20 secs. once  
you shut the Unit off.

5

2

11

15 12

7

8

9

10

1

13

14

3

6

4

Содержание Power AirFryer Pro CM002

Страница 1: ...sic safety precautions should always be followed Do not use The Power AirFryer ProTM until you have read this manual thoroughly Save These Instructions For Household Use Only Owner s Manual Guarantee Information Inside MODEL CM002 DELUXE ...

Страница 2: ...reat tasting food and snacks with the Power AirFryer ProTM We All Love Fried Food Crispy fried chicken French fries coconut shrimp chicken Parmesan spicy hot wings the list goes on and on Those tasty delights have become part of our everyday diet Until now it was impossible to get that great crispy fried crunch and flavor without frying in deep fat or oil Good News The Power AirFryer ProTM has cha...

Страница 3: ... Parts Accessories 6 Using the Accessories 8 Using the Digital Control Panel 10 Cooking Presets 11 General Operating Instructions 12 Cooking Chart 14 Cleaning Storage 15 Troubleshooting 16 Frequently Asked Questions 17 60 Day Guarantee 18 Table of Contents ...

Страница 4: ...While cooking the internal temperature of the Unit reaches several hundred degrees Fahrenheit TO AVOID PERSONAL INJURY never place hands inside the Unit unless it is thoroughly cooled Always use hand protection when removing hot items from Unit This appliance is NOT INTENDED FOR USE by persons with reduced physical sensory or mental capabilities or a lack of experience and knowledge unless they ar...

Страница 5: ...t Vent Also avoid the heated air while removing the Rotating Mesh Basket from the appliance The Unit s outer surfaces may become hot during use The Rotating Mesh Basket WILL BE HOT WEAR OVEN MITTS or use the Fetch Tool when handling hot components Should the Unit emit black smoke UNPLUG IMMEDIATELY and wait for smoking to stop before removing oven contents When the cooking time has completed cooki...

Страница 6: ...ir Flow Racks 3 6 Rotating Mesh Basket 7 Drip Tray 8a Skewers 10 8b Adjustable Skewer Racks 2 9 Rotisserie Shaft Forks Set Screws 10 Rotisserie Fetch Tool 11 Rotisserie Stand optional 4 Optional Optional NOTE Unpack all the appliance s components Please remove any clear or blue protective film on the components The included components vary by model Components may be available for purchase ...

Страница 7: ... Set Screws 9 Rotisserie Shaft Forks Set Screws Use for roasts and whole chicken Slide the Shaft lengthwise through the center of the meat Slide the Forks onto the Shaft from each end and then into the meat Lock in place with the Set Screws There are indentations on the Shaft for the Set Screws You can adjust the Screws closer to the center of the Shaft if needed but never beyond the indentation N...

Страница 8: ...nd vice versa to ensure even cooking 1 Place a Skewer Rack at each end of the Rotisserie Shaft Ensure that the Set Screw box is facing the outside of the Rotisserie Shaft 2 Slightly tighten the Set Screws Do not overtighten as you may need to adjust the tightness after you insert the Skewers 3 Carefully slide the Skewers through food 8 Power AirFryer Pro Model CM002 Using the Accessories SKEWER RA...

Страница 9: ...n FIG D 4 Repeat steps 3 6 in a uniform manner around the Skewer Rack Make sure Skewers are evenly spaced 5 Ensure the Skewer Racks are inside the indentations on the Shaft tighten the Set Screws and ensure they are securely in place 6 Use caution while inserting the Shaft into the Unit The Skewer ends are sharp and can poke you Removing Rotisserie Spit or Rotating Basket from Unit 1 Open Unit doo...

Страница 10: ...s button when cooking anything using the Rotisserie Mode Function can be used with any preset The icon will blink while in use 4 Temperature Control Buttons These buttons enable you to raise or lower cooking temperature by 5 F 2 7 C intervals ranging from 150 F 65 C to 400 F 200 C Dehydration ranges from 90 F 30 C to 170 F 75 C 5 Time Control Buttons These buttons enable you to select exact cookin...

Страница 11: ...5 F 75 C Whole bird legs thighs wings 165 F 75 C Fish Shellfish Any type 145 F 63 C Lamb Ground 160 F 70 C Steaks roasts medium 140 F 60 C Steaks roasts rare 130 F 55 C Pork Chops ground ribs roasts 160 F 70 C Fully cooked ham 140 F 60 C Cooking time for whole roasted chicken will vary with weight Use meat thermometer to check internal temperature as per chart below This chart should be used to ch...

Страница 12: ...e inside and outside of the Unit with a warm moist cloth and mild detergent Rinse with a warm moist cloth Hand wash all cooking accessories Before cooking food preheat the Power AirFryer Pro for a few minutes to allow the Unit to burn off the manufacturer s protective coating of oil Wipe the Unit with warm soapy water and a washcloth after the burn in cycle 3 Select the cooking accessory for your ...

Страница 13: ...r to view the food at any time during the cooking process to check the progress NOTE Consult the charts in this manual or the recipe books to determine the correct settings for the specific item and weight being cooked Cooking with the Power AirFryer Pro Tips Foods that are smaller in size usually require a slightly shorter cooking time than larger ones Flipping or turning foods halfway through th...

Страница 14: ...Hamburger 1 4 1 1 lb 7 14 mins 360 F 182 C Sausage Roll 1 4 1 1 lb 13 15 mins 400 F 200 C Chicken Drumsticks 1 4 1 1 lb 18 22 mins 360 F 182 C Chicken Breast 1 4 1 1 lb 10 15 mins 360 F 182 C Spring Rolls 1 4 3 4 lb 15 20 mins 400 F 200 C Use oven ready Frozen Chicken Nuggets 1 4 1 1 lb 10 15 mins 400 F 200 C Use oven ready Frozen Fish Sticks 1 4 1 1 lb 6 10 mins 400 F 200 C Use oven ready Mozzare...

Страница 15: ...horoughly cooled before cleaning Clean the Power AirFryer Pro after each use The Rotating Mesh Basket and other accessories are made of durable stainless steel and are dishwasher safe Never use abrasive cleaning materials or utensils on these surfaces Caked on food should be soaked in warm soapy water for easy removal 1 Wipe the outside of the appliance with a warm moist cloth and mild detergent 2...

Страница 16: ... from Unit 1 Oil is being used 2 Accessories have excess grease residue from previous cooking 1 Wipe down to remove excess oil 2 Clean the Rotating Mesh Basket and Air Flow Racks after each use French fries are not fried evenly 1 Potato is not prepared properly 2 Potatoes not rinsed properly during preparation 3 Fries are not cut evenly 4 Fries are too crowded 1 Consult the recipe for the correct ...

Страница 17: ...he cooking time and temperature should resume from where they left off when you close the door 7 Is the Power AirFryer Pro dishwasher safe Only the accessories are dishwasher safe The Unit itself containing the heating coil and electronics should never be submerged in liquid of any kind or cleaned with anything more than a warm moist cloth or nonabrasive sponge with a small amount of mild detergen...

Страница 18: ...eturn the product call customer service at 1 973 287 5197 and request a return merchandise authorization number Pack the product carefully and include in the package a note with 1 your name 2 mailing address 3 phone number 4 email address 5 reason for return and 6 proof of purchase or order number and 7 specify on the note whether you are requesting a refund or replacement Write the return merchan...

Страница 19: ......

Страница 20: ...oduct has been manufactured to the highest standards Should you have any questions our friendly customer service staff is here to help you 973 287 5197 Distributed by Tristar Products Inc Fairfield NJ 07004 2018 Tristar Products Inc Made in China PAF_PRO_8QT_UL_IB_KL_ENG_V1_181218 ...

Отзывы: