4
7. Installation
7.1 Preparation
7.1.1 Equipment Inspection
Remove the equipment from the packaging material and inspect for any shipping damage that may have been overlooked upon receipt of
goods. Verify that the system includes all necessary hardware for installation.
7.1.2 Necessary Equipment and Tools
• Properly insulated tools
• Properly sized and rated mounting hardware
7.1.3 Installation Safety Precautions
Before proceeding with system installation, be sure to review and understand all of the SAFETY PRECAUTIONS in
Section 3
of this
manual!
AC VOLTAGE WARNING
The input/output voltage in this equipment can be up to 240V AC (SUT20KMBP, SUT30KMBP) or 400V AC (SUT20KMBPX,
SUT40KMBPX). Be sure to fully read and understand this manual and verify that all AC connections are correct and properly torqued.
Use extreme caution when installing and maintaining the system!
7.1.4 Storage
If the equipment cannot be immediately installed, it should be stored in a clean and dry indoor location with adequate air circulation and
uniform temperature to prevent condensation. If the equipment must be stored for any length of time, it should be covered to protect it from
dust, debris and moisture.
7.2 Installation Steps
Before installing or maintaining this system, it is extremely important to read this manual and be sure that all system drawings and
schematics are reviewed and clearly understood. If there are any questions concerning this manual or any of the installation or
maintenance procedures and/or requirements, please contact a Tripp Lite representative before proceeding.
7.2.1 Equipment Location
This equipment is intended to be installed in a restricted access location.
The permanent location of the equipment must be on a smooth and solid wall surface. Do not locate the equipment against a non-fireproof
ceiling. Allow a space of 3 feet between the ceiling and the equipment unless an adequate fireproof shield is provided. Also verify that the
selected location will provide working clearances in compliance with article 110.26 of the National Electrical Code (NEC). Environmental
conditions of the selected location should also be reviewed. Refer to section
6.2 Environmental
for environmental specifications.
7.2.2 Equipment Mounting
The equipment should be reliably secured to the mounting surface. Do not depend on wooden plugs driven into holes in masonry, concrete,
plaster or similar materials in accordance with Article 110.13 of the National Electrical Code (NEC). Secure the equipment utilizing the four
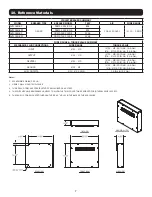
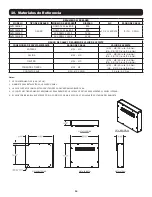
0.34-inch diameter mounting holes located in the back of the equipment. A set of equipment drawings for the specific configuration of
the equipment is included inside the equipment. Reference the equipment drawings or mounting hole size and locations. (See drawings in
Reference Materials
section.)
7.2.3 Equipment Connections
Never work on power equipment while it is energized. De-energize equipment and lock off all power to the equipment before working
inside.
The bottom panel of the equipment is the recommended designated area for landing conduit to the equipment. All conduits must be located
to avoid interference with structural members and live bus. A set of drawings for the specific configuration of the equipment is included inside
the equipment. Reference the equipment drawings in
Section 10 Reference Materials
.
All conductors are to be sized for 167°F (75°C) ampacity. When cable is used with temperature ratings above 167°F/75°C, it shall be
sized based on the ampacity of cable rated 167°F (75°C).
The equipment must be grounded with the appropriately sized conductor in compliance with Article 250 of the National Electrical
Code (NEC). The ground conductor should be terminated to the main ground bus bar inside the equipment.

