20
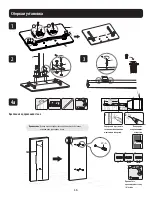
A
F
H
A (x1)
B (x1)
D (x1)
F (x4)
G (x1)
H (x1)
W-A (x4)
W-B (x4)
D
1
X
W-A
W-A
W-B
Note
: This product is designed to be installed on solid
concrete walls, masonry walls or wood walls.
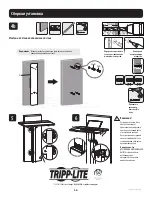
Note
: This product is designed to be installed on solid
concrete walls, masonry walls or wood walls.
2
G
D
C (x1)
E (x4)
E
B
C
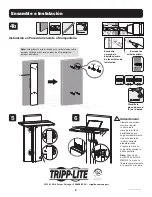
Montage und Installation
>5mm
>5mm
1111 W. 35th Street, Chicago, IL 60609 USA • tripplite.com/support
21-01-258 93-3DCC_revA
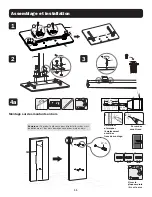
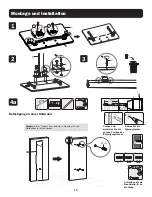
Schrauben Sie
die Wandplatte
(A) an die Wand.
1
2
Suchen und markieren
Sie die genaue Position
der Befestigungslöcher.
Bohren Sie die
Führungslöcher.
A
F
H
A (x1)
B (x1)
D (x1)
F (x4)
G (x1)
H (x1)
W-A (x4)
W-B (x4)
D
1
X
W-A
W-A
W-B
Note
: This product is designed to be installed on solid
concrete walls, masonry walls or wood walls.
Note
: This product is designed to be installed on solid
concrete walls, masonry walls or wood walls.
2
G
D
C (x1)
E (x4)
E
B
C
5
6
4b
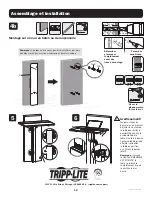
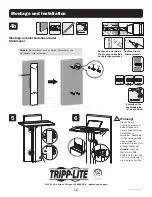
Warnung!
Stellen Sie die
Tischhöhe immer mit
beiden Händen ein,
um ein versehentliches
Herabfallen zu
vermeiden. Sobald die
richtige voreingestellte
Höhe erreicht ist,
arretieren Sie den Tisch
mit dem Drehknopf.
Hinweis:
Wenn die
MAXIMALE HÖHE
ERREICHT IST, löst sich
der Tisch vollständig in
die niedrigste Position.
Montage an einer Betonwand oder
Steinmauer
Hinweis:
Dieses Produkt kann an Beton-, Mauerwerks- und
Holzwänden installiert warden.

