


51
OSD Operation
(continued)
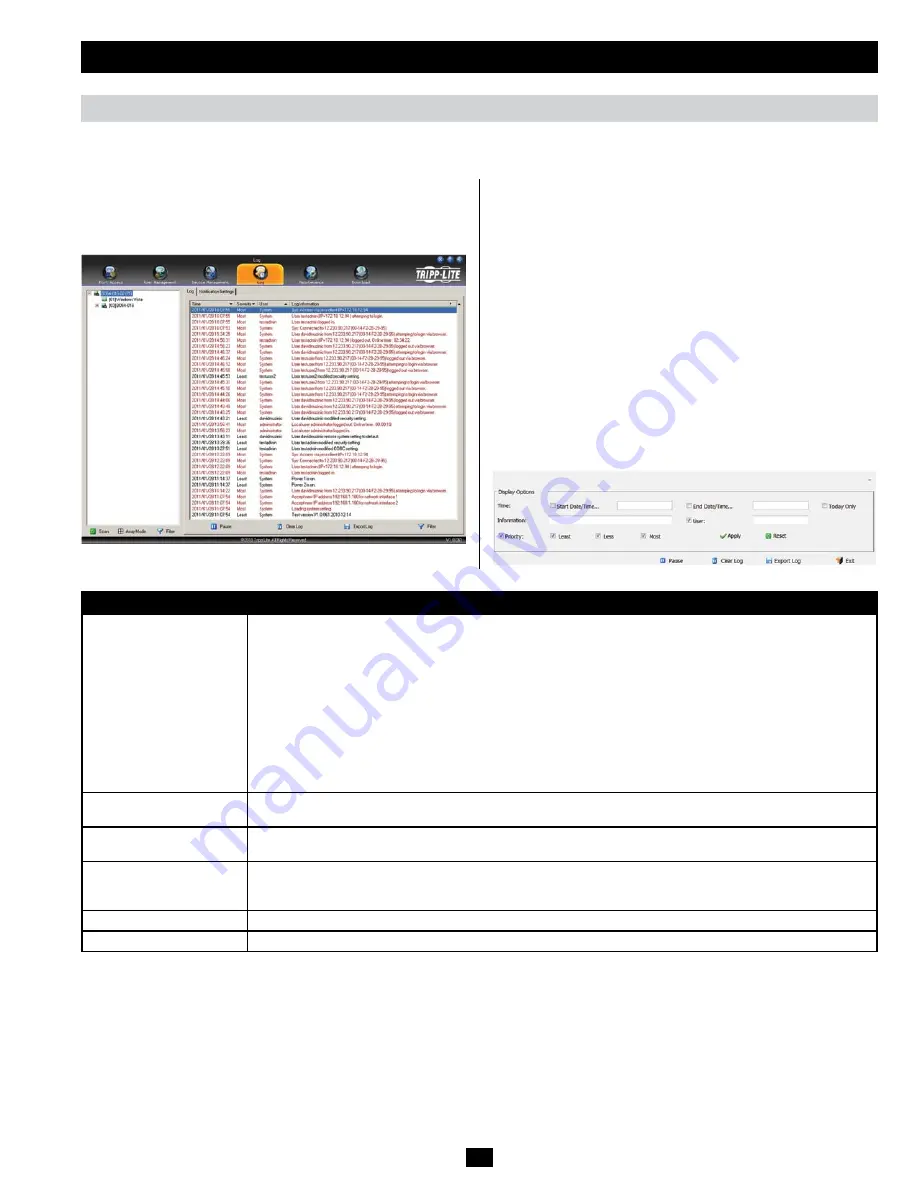
Log Information
The
Log Information
sub-section is where you can view the contents
of the built-in log file. When opened, a page similar to the one below
appears.
The B064-Series KVM switch logs all the events that take place and writes them to a log file. The Log section is split into two sub-sections;
Log
Information
and
Notification Settings
.
The
Log Information
page can store up to 512 events, at which time
the oldest files are deleted and replaced with newer files. The records
it displays show the
Time, Severity, User
and
Log Information
associated with the event. At the bottom of the screen are four icons,
whose functionality is described below.
•
Pause –
Clicking the
Pause
button stops new events from being
displayed in the
Log Information
page. When clicked, the icon changes
to
Resume
. Click
Resume
to allow events to be displayed again.
•
Clear Log –
Clicking the
Clear Log
button will clear the records
displayed in the
Log Information
page.
•
Export Log –
Clicking the
Export Log
button will allow you to
export and save the log file to your computer.
•
Filter –
Clicking the
Filter
button opens the
Filter
settings, shown
below, which allow you to display only records that match the filter
settings entered. The filter settings are described in the table below.
Field
Example
Time
The
Time
filter settings allow you to display only those records that occurred at a specific time. Below are the
options.
•
Today Only –
Check the
Today Only
checkbox and click the
Apply
button to display only those events that
occurred on today’s date.
•
Start Date/Time –
Check the
Start Date/Time
checkbox and click in the field to the right of it to bring up a
calendar that allows you to select a desired date and time. Click the
Apply
button to display all of the events that
occurred between the date/time entered into the
Start Date/Time
field and the present date/time.
•
End Date/Time –
This setting works in conjunction with the
Start Date/Time
field. Check the
Start Date/Time
checkbox and click in the field to the right of it to bring up a calendar that allows you to select a desired date and
time. Check the
End Date/Time
checkbox and click in the field to the right of it to bring up a calendar that allows
you to select a desired date and time. Click the
Apply
button to display all of the events that occurred between the
date/time entered into the
Start Date/Time
field and the date/time entered into the
End Date/Time
field.
Information
The
Information
field allows you to type in a key word or string, and display only those records that contain the
search term. Simply type in a search term and click the
Apply
button.
User
The
User
field allows you to type in a user name, and display only those records that contain the text that you entered in
the
User
field. To filter by User, you must check the User checkbox, type in a search term, and then click the
Apply
button.
Priority
The
Priority
fields allow you to filter by the
Priority
of the event being recorded;
Least, Less
or
Most
. To filter by
Priority
, check the
Priority
checkbox, then check the
Priority
level checkbox(es) that you wish to filter by, and then
click the
Apply
button.
Reset
Click the
Reset
button at any time to clear any filter settings that were entered and display all events.
Exit
Click the
Exit
button to close the
Filter
settings.
Notification Settings
The
Notification Settings
sub-section allows you to select which events are sent out to SNMP, SMTP and SysLog servers. Simply check the
checkboxes in the rows of the events that you want notifications sent out for, and in the column(s) of the methods you want them to be sent to. When
checked, the corresponding event notification will be sent using the corresponding method.
Note
: You can check multiple boxes at the same time
using the [Shift] or [Ctrl] keys. To highlight a group of consecutive ports, start by highlighting the first port, hold down the [Shift] key, and then
highlight the last port that you wish to highlight. All ports from the first one you highlighted to the last will be highlighted. You can then click on
any of the permission checkboxes to change that permission for all of the highlighted ports. To highlight multiple non-consecutive ports, start by
highlighting the first port, hold down the [Ctrl] key, and then highlight each additional port one by one while continuing to hold down the [Ctrl]
key. When all of the desired ports are highlighted, click on any checkbox to change that permission for all of the highlighted ports.
Log


