background image

TY96/96A and TY97/97A VHF Radio Installation Manual   

26 September 2018 

01238-00 


Issue AJ 


______________________


Page 14 

Trig Avionics Limited 

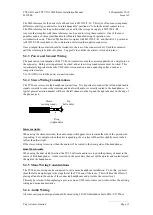
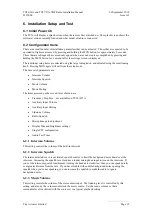
equivalent.  Mono audio signals should use 2 core shielded cable and stereo signals should use 3 core 
shielded cable.  One core wire within each shielded cable should be connected to ground; the cable 
shield should not be used to carry the audio ground signals. 

The cable shield should be connected to ground at the TY96 end only.  Do not connect the shield at 
both ends of the cable to avoid a ground loop which can increase interference effects. 

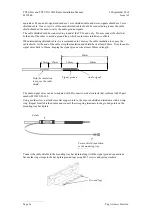
When terminating shielded cable it is recommended to cut away the cable insulation to expose the 
cable shield.  At the end of the cable, strip the insulation and shield back at least 90mm.  Trim the audio 
signal wires back to 30mm, keeping the signal ground wire at least 90mm in length. 


The audio signal wires can be terminated with D connector socket contacts that conform to MIL part 
number M39029/63-368. 

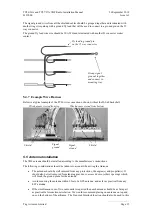
Using a solder sleeve, attach some flat copper braid to the exposed shield and terminate with a crimp 
ring.  Repeat for all shielded cable and connect the crimp ring terminals to the ground points on the 
mounting tray back plate. 


Connect the cable shields to the mounting tray back plate along with the signal ground connections.  
Secure the ring crimps to the back plate ground lugs using M2.5 screws and spring washers. 


15mm 

25mm 

30mm 

60mm 

Strip the insulation 
to expose the cable 
shield  

Audio signal 
wires  

Signal ground 
wire  

90mm 

Solder 
Sleeve 

Secure shield connection 
to the mounting tray 
back plate 

Ground lugs 
(x6) 

Содержание TY96

Страница 1: ...Y96 96A and TY97 97A VHF Radio Installation Manual 01238 00 AJ 26 September 2018 Trig Avionics Limited Heriot Watt Research Park Riccarton Currie EH14 4AP Scotland UK Copyright Trig Avionics Limited 2015 ...

Страница 2: ...This page intentionally left blank ...

Страница 3: ...00 01 6 3 5 PHYSICAL SPECIFICATIONS IN TRAY 6 3 6 LOW VOLTAGE OPERATION 6 3 7 INSTALLATION APPROVAL 7 3 8 NON ETSO FUNCTIONS 7 4 UNIT AND ACCESSORIES SUPPLIED 8 4 1 TY96 VHF RADIO ITEMS 8 4 2 TY96A VHF RADIO ITEMS 8 4 3 TY97 VHF RADIO ITEMS 8 4 4 TY97A VHF RADIO ITEMS 8 4 5 INSTALLATION KIT 9 4 6 REQUIRED ITEMS 9 5 INSTALLATION 10 5 1 UNPACKING AND INSPECTING EQUIPMENT 10 5 2 INSTALLATION OVERVIEW...

Страница 4: ...ut 18 5 6 11 RS232 Input Output 18 5 6 12 Remote Flip Flop 18 5 6 13 Power Input 18 5 6 14 Ground Returns 18 6 INSTALLATION SETUP AND TEST 19 6 1 INITIAL POWER ON 19 6 2 CONFIGURATION ITEMS 19 6 2 1 Intercom Volume 19 6 2 2 Intercom Squelch 19 6 2 3 Music Volume 19 6 2 4 Music Muting 20 6 2 5 Frequency Step Size 20 6 2 6 Auxiliary Input Volume 20 6 2 7 Auxiliary Input Muting 20 6 2 8 Sidetone Volu...

Страница 5: ...BUTTON 24 8 8 PLAY BUTTON 24 8 9 EMER BUTTON 24 8 10 SAVING AND LOADING THE FREQUENCY DATABASE 24 8 11 GENERAL LOW TEMPERATURE OPERATION 24 8 12 WARNING MESSAGES 24 8 13 FAULT ANNUNCIATION 25 9 CONTINUED AIRWORTHINESS 26 9 1 CLEANING THE FRONT PANEL 26 10 LIMITED WARRANTY 27 11 ENVIRONMENTAL QUALIFICATION FORMS 28 12 INSTALLATION DRAWINGS 32 13 WIRING DIAGRAMS 34 14 USB FILE FORMAT 40 14 1 USB COM...

Страница 6: ......
Страница 7: ...dentifier is 1 1 The software and FPGA versions are subject to change without notice 1 3 Changes from Previous Issue Numerous small editorial changes 1 4 Document Cross References 01239 00 TY96 TY96A and TY97 TY97A VHF Radio Operating Manual AC ETSO 2C169a VHF Radio communication receiving equipment operating within the radio frequency range 117 975 137 MHz EASA TSO C169a Minimum Operational Perfo...

Страница 8: ... nominal DC power supply 2 2 Interfaces At the rear the VHF radio unit has a 25 way D type connector and single antenna connector for blind mating with the corresponding connectors in the mounting tray The 25 way D type interface provides the following services INPUTS DESCRIPTION Power input The TY96 operates on 11 to 33 volts DC The TY97 operates on 22 to 33 volts DC Lighting bus input Connects t...

Страница 9: ...stereo headphone outputs suitable for conventional aircraft headsets with impedance in the region of 150 600 ohms Audio routing Intercom received audio auxiliary and music inputs transmitter sidetone Mono audio output A mono audio output designed to connect to an aircraft audio panel with an impedance of 600 ohms Audio routing Received audio transmitter sidetone ...

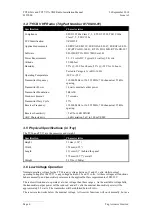
Страница 10: ...r Power 10 watts nominal carrier power Transmitter Modulation 5K6 A3E Stuck mic timeout 35 seconds Transmitter Duty Cycle 100 transmit is possible subject to stuck mic timeout Receiver Frequency 118 000 MHz to 136 992 MHz 760 channels at 25 kHz spacing 2280 channels at 8 33 kHz spacing Receiver Sensitivity 5uV for 6 dB SINAD AGC Characteristic 6dB variation 5 uV to 100 mV EMF 3 2 TY97 VHF Radio Tr...

Страница 11: ...ass C 4 TSO C128a FCC Identification VZI01228 Applicable documents EUROCAE ED 23C EUROCAE ED 67 EUROCAE ED 14F RTCA DO 160F RTCA DO 186B RTCA DO 207 Software ED 12B RTCA DO 178B Level B Power Requirements 11 33 volts DC Typical 6 3 watts 14 volts Altitude 55 000 feet Humidity 95 50C for 6 hours 85 38C for 16 hours Tested to Category A in DO 160G Operating Temperature 20C to 55C Transmitter Frequen...

Страница 12: ...ceiver Frequency 118 000 MHz to 136 992 MHz 760 channels at 25 kHz spacing Receiver Sensitivity 5uV for 6 dB SINAD AGC Characteristic 6dB variation 5 uV to 100 mV EMF 3 5 Physical Specifications in Tray The TY96 and TY97 are the same size and weight Specification Characteristics Height 33 mm 1 30 Width 159 mm 6 25 Length 231 mm 9 1 behind the panel 273 mm 10 77 overall Weight 2 33lbs 1 06Kg 3 6 Lo...

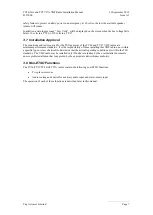
Страница 13: ... TY96 and TY97 VHF radios are minimum performance standards It is the responsibility of those installing this VHF radio on or within a specific type or class of aircraft to determine that the aircraft operating conditions are within the TSO standards The VHF radio may be installed only if further evaluation by the user installer documents an acceptable installation that is approved by the appropri...

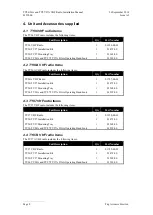
Страница 14: ...ption Qty Part Number TY96A VHF Radio 1 01787 00 01 TY96 TY97 Installation Kit 1 01472 00 TY96 TY97 Mounting Tray 1 01368 00 TY96 TY96A and TY97 TY97A Pilots Operating Handbook 1 01239 00 4 3 TY97 VHF radio Items The TY97 VHF radio includes the following items Unit Description Qty Part Number TY97 VHF Radio 1 01228 00 01 TY96 TY97 Installation Kit 1 01472 00 TY96 TY97 Mounting Tray 1 01368 00 TY96...

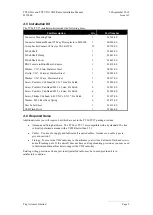
Страница 15: ... 5mm Pre Patch 6 01021 00 Screw Pozidriv Pan Head M2 5 x 8mm Pre Patch 4 01024 00 Screw Philips Csk head 4 40 UNC x 0 312 Pre Patch 2 01397 00 Washer M2 5 Rect Sect Spring 6 01473 00 User Label Sheet USB Flash Drive 1 1 01412 00 01646 00 4 6 Required Items Additional items you will require but which are not in the TY96 TY97 package include Antenna and fixing hardware The TY96 or TY97 are compatibl...

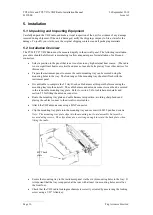
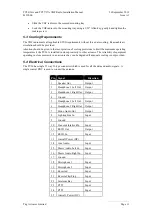
Страница 16: ...he tray The front edge of the mounting tray should sit flush with the instrument panel It is advisable to complete the 25 way D sub cable harness at this point before securing the mounting tray into the aircraft The cable harness and antenna connector can then be secured to the removable mounting tray plate Refer to section 5 4 for cable harness details and section 5 5 for fitting the antenna conn...

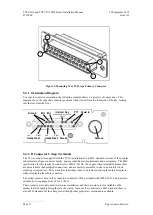
Страница 17: ...pment operating in close proximity in an avionics bay can be degraded if adequate cooling is not provided 5 4 Electrical Connections The TY96 has single 25 way D type connector which is used for all the data and audio signals A single coaxial BNC is used to connect the antenna Pin Signal Direction 1 Speaker Out Output 2 Headphone 1 Left Out Output 3 Headphone 1 Right Out Output 4 Ground 5 Headphon...

Страница 18: ...mily of connectors is MIL C 24308 We supply crimp terminals because these are more reliable than soldered connections and are easier to assemble in situ in an aircraft where soldering is impractical They also allow individual wires to be removed and replaced in a receptacle without replacing the whole connector The socket contacts used in the connectors conform to MIL part number M39029 63 368 and...

Страница 19: ... 4 4 Stereo Wiring Considerations The TY96 uses stereo for the headphone connections It is important to connect the left and right audio signals correctly to ensure the intercom and dual watch audio is correctly routed to the headphones A typical general aviation headset will have the left channel on the tip and the right channel on the ring of the phones jack Intercom Audio When using the stereo ...

Страница 20: ...e end of the cable strip the insulation and shield back at least 90mm Trim the audio signal wires back to 30mm keeping the signal ground wire at least 90mm in length The audio signal wires can be terminated with D connector socket contacts that conform to MIL part number M39029 63 368 Using a solder sleeve attach some flat copper braid to the exposed shield and terminate with a crimp ring Repeat f...

Страница 21: ...ld be taken into account when siting the Antenna The antenna should be well removed from any projections the engine s and propeller s It should also be well removed from landing gear doors access doors or others openings which will break the ground plane for the antenna Avoid mounting the antenna within 2 feet of a GPS antenna and as far as practical from any ELT antenna If the simultaneous use of...

Страница 22: ...under the antenna The thickness of the material used to construct the ground plane is not critical providing it is sufficiently conductive A variety of proprietary mesh and grid solutions are available Heavyweight cooking foil meets the technical requirements but obviously needs to be properly supported 5 5 2 Antenna Cable Use a high quality 50 ohm coaxial cable such as RG400 or RG142B When routin...

Страница 23: ...Lighting Bus Input The TY96 will adjust the brightness of the front panel switch lighting according to the voltage on the lighting bus input The lighting bus voltage is automatically adapted to the aircraft bus voltage If no lighting bus input is detected the radio will automatically control the front panel lighting based on the ambient light sensor 5 6 6 PTT1 2 Key Input Two Push to Talk PTT inpu...

Страница 24: ...be adjusted within the setup menu 5 6 11 RS232 Input Output The RS232 input allows certain GPS receivers to preload the standby and active frequencies The radio understands the Apollo SL40 protocol PMRRC based on NMEA at a speed of 9600 bps and responds to message types 1 4 5 and 6 5 6 12 Remote Flip Flop This input is used to allow remote activation of the frequency change and is typically used i...

Страница 25: ... Volume Music Muting The items accessed on the second level of menu are Frequency Step Size not available on TY96A 97A Auxiliary Input Volume Auxiliary Input Muting Sidetone Volume Radio Squelch Microphone gain adjustment Display Dim and Brightness settings Single PTT configuration Audio Test Tones 6 2 1 Intercom Volume This setting controls the volume of the built in intercom 6 2 2 Intercom Squel...

Страница 26: ...ments such as vintage or experimental aircraft the factory setting may lead to nuisance squelch breaking The radio squelch allows the installer to moderately increase the squelch set point The squelch point is indicated on the screen by a bar being filled in higher values being represented by more of the bar being filled Even with the radio squelch at its highest setting the unit will still meet i...

Страница 27: ...appearance at night Note it is only practical to do this in pitch darkness since that is the in flight environment that you are trying to reproduce If you are working in a hangar with any other lighting it may be better to leave the setting in the mid range 6 2 13 LCD Brightness Curve The actual maximum brightness of the LCD cannot be increased with this control What it controls is the rate at whi...

Страница 28: ...ck that they are receiving you clearly Interference check Check the radio with other avionics and electrical equipment on the aircraft operating Check at low mid and high radio frequencies There should be no significant interference on reception and when the TY96 TY97 transmits there should be no adverse effect on any other equipment Sidetone adjustment During the transmit checks verify the sideto...

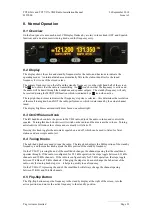
Страница 29: ...ed on ambient light 8 3 On Off Volume Knob The left hand knob controls the power to the VHF radio adjusts the audio volume and controls the squelch Turning this knob clockwise will switch on the radio and then increase the volume Turning anticlockwise will reduce the volume and eventually will click off Pressing this knob toggles the automatic squelch on and off which can be used to listen for fai...

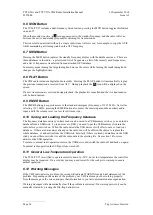
Страница 30: ...z pressing the EMER button also mutes the music input and the auxiliary audio input and if the volume is set to a low level it turns it up 8 10 Saving and Loading the Frequency Database The frequency database entries you have made can be saved to a USB memory stick or you can load a database from a USB stick To load or save to USB you need to put the USB memory stick into the radio before you swit...

Страница 31: ...atement of the problem The controller will not respond to button or knob inputs but the radio may still be working on the last settings prior to the fault indication Some FAULT indications can be recovered by switching the VHF radio off and back on again although in all cases a FAULT code implies that there is a fault with the VHF radio or the installation Note the FAULT message shown on the scree...

Страница 32: ...rements necessary to maintain continued airworthiness and no maintenance is required until the equipment does not properly perform its intended function When service is required a complete performance test should be accomplished following any repair action Repairs should only be carried out in accordance with Trig Avionics Limited service procedures 9 1 Cleaning the Front Panel The plastic body an...

Страница 33: ...buse or normal wear All warranties are F O B Trig Avionics Limited Heriot Watt Research Park Riccarton Edinburgh EH14 4AP Trig Avionics will not accept or pay for any charges for warranty work performed outside our factory without prior written consent This warranty applies only to products in normal use It does not apply to units or circuit boards defective due to improper installation physical d...

Страница 34: ...0 Aircraft zone 2 type 3 4 5 to category S level M type 1 Helicopters to category U level G Explosion 9 0 Equipment identified as Category X no test required Waterproofness 10 0 Equipment identified as Category X no test required Fluids Susceptibility 11 0 Equipment identified as Category X no test required Sand and Dust 12 0 Equipment identified as Category X no test required Fungus 13 0 Equipmen...

Страница 35: ...type 3 4 5 to category S level M type 1 Helicopters to category U level G Explosion 9 0 Equipment identified as Category X no test required Waterproofness 10 0 Equipment identified as Category X no test required Fluids Susceptibility 11 0 Equipment identified as Category X no test required Sand and Dust 12 0 Equipment identified as Category X no test required Fungus 13 0 Equipment identified as Ca...

Страница 36: ...type 3 4 5 to category S level M type 1 Helicopters to category U level G Explosion 9 0 Equipment identified as Category X no test required Waterproofness 10 0 Equipment identified as Category X no test required Fluids Susceptibility 11 0 Equipment identified as Category X no test required Sand and Dust 12 0 Equipment identified as Category X no test required Fungus 13 0 Equipment identified as Ca...

Страница 37: ...type 3 4 5 to category S level M type 1 Helicopters to category U level G Explosion 9 0 Equipment identified as Category X no test required Waterproofness 10 0 Equipment identified as Category X no test required Fluids Susceptibility 11 0 Equipment identified as Category X no test required Sand and Dust 12 0 Equipment identified as Category X no test required Fungus 13 0 Equipment identified as Ca...

Страница 38: ..._________ Page 32 Trig Avionics Limited 12 Installation Drawings Dimensions in are millimetres dimensions in are inches 158 90 mm CUT OUT DIMENSIONS FOR BEHIND AIRCRAFT PANEL MOUNT 31 50 mm 160 30 mm CUT OUT DIMENSIONS FOR FRONT AIRCRAFT PANEL MOUNT 33 80 mm CENTER OF GRAVITY COG 84 3 3 4 2 107 17 0 67 ...

Страница 39: ...tallation Manual 26 September 2018 01238 00 Issue AJ ______________________ Trig Avionics Limited Page 33 ITEM DESCRIPTION QTY 1 TY96 VHF Radio 1 2 TY96 Mounting Tray 1 3 TY96 Mounting Tray Back Plate 1 4 Screw M2 5 x 8mm pan Pozidriv 2 ...

Страница 40: ...n Manual 26 September 2018 01238 00 Issue AJ ______________________ Page 34 Trig Avionics Limited 13 Wiring Diagrams Diagram 1 System Interface 35 Diagram 2 Typical standalone interconnect no audio panel 36 Diagram 3 Audio panel interconnect 37 ...

Страница 41: ...rcraft Power and Ground 1 1 AUXILIARY INPUT TO BE USED FOR WARNINGS AND IDENT TONES Headphone 2 MIC 1 Input MIC 2 Input Pilot Microphone Copilot Microphone Pilot Headphones Copilot Headphones Lighting Bus Input Aircraft Lighting Bus 14v or 28v Headphone 1 Audio Panel If installed Mono Audio Out MP3 Player Music In L Music In R GPS RS232 Input BNC Antenna Connector IF AN AUDIO PANEL IS INSTALLED TH...

Страница 42: ...ONE COPILOTS MICROPHONE COM ANTENNA 1 AUXILIARY INPUT TO BE USED FOR WARNINGS AND IDENT TONES THE TY96 INTERCOM IS ENABLED WHEN THIS PIN IS CONNECTED TO GROUND THE GROUND SIGNAL CAN BE SWITCHED IF REQUIRED TO CREATE AN INTERCOM PTT TO DISABLE THE INTERCOM LEAVE THIS PIN FLOATING NOTES 1 POWER AND GROUND WIRES SHOULD ALL BE 20 AWG 2 ALL OTHER WIRES SHOULD BE 20 24 AWG UNLESS STATED OTHERWISE MOUNTI...

Страница 43: ... 9 10 GND LUG P H GND LUG R V 4 5 21 22 37 39 GND LUG 38 40 9 10 GND LUG P H GND LUG R V T 16 GND LUG 3 E GND LUG C H MOUNTING TRAY BACK PLATE GROUND BLOCK 7 18 4 9 17 13 25 23 10 MONO AUDIO OUT MICROPHONE 1 GROUND AIRCRAFT GROUND AIRCRAFT GROUND AIRCRAFT POWER IN AIRCRAFT POWER IN PTT 1 TRANSMIT INTERLOCK TRIG TY96 P1 PTT 1 TRANSMIT INTERLOCK Com 2 1 TX INTERLOCK AND PTT CONNECTIONS TO COM 2 REQU...

Страница 44: ...ULD ALREADY BE WIRED USING SCREENED CABLE THIS DIAGRAM ONLY ILLUSTRATES THE EXPOSED WIRING INSIDE THE SHIELD THE SHIELD SHOULD BE CONNECTED TO THE TY96 GROUND BLOCK NOTES THIS DIAGRAM ILLUSTRATES HOW TO USE THE EXISTING WIRING FROM A GARMIN SL40 1 POWER AND GROUND WIRES SHOULD ALL BE 20 AWG 2 ALL OTHER WIRES SHOULD BE 20 24 AWG UNLESS STATED OTHERWISE 3 HEADPHONE OUTPUTS 1L 2R ARE SHORTED TOGETHER...

Страница 45: ...BLE THIS DIAGRAM ONLY ILLUSTRATES THE EXPOSED WIRING INSIDE THE SHIELD THE SHIELD SHOULD BE CONNECTED TO THE TY96 GROUND BLOCK NOTES THIS DIAGRAM ILLUSTRATES HOW TO USE THE EXISTING WIRING FROM A BENDIX KING KY197A WHICH IS CONNECTED TO AN AUDIO PANEL 1 POWER AND GROUND WIRES SHOULD ALL BE 20 AWG 2 ALL OTHER WIRES SHOULD BE 20 24 AWG UNLESS STATED OTHERWISE 2 ALL EXISTING SHIELD CONNECTIONS SHOULD...

Страница 46: ...m which means that the file can also be edited on a desktop computer CSV files can be edited using a simple text editor or they can be opened by most spreadsheet software The Trig Com radio database is always loaded from and stored to a file called TRIGCOM CSV located in the root directory of the USB stick Each database record is written to a single line of the file and is in the following format ...

Страница 47: ...hough trailing zeroes can be omitted 14 1 USB Compatibility Although intended as a generic USB interface not all memory sticks will work in the TY96 TY97 A Trig branded USB stick is supplied with each radio the Trig USB stick will work correctly The Trig USB stick also has a read only partition that contains a copy of this manual The USB socket is not intended for other functions and is disabled d...

Отзывы: