background image

DAB 792 R

4

ENGLISH

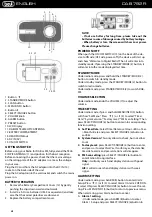
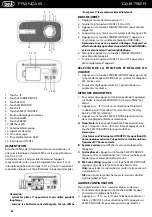
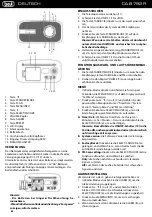
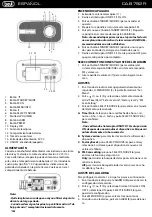
1.  Button 

2.  STANDBY/MODE button
3.  SCAN button
4.  MENU/INFO button
5.  Button

6.  SELECT/SNOOZE button
7.  VOLUME knob
8.  ALARM button
9.  PRESET button
10. LCD Display
11. DAB/FM TELESCOPIC ANTENNA
12. BATTERY COMPARTMENT
13. HEADPHONE out
14. DC IN (5V)
15. ON/OFF SWITCH

GETTING STARTED

Before using your Radio for DAB or FM, fully extend the TELE-
SCOPIC ANTENNA (11) and position for the best reception.
Before connecting the power, check that the mains voltage 
on the rating plate of the AC adaptor is same as the voltage 
in your area.
Plug the DC cord from the AC adaptor into the DC IN (14) 
socket on the back side of the unit.
Plug the AC adaptor into the wall socket and switch the mains 
power on.

BATTERY OPERATION

1.  Remove the Battery Compartment Cover (12) by gently 

pushing the clips downward and outwards.

2.  Install 4 x 'AA' size batteries (UM-3 or equivalent) and take 

care that the correct polarities are observed.

3.  Replace the battery compartment cover.

NOTE:
- If not use battery for long time, please take out the 
batteries in case of damage caused by battery leakage.
- When battery is low, the screen will show Low power. 
Please change batteries.

POWER ON/OFF

When push the ON/OFF SWITCH (15) on the back of the de-
vice to ON side (OFF side, power-off), the device will start up 
and show “Welcome to Digital Radio”. Then it will enter into 
standby mode. If pressing the STANDBY/MODE (2) button, it 
will enter into the mode displayed last time.

STANDBY MODE

Under radio mode, press and hold the STANDBY/MODE (2) 
button to switch to standby mode.
Under standby mode, press the STANDBY/MODE (2) button to 
switch to radio mode.
Under radio mode, press STANDBY/MODE (2) to switch DAB-
FM.

VOLUME SELECTION

Under radio mode, knob the VOLUME (7) to adjust the 
volume.

TIME SETTING

Under radio mode, if press and hold MENU/INFO (4) button, 
will show “Set Menu”. Press 

(1) or 

(5) to select “Time/

Date”, “System version”, “Factory reset”, “FM Scan Setting”. Then 
press SELECT/SNOOZE (6) button to enter into corresponding 
function setting.

A.


Set Time/Date:

 Select Time/Date to set Hour->Min->Year-

>Month->Date and press SELECT/SNOOZE (6) button to 
confirm.

B.


System Version:

 This only allows to check, but not allow 

to set.

C.


Factory reset:

 press SELECT/SNOOZE (6) button to enter, 

and press or to select No/Yes. If confirm yes, the data like 
time/date, alarm and preset stations will disappear.

D.


FM Scan setting:

 press SELECT/SNOOZE (6) button to 

enter Station Strong interface


Only:

 it will only search and display stations with good 

signal.


All:

 it will also search and display stations with weak 

signal.

ALARM SETTING

Under radio mode, press ALARM (8) button to enter Alarm 
Setup. Press 

(1) or

(5) to select Alarm 1/Alarm 2 OFF/ON. 

If select ON, press SELECT/SNOOZE (6) button to save the set-
ting. Press MENU/INFO (4) button to return to previous menu. 
When alarm ring, press Alarm button to cancel.
A. 

Alarm 1 setting


- Under radio mode, press ALARM (8) button to enter 
Alarm 1 Setup and press SELECT/SNOOZE (6) button to 

1

2

3

4

5

6

7

8

9

10

11

12

13

14

15

Содержание DAB 792 R

Страница 1: ...anual RADIO AVEC DAB DAB ET FM Mode d emploi et connexions RADIO MIT DAB DAB UND FM Gebrauchs und Anschlusshandbuch RADIO DAB DAB Y FM Manual de uso y conexión Per informazioni integrative e aggiornamenti di questo prodotto vedi www trevi it For additional information and updates of this product see www trevi it ita eng fra deu esp ...

Страница 2: ... Setting 3 Premere il tasto SELECT SNOOZE 6 per entrare nelle impostazioni della voce selezionata A Time Date Selezionare Time Date per impostare ora Minuti Anno Mese Data e premere il pulsante SELECT SNOOZE 6 per confermare Nota Unavoltaportatol interruttoreON OFF 15 inposizione ON dopoqualcheminutol apparecchioagganceràauto maticamente l ora corretta B System version per visualizzare la versione...

Страница 3: ...ere i tasti 1 o 5 per selezionare il numero da 1 a 10 dove si desidera salvare la stazione radio 3 Premere il tasto SELECT SNOOZE 6 per salvare il display mostrerà la scritta Stored Nota Si possono salvare 10 stazioni in Funzione DAB DAB e 10 stazioni in Funzione Radio FM SELEZIONE STAZIONI RADIO MEMORIZZATE 1 Premere il tasto PRESET 9 sul display verrà visualizzato Preset Recall 2 Premere i tasti...

Страница 4: ...button it will enter into the mode displayed last time STANDBY MODE Under radio mode press and hold the STANDBY MODE 2 button to switch to standby mode Under standby mode press the STANDBY MODE 2 button to switch to radio mode Under radio mode press STANDBY MODE 2 to switch DAB FM VOLUME SELECTION Under radio mode knob the VOLUME 7 to adjust the volume TIME SETTING Under radio mode if press and ho...

Страница 5: ...splay state It totally can save 10 stations NOTE Thesymbol representsthesavenumber From1to10 If number without preset station it will appear Empty If numberwithpresetstation FMwillshowstationfrequency and DAB will show station name And preset station can be replaced by new station B Recall stations Please press PRESET 9 button to activate the station output function Press 1 or 5 to select the reca...

Страница 6: ...ECTION DE LA FONCTION ET RÉGLAGE DU VOLUME 1 Appuyez sur la touche STANDBY MODE 2 pour passer du système de réception DAB DAB au système de réception FM et vice versa 2 Tournez de réglage du volume 7 pour diminuer ou augmenter le volume MENU DES PARAMETRES 1 En mode radio appuyez et maintenez pendant quelques secondes la touche MENU INFO 4 l écran affiche Set Menu 2 Appuyez sur 1 ou 5 et sélection...

Страница 7: ...en cours Date affiche les informations relatives à la date de la transmission en cours MEMORISATION DES STATIONS DAB DAB 1 Appuyez sur la touche PRESET 9 pendant quelques secondes l écran affiche Preset Station X Empty 2 Appuyez sur la touche 1 ou 5 pour sélectionner le numéro 1 à 10 où vous souhaitez enregistrer la station 3 Appuyez sur la touche SELECT SNOOZE 6 pour sauver l écran affichera Pres...

Страница 8: ...en um zwischen den Empfangssystemen DAB DAB und FM umzuschalten 2 Drehen Sie den Regler VOLUME 7 zu verringern oder erhöhen Sie die Lautstärke MENÜ 1 Im Radio Modus drücken und halten Sie für ein paar Sekunden die MENU INFO 4 auf dem Display erscheint Set Menu zu zeigen 2 Drücken die taste 1 ou 5 und wählen Sie den gewünschten Menüpunkt unter Time Date System Version Factory Reset und FM Scan Sett...

Страница 9: ...ragung SPEICHERN VON RADIOSENDER DAB DAB 1 Drücken Sie die PRESET 9 für wenige Sekunden zeigt das Display Preset Station X Empty 2 Drücken Sie 1 ou 5 um die Nummer 1 bis 10 in der Sie den Sender speichern möchten 3 Drücken Sie die SELECT SNOOZE 6 um zu speichern zeigt das Display Preset Anmerkung Sie können 10 Sender in Funktion DAB DAB und 10 FM Radiosender in der Funktion zu speichern RADIO FM 1...

Страница 10: ...gar el dispositivo por completo SELECCIÓNDEFUNCIONESYAJUSTEDELVOLUMEN 1 Pulse el botón STANDBY MODE 2 para cambiar del sistema de recepción DAB DAB al sistema de recepción FM y viceversa 2 Gire la perilla de volumen 7 para subir o bajar el volu men AJUSTES 1 En el modo de radio mantenga pulsado durante unos segundos el MENÚ INFO 4 la pantalla mostrará Set Menú 2 Pulse 1 ou 5 y seleccione el elemen...

Страница 11: ...cha muestra información relativa a la fecha de la transmi sión en curso ALMACENAMIENTO DE ESTACIONES DAB DAB 1 Pulse PRESET 9 durante unos segundos la pantalla mostrará Preset Station X Empty 2 Pulse 1 ou 5 para seleccionar el número 1 a 10 en el que desea guardar la emisora 3 Pulse el botón SELECT SNOOZE 6 para guardar la pantal la mostrará Preset Nota Ustedpuedeahorrar10estacionesenfunciónDAB DA...

Страница 12: ...prend la réparation des composantes à la suite de défauts de fabrica tion à l exclusion d étiquettes boutons de réglage et parties amovibles 3 TREVI ne répond pas des dommages directs ou in directs aux choses et ou aux personnes entraînés pendant l usage ou la suspension d usage de l appareil GARANTIEBESTIMMUNGEN 1 Das Gerät hat eine Garantie von 24 Monaten ab dem Herstellungsdatum Das Herstellung...

Страница 13: ... locales ou bien le rendre au revendeur quand il achètera un nouvel appareil équivalent La collecte séparée du produit et les opérations successives de traitement recyclage et élimination favorisent la produc tion d appareils composés par des matériaux recyclés ainsi que permettent d éviter des effets négatifs sur l environ nement et sur la santé des personnes suite à une gestion impropre du déche...

Страница 14: ...DAB 792 R 14 NOTE ...

Страница 15: ...15 DAB 792 R NOTE ...

Страница 16: ...alle prescrizioni dell art 2 comma 1 del D M 28 agosto 1995 n 548 Rimini 07 12 2015 TREVI S p A Strada Consolare Rimini San Marino 62 47924 Rimini RN Italia TREVIS p A Strada Consolare Rimini San Marino 62 47924 Rimini RN Italy Tel 0541 756420 Fax 0541 756430 E mail info trevi it www trevi it MADEINCHINA ...

Отзывы: