DE Anleitungen für den Gebrauch der Smartphone-APP GB Smartphone APP Control Instructions
FR Consignes pour utiliser l’application pour Smartphone ES Instrucciones para descargar la APP de smartphone
IT Istruzioni comandi APP smartphone CZ Návod k obsluze APP pro chytrý telefon
GB
1.Smartphone WIFI Connection: Turn on the quadcopter and place on a flat surface.
The LED light on the camera will turn red. About 15 seconds later the light will flash blue indicating
it is transmitting a Wifi signal. Enter the menu in the smart phone, open the Wifi setting and search for
„FPV-WIFI_F40C7C” signal. Connect to "„FPV-WIFI_F40C7C” signal. When connect successfully,
the red LED lights light off, green LED light stable. Exit the phone set.
2.Operate Smart Phone App
Open the downloaded App "WIFI CAMERA" by pressing on the this icon.
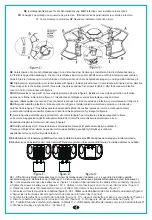
The APP will open to main page (Figure 1). Press the icon 480P
to enter control interface.
480P control interface"(Figure 3)
1Icon: Take photo, automatically saves to phone.
You can retrieve your photos by pressing icon 4.
2Icon: Smartphone take video, press after take video (icon turn red),
automatically saves to phone and in icon 4 document.
3Icon: Smartphone file, check photo and video.
4Icon: Wifi signal.
5Icon: 2D/3D Image transfer, only real-time transmission has this function.
6Icon: Return.
7Icon: Icon instruction manual.
DE
WI-FI-Verbindung mit dem Smartphone:Schalten Sie den Quadcopter ein und stellen Sie ihn
auf einen ebenen Untergrund.Die LED-Anzeige an der Kamera leuchtet rot auf.
Nach ca. 15 Sekunden leuchtet die Anzeige blau und weist somit auf die Übertragung
eines Wi-Fi-Signals hin. Öffnen Sie an Ihrem Smartphone das Menü WLAN, wählen Sie die
WLAN Einstellungen und suchen Sie das Signal„FPV-WIFI_F40C7C”.
Verbinden Sie „FPV-WIFI_F40C7C”.
Nach erfolgreicher Verbindung erlischt die rote LED-Anzeige und die grüne LED leuchtet auf.
Verlassen Sie das Einstellungsmenü am Handy.
2. Gebrauch der Smartphone-App
Öffnen Sie die heruntergeladene App„WIFI CAMERA“
, indem Sie das Icon antippen.
Die APP öffnet die Startseite (Abbildung 1).
Tippen Sie auf das Icon 480p,
um das 480P-Interface zu öffnen.
480P-Interface (Abbildung 3)
I.con 1: Foto aufnehmen und automatisch auf dem Handy speichern.
Tippen Sie Icon 4 an, um die Bilder anzuzeigen.
Icon 2: Video mit Smartphone; nach der Videoaufnahme antippen
(Icon leuchtet rot); Videos werden automatisch auf dem Handy oder
im Ordner unter Icon 4 gespeichert.
Icon 3: Smartphone-Datei; Fotos und Videos anzeigen.
Icon 4: Wi-Fi-Signal
Icon 5: 2D/3D Bildübertragung; Funktion ist nur während
der Echtzeit-Übertragung verfügbar.
Icon 6: Zurück.
Icon 7: Bedienungsanleitung für die Icons
(figure3)
15


