


Press MENU
to move through options.
Press SET
to select an option.
Press MENU
to move through options.
Press SET
to select an option.
Press SET
to select an option.
Enter Programming
Press and hold
MENU for 3 seconds
Steering Sensitivity (Expo)
One Blink Red
1
Electric
One Blink Red
1
Unlock
One Blink Red
1
Servo Reversing
One Blink Red
1
Servo Reversing
One Blink Red
1
Confirm Deletion
One Blink Red
1
Multi-Function Knob
One Blink Green
1
Channel Setup
Two Blinks Green
2
Mode Selection
Three Blinks Green
3
Traxxas-Link
Four Blinks Green
4
Steering (Channel 1)
One Blink Green
1
Model Locking
One Blink Green
1
Throttle (Channel 2)
Two Blinks Green
2
Delete Model
Two Blinks Green
2
Throttle Sensitivity (Expo)
Two Blinks Red
2
Nitro
Two Blinks Red
2
Lock
Two Blinks Red
2
Sub Trim
Two Blinks Red
2
Sub Trim
Two Blinks Red
2
Steering % (Dual Rate)
Three Blinks Red
3
Unlock All
Three Blinks Red
3
End Points
Three Blinks Red
3
Braking %
Four Blinks Red
4
Reset End Points
Four Blinks Red
4
Throttle Trim
Five Blinks Red
5
Knob Disabled
Six Blinks Red
6
Press
MENU
Press
MENU
Press
MENU
Press
MENU
Press
MENU
Press
MENU
Press
SET
Press
SET
Press
SET
Press
SET
Press
SET
Press
SET
Press
SET
Press
SET
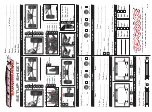
Press SET to reverse
servo direction.
Press SET to reverse
servo direction.
Press SET to restore
factory default endpoints.
Reset End Points
Four Blinks Red
4
Press SET to restore
factory default endpoints.
Use knob to adjust
sub-trim. Press SET to save.
Use knob to adjust sub-
trim. Press SET to save.
Use steering wheel to
adjust. Turn right to desired
end point, press set to save.
Turn left to desired endpoint and press set to save.
To reset max throw: Let go of controls and press SET.
32 • SLASH 4x4 ULTIMATE
TQ 2.4GHz ADVANCED TUNING GUIDE
Note: The transmitter is “live” during programming
so you can test the settings real time without having
to exit the menu tree.
End Points
Three Blinks Red
3
Use trigger to adjust. Pull
back to desired end point,
press set to save. Push
forward to desired endpoint and press set to save.
To reset max throw: Let go of controls and press SET.
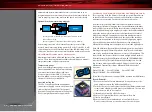
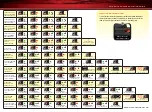
The menu tree below shows how to navigate through
the TQ 2.4GHz transmitter’s various settings and
functions. Press and hold MENU to enter the menu tree,
and use the following commands to navigate through
the menu and select options.
MENU:
When you enter a menu, you always start at the
top. Press MENU to move down the menu tree.
When you reach the bottom of the tree, pressing
MENU again will return you to the top.
SET:
Press SET to move across the menu tree and select
options. When an option is committed to the
transmitter’s memory, the status LED will rapidly
blink green.
BACK:
Press both MENU and SET to go back one level in
the menu tree.
EXIT:
Press and hold MENU to exit programming.
Your selected options will be saved.
ECHO:
Press and hold SET to activate the “echo” function.
Echo will “play back” your current position on the
Menu Tree, should you lose your place. For example:
If your current position is Steering Channel End
Points, holding SET will cause the LED to blink green
twice, green once, and then red three times. Echo
will not alter your adjustments or change your
position in the programming sequence.
MENU TREE
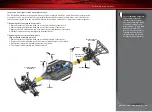
Below is an example of how to access a function in the menu
tree. In the example, the user is setting the Multi-Function knob
to be a steering Dual Rate control.
To set the Multi-Function knob to control STEERING DUAL RATE (%):
1. Switch the transmitter on
2. Press and hold MENU until the green LED lights. It will blink in single
intervals.
3. Press SET. The red LED will blink in single intervals to indicate Steering
Dual Rate has been selected.
4. Press MENU twice. The red LED will blink three times repeatedly to
indicate Steering Percentage has been selected.
5. Press SET to select. The green LED will blink 8 times fast to indicate
successful selection.
6. Press and hold MENU to return to driving mode.
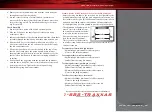
Restoring Factory Defaults:
Transmitter
OFF
Hold both
MENU and SET
Transmitter
ON
Release MENU and SET
red LED blinks
Press SET
to clear settings. LED will turn
solid green. Transmitter is restored to default


