


SLASH 4X4 ULTIMATE • 3
INTRODUCTION
This manual contains the instructions you will need to operate and
maintain your model so that you can enjoy it for years to come. We want
you to feel confident that you own one of the best-performing models
in the market and that it is backed by a team of professionals who aim to
provide the highest level of factory support possible. Traxxas models are
about experiencing total performance and satisfaction, not just with your
model, but also with the company that stands behind it.
We know you’re excited about getting your new model on the road,
but it’s very important that you take some time to read through the
Owner’s Manual. This manual contains all the necessary set-up and
operating procedures that will allow you to unlock the performance
potential that Traxxas engineers designed into your model. Also be
sure to read and follow the precautions and warnings in this manual
and on any labels or tags attached to your model. They are there
to educate you on how to operate your model safely and also get
maximum life and performance from your model.
Even if you are an experienced R/C enthusiast, it’s important to read
and follow the procedures in this manual.
Thank you again for going with Traxxas. We work hard every day to
assure you receive the highest level of customer satisfaction possible.
We truly want you to enjoy your new model!
Quick Start
This manual is designed with a Quick Start path that outlines the necessary procedures to get your model up and running in
the shortest time possible. If you are an experienced R/C enthusiast you will find it helpful and fast. Be sure and read through
the rest of the manual to learn about important safety, maintenance, and adjustment procedures. Turn to page 7 to begin.
BEFORE YOU PROCEED
Carefully read and follow all instructions in this and any accompanying
materials to prevent serious damage to your model. Failure to follow
these instructions will be considered abuse and/or neglect.
Before running your model, look over this entire manual and examine the
model carefully. If for some reason you decide it is not what you wanted,
then do not continue any further.
Your hobby dealer absolutely cannot
accept a model for return or exchange after it has been run.
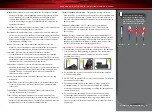
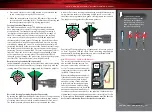
WARNINGS, HELPFUL HINTS, & CROSS-REFERENCES
Throughout this manual, you’ll notice warnings and helpful hints
identified by the icons below. Be sure to read them!
An important warning about personal safety or avoiding
damage to your model and related components.
Special advice from Traxxas to make things easier
and more fun.
Refers you to a page with a related topic.
SUPPORT
If you have any questions about your model or its
operation, call the Traxxas Technical Support line toll-free
at:
1-888-TRAXXAS (1-888-872-9927)
*
Technical support is available Monday through Friday from
8:30am to 9:00pm central time. Technical assistance is also available
at Traxxas.com/support. You may also e-mail customer support with
your question at [email protected]. Join thousands of registered
members in our online community at Traxxas.com.
Traxxas offers a full-service, on-site repair facility to handle any of your
Traxxas service needs. Maintenance and replacement parts may be
purchased directly from Traxxas by phone or online at BuyTraxxas.com.
You can save time, along with shipping and handling costs, by purchasing
replacement parts from your local dealer.
Do not hesitate to contact us with any of your product support needs.
We want you to be thoroughly satisfied with your new model!
*Toll-free support is available to U.S. residents only.
3
BEFORE YOU
PROCEED
4
SAFETY
PRECAUTIONS
5
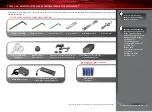
TOOLS, SUPPLIES AND
REQUIRED EQUIPMENT
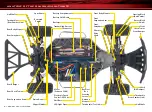
6
SLASH 4x4 ULTIMATE
7
QUICK START:
GETTING UP TO SPEED
8
TQ 2.4GHz RADIO AND
VELINEON BRUSHLESS
POWER SYSTEM
16
ADJUSTING THE
ELECTRONIC SPEED
CONTROL
18
DRIVING YOUR MODEL
20
BASIC TUNING
ADJUSTMENTS
22
MAINTAINING
YOUR MODEL
24
ADVANCED TUNING
ADJUSTMENTS
30
TQ 2.4GHz ADVANCED
TUNING GUIDE
TABLE OF CONTENTS


